 Site owners prefer to grow vegetables, rather than buying them in the store. Determining at first glance whether a product on a table is harmful or useful is difficult.
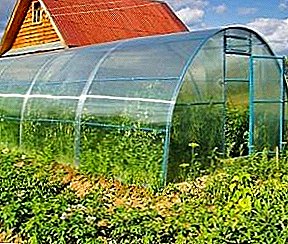
Therefore, providing themselves with healthy and tasty food is within the reach of every summer resident. A great helper is the greenhouse.
It helps to increase yields. For the construction you need to spend not only strength, but also time, but such costs will pay off.
The choice of material for the greenhouse
When deciding on the choice of material for the construction of the greenhouse, it is necessary to pay attention to the products of famous brands. For construction, it is best to use cellular polycarbonate of the required thickness.
 It retains all the necessary qualities, is simple when mounted, perfectly transmits light, is plastic, allows you to do without a rigid frame, and also withstands dampness and temperature changes. One of the sides of the polycarbonate sheet must be covered with a special layer, UV protection.
Cellular and profiled polycarbonate must be used together.
The difference of this material from others is that the condensate appearing on the inner side of the sheet is evenly distributed over the surface, forming a transparent film. It increases the illumination in the greenhouse.
Growing topinambur - note gardener.
Learn how to grow melons in the open ground //rusfermer.net/ogorod/plodovye-ovoshhi/vyrashhivanie-v-otkrytom-grunte/dynya-na-sobstvennom-ogorode-vyrashhivanie-uhod.html.
Read here how to care for black currants.
 Growing topinambur - note gardener.
Choosing a place for the structure of the greenhouse
Before you start building a greenhouse, you should determine its location. It is best to choose the most open area, away from the trees. It is necessary to avoid placing greenhouses near high buildings: in the summer they will not interfere, but in winter, when the sun is low over the horizon, they can obscure the greenhouse.
Installing a greenhouse, oriented from east to west, will allow the cultivation of light-loving crops to begin several weeks earlier, thus saving energy for heating and lighting. A good warm-up will help avoid condensation in the morning.
It is better if the place chosen for the greenhouse will be as flat as possible. Such a landscape will allow for watering plants without too much difficulty. In the case of a slope of the plot, leveling the site, you need to pour the ground.
You can not ram the soil, because the plants will be deprived of sufficient oxygen. If the plot has a slope and watering drip on it, then the lowest sector will be flooded with water.
 When installing a greenhouse, designed for regular maintenance, you should put in the estimate the device plumbing, electricity and heating.
The next item - the drafting of the project, that is, the drawing and cost estimate of materials. At the stage of drawing up a drawing to pay attention to ventilation. It is the cause of such consequences as disturbances in the process of pollination and the appearance of pests.
Based on the area, you can calculate the heating of the greenhouse. If you have difficulty counting materials, you should ask for help at the place of purchase, showing the consultants a drawing.
Learn all about planting watermelons in the open ground.
Read tips on growing spinach //rusfermer.net/ogorod/listovye-ovoshhi/vyrashhivanie-i-uhod/vyrashhivanie-shpinata-na-svoem-ogorode.html.
 Learn all about planting watermelons in the open ground.
How to build a greenhouse with your own hands
Polycarbonate greenhouse foundation needed
It should be done so that the structure does not sink into the ground, in order to avoid the destruction of the building. A traditional strip foundation is enough to increase the reliability of the structure. His bookmark will require the application of labor and time, in addition to the accuracy and reasonableness of action.
After determining the shape of the greenhouse (usually a rectangle of 3 * 6 m, height up to 2.5 m), the foundation should be poured around the perimeter of 3 * 6 m. Depth, width, padding and pouring are standard, you can reinforce the foundation to increase its strength. If the structure is reinforced, with dimensions exceeding the standard ones, then reinforcement and the withdrawal of the roof to the outside is a prerequisite.
 Next to the foundation is established bearing frame. The material for its manufacture can be steel, aluminum or mounting profile.
For the construction of winter greenhouses are applicable as a profile, and pipes. The metal profile is much cheaper, but such a design can not withstand the load. Difficulty occurs during pipe delivery and bending. The last problem is solved through the use of a pipe bender, you can rent it in a specialty store.
The metal is corroded. Therefore, to protect you need to cover it with a primer and high-quality paint. At the slightest metal defects attention during the operation of the greenhouse should be paid immediately, periodically tinting it. The best option in this case is galvanization, which significantly increases the service life of such a frame.
It is better to install a more durable framework for reinsurance. It should provide stiffeners attached to the screws. In the frame, the presence of doors and vents on the contrary, to ventilate the room in the future, is mandatory. To ensure the additional reliability of the entire structure, the steps should be made at crate minimal.
After the foundation and the completion of the frame, you can begin to cover the greenhouse. If the process is carried out strictly according to the instructions, then it is simple, albeit time-consuming.
For work polycarbonate profiles are used. With the help of perforated tape, which prevents the appearance of dirt, the lower ends are closed, and the top - with a continuous aluminum tape. In the arched greenhouses with perforated tape both ends are closed.
Learn about the specifics of growing sorrel.
Read how to grow parsley //rusfermer.net/ogorod/listovye-ovoshhi/vyrashhivanie-i-uhod/petrushka-eyo-polza-dlya-zdorovya-posadka-i-vyrashhivanie.html.
 Learn about the specifics of growing sorrel.
Consider the size of the polycarbonate before cutting it. This contributes to cost savings and panel balances. Cutting can be carried out using a circular saw or jigsaw, after first removing the dimensions.
After you need to mark the mount, drill holes for installation. At their production the electric drill is used. Distance from the edge - not less than 40 mm.
Next, the installation phase begins.
 The greenhouse is assembled by fastening profiles and polycarbonate sheets to the framework. For this purpose, use of fasteners with seals, thermal washers, their covers. Pick up screws should be slightly larger than the mounting hole size.
After installation of polycarbonate sheets and their parts should be ensured tightness and heat insulation. This is done using perforated adhesive tape.
With the help of polycarbonate greenhouses, it is possible not only to grow a multitude of crops, but also to harvest even in cold weather, provided that the greenhouse itself is properly manufactured. Subject to the implementation of all recommendations for construction, the greenhouse will be an ideal place for growing plants.