Farming is not as simple as it may seem to a city dweller. It would seem that small errors in the maintenance or feeding of living creatures can lead to rather pitiable results - illness, poor growth and even a mora.
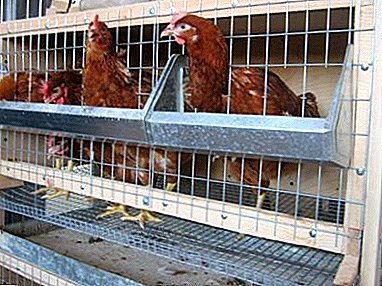
Growing chickens for eggs is one of the most profitable enterprises in agriculture, and a cage is a profitable and convenient poultry housing. However, you need to understand that ordinary cells in this case will not fit, the design should be specialized for this type of activity.
What is it for?
The cellular content of laying hens for commercial egg has its advantages and disadvantages. The positive factors include:
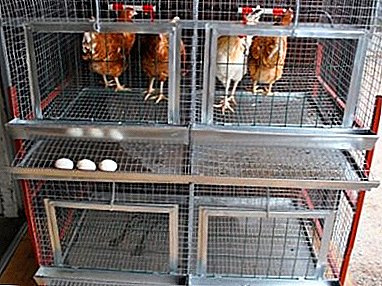 complete mechanization of the process of feeding, watering, cleaning the cells and obtaining the product itself (that is, the eggs);
- the area is economically consumed, since even in a small building it is possible to compactly concentrate several cell blocks, which makes it possible to contain a sufficiently large number of livestock;
- it is easy to create optimal conditions for the comfortable life of the bird - artificial lighting, ventilation, heating;
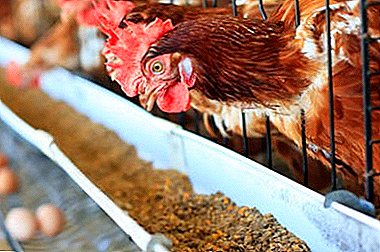
- the quantity of feed is controlled, which also reduces the cost of the final product;
- significantly simplified control over the state of the bird and the procedure for carrying out veterinary examinations, vaccinations and so on.
 complete mechanization of the process of feeding, watering, cleaning the cells and obtaining the product itself (that is, the eggs);
REFERENCE! In addition, the number of staff is also significantly reduced, which also helps to reduce costs.
However, along with a rather extensive list of advantages, this type of content has some disadvantages. In this regard, the following factors should be highlighted:
- improperly mounted cage can lead to traumatization of poultry or damage to the final product;
- due to the fact that the bird is contained in a fairly limited area, it is less resistant to diseases. This is due to the lack of (or even lack of) sunlight and fresh air;
- expenses for veterinary procedures increase significantly, in particular, more vitamins are required;
 feed must be of the best grade;
- the microclimate should be constantly regulated in the room and the optimum temperature should be maintained.
 feed must be of the best grade;
Therefore, when using such a system, you should still have a walking area for birds. In the opposite case, the quality of the original product, as well as the vital activity of the layer itself, will not be at the highest level.
Kinds
In general, the self-made hen cage scheme is fairly standardized, but there is a slight difference in some components. In this way, The following cell types are considered:
- on the litter;
- with sloping floor.
Requirements for cages for laying hens
A good cage is one that meets all the requirements and allows the bird to develop properly, which, in fact, determines the performance and quality of the product. The grid must be galvanized, but it is better if it is an ecological plastic.
Regarding these structures, the following requirements should be highlighted:
Dimensions
The size of the grid should be small - such that the bird can only stick its head. Norm per head - for a chick 10 cm2, for young birds 30 cm2, for an adult laying hen 60 cm2.
The room
Besides, It should also highlight the general requirements for the premises in which the blocks with cells will be located:
 the room must be well ventilated;
- lighting should be regular - both artificial and natural;
- the temperature in the room with cells should be 22 degrees (a deviation of 1-2 degrees is allowed);
- the duration of daylight hours must be at least 16 hours.
 the room must be well ventilated;
In principle, compliance with such recommendations does not require special force or material costs.
IMPORTANT! Saving on arrangement, in this case, should not be, since non-compliance with the recommendations can lead to disastrous results - the disease and the mora of birds.
Materials
Immediately it should be noted that it is better to take the materials from the calculation with a small margin, since some unforeseen situations may arise during the direct installation.
For installation of the cage will require the following materials:
- metal or plastic mesh;
- metal corners;
- boards and wooden bars;
- plywood;
- sheet of tin or a special plastic tray;
- hardware for fixing the grid - galvanized screws on the tree, screws with a wide hat for mounting the grid.
In addition, you will additionally need to purchase components for drinking and feeding.
How to do it yourself?
Before proceeding directly to the manufacture of the block, it is necessary to determine its height and constructional type, as well as its dimensions. The calculation should be based on the number of birds in relation to the standards described above.
Tool
- roulette;
- jigsaw or hacksaw;
- Bulgarian for sawing tin sheet;
- screwdriver;
- pencil or marker for marking;
- grinding machine.
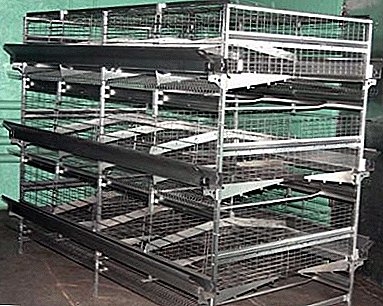
Caracas cages are most often made of wooden bars, as it is the easiest to use and is relatively inexpensive. In some cases, a profile for fixing drywall or metal corners can be used. However, in this case the structure itself will be more massive, and a welding machine will be needed.
Assembly according to drawings and sizes
Cage for laying hens do-it-yourself photos, drawings.


Further cell block assembly operations are approximately as follows. (we will use a cage in three floors with two sections of the following dimensions - 1407 by 1660 by 700 mm):
- According to the size of the cages for laying hens and the selected drawing, the material is cut. We prepare 4 bars with a length of 1407 mm, 6 bars with a length of 1660 mm, 4 bars with a length of 700 mm. The ends of the wooden beam must be cleaned with sandpaper or with a sanding machine.
- From sawn wooden beams collect frame. For fastening the frame, use galvanized self-tapping screws - it is optimal to take two self-tapping screws for each fastening angle.
NOTE! On the side walls of the frame can be further strengthened with plywood corners - for each corner there is one hardware. In total, it may take about 50 screws.
- Under the skeleton of the cage is installed grating. For this, mainly, a bar is used 20 by 40 mm with a length of 700 mm (7 pieces). Similar to the frame is going to flooring. - one screw is screwed on each end of the beam.
In total, you will need 6 screws, but take better with a margin. Nails should not be used, since the bar will simply crack when the fixing component is driven in.
 The slatted floor itself is made according to the size of the flooring area (1407 by 700 mm). It is necessary to fix the net with self-tapping screws with a wide head - one every 5 centimeters.
The front edge is folded to form a tray. To make the floor stronger, you can install wooden bars in the form of stiffeners. However, the tree must be treated with antiseptic.
- The back and side wall of the frame is sewn with mesh. Sheet dimensions - 1660 by 1407 mm, plus 5-10 centimeters, since the edges will be folded. The edges of the grid (if there are any) must be bent carefully.
Fastening of the grid is carried out using self-tapping screws with a wide head according to the same principle as in the case of flooring mounting.
Note, that for the back wall you can use a sheet of plywood.
- The front wall is designed for the door. The door is also made from a 50 x 50 mm mesh. For the framework, you need two bars with a length of 470 mm and two bars of 700 mm. Using self-tapping screws, we connect them together (one hardware per each end, a total of 4 pieces).
On the finished frame we stretch the net - at the edges we bend and fasten with screws with a wide bonnet, one every 2-3 centimeters. Latch bolts can be used to close the door.
- Covered frame - the roof can be made of mesh or moisture-resistant plywood. In the case of plywood, the material should also be treated with an antiseptic. Plywood should be cut to such dimensions - 1409 by 700 mm.
We cover the upper part of the frame and fasten with screws or small nails. In the latter case, it will take about a hundred hardware, as they need to be driven in steps of 1.5-2 centimeters. When using a self-tapping screw, you can follow the step of 2-3 cm, therefore you need 40-50 hardware.
 The slatted floor itself is made according to the size of the flooring area (1407 by 700 mm). It is necessary to fix the net with self-tapping screws with a wide head - one every 5 centimeters.
Tray tray
 The process of assembling the cell is complete. Now you need to make a tray-pallet, the size of which must correspond to the length and width of the cell block (that is, 1407 by 700 mm). For this should use tin sheet, it is better to bend the edge of the tray in the form of a handle inside.
This will help prevent the feed from spilling out of the chute. Actually on this cell block itself is ready. It is imperative that before settling birds there it is necessary to carefully double-check all attachment points for sharp corners, chips, untreated wood.
Feeders and drinkers
The feeder can be made of planed boards or polypropylene pipes of sufficient diameter. In the case of using a wooden base, the algorithm of work is as follows:
- three boards of the same length (1407 mm) should be pre-treated with a sander and antiseptic;
- Three finished parts should be fastened together with galvanized screws with fastening steps of 3-4 cm (about 50 pieces of hardware). From the ends set plugs.
When using a pipe, it is enough to cut it in half along and along the edges to install special plugs for pipes. The feeder is mounted above the egg tray at a height of 10-15 centimeters. It can be fastened with galvanized wire or special fasteners in places of the framework bars.
As for the drinkers, nipple construction is bestas in this case the birds will always have clean water. Drinking bowls should be located inside the cage, mounting them on the grid with wire or galvanized yoke.
Care
In order for laying hens to feel comfortable, you need to properly care for their habitat. Here we should highlight the following general recommendations:
- to carry out cleaning in time. It should be noted that in winter such procedures should be carried out more often;
- Drinkers and feeders should be systematically washed and treated with a special antiseptic to prevent infectious diseases in birds.
In addition, you need to monitor the microclimate in the room, properly disperse the birds according to their behavior and monitor the full nutrition of chickens.
Conclusion
In general, making a cage for laying hens with your own hands is not a very complicated procedure. The most important thing is to correctly calculate and cut the material. The best option would be to choose a ready-made drawing with dimensions.
The level of comfort of the birds themselves will depend on the quality of the building, so the work should be done conscientiously.