In the summertime you often want to sit in the fresh air, look through a book or just admire nature so that the sun does not interfere. Technology does not stand still, and in our time, many are constructing summer-house gazebos made of polycarbonate - a material that has found application in many areas of activity. Today we will learn to build polycarbonate gazebo do it yourself, we will evaluate all the pros and cons, we will write out the construction stages in detail.
Advantages and disadvantages
All the advantages and disadvantages are directly related to the material itself - polycarbonate, which is used by many summer residents to build greenhouses and (quite rarely) greenhouses. It is also used to create a carport at public transport stops, as well as in many stores. 
Discuss first all the disadvantages of such a structure to immediately understand whether this material is worth attention or not.
- The main disadvantage of polycarbonate - heat transfer. Yes, it protects from direct sunlight and ultraviolet radiation, however, sitting in such an arbor, you will feel like in a sauna. Even the thickest sheets of thermoplastic will pass almost all the heat, creating uncomfortable conditions for a long time.
- Polycarbonate is very sonorous. During the rain you will hear the blow of every drop on the roof. You may get the impression that the building is covered with tin or some other metal that makes a loud sound. At such moments, you will not be able to relax and read a book or chat with relatives over a cup of tea.
- Low material strength. Many of the resources devoted to the installation of polycarbonate gazebos show that it is enough to cover the building with 4 mm sheets and everything will be fine. This is false information, since in winter such a roof will not even withstand 15-20 cm of snow, let alone hail. When allocating money for a gazebo, you assume that it will serve not a year or two, which means you need to pick up thicker sheets of polycarbonate (at least 8 mm), which will cost much more.

Did you know? The first polycarbonate was invented in the XIX century. The process of obtaining the material was described by the German chemist Alfred Einhorn, who is also considered the creator of novocaine.
Polycarbonate is still more pluses than minuses, which led to its widespread use.
- Polycarbonate - refractory material. The melting point of polycarbonate is 125 ° C. That is, you can not worry about the fact that during peak heat the roof will begin to deform or melt.
- Plasticity and lightness of the material. In terms of plasticity, polycarbonate can give odds to any other material that can be used to create the roof of a house or gazebo. And if you add to this a variety of color variations, you get a great option to create a truly unique building, the beauty of which will be touched by the neighbors.
- Durability. Thermoplastic does not decompose under the influence of external factors, which means that its service life is long enough. Of course, over time, the colors will begin to fade and, possibly, some deformation will appear. But despite this, the service life of such a roof is about 10 years.
- Easy to install. Since the material is ductile and lightweight, it can be easily installed and dismantled. You can remove the polycarbonate sheet at any time and replace it. It will take you a couple of hours and a minimum of expenses.
- Resistance to low temperatures. Thermoplastic is not afraid of even the most severe frosts, since its structure implies the presence of air chambers between the sheets, which do not allow the material to freeze and crack.

Thus, assessing all the pros and cons, we can conclude that polycarbonate - Enough convenient material to create a roof in the summer gazebo. It is ductile, has average strength, resistant to heat and extreme cold. It should be understood that, for example, slate and wood somehow have an order of magnitude more minuses, but we are accustomed to them and are used everywhere.
Important! The refractoriness of polycarbonate does not apply to direct contact with fire. Polycarbonate will burn just as well as plastic.
Variants of homemade polycarbonate arbors
Having discussed the positive and negative sides of the thermoplastic, we consider the options of arbors that can be constructed with the help of this plastic material.
Open and closed
The most important thing when choosing a gazebo - decide on its type and direct appointment. If you want a small polycarbonate garden shed, then an open type of structure will suit you. If you are planning a more or less capital construction in which you can spend time all spring or autumn without fear of wind, rain or a decrease in temperature, then it is better to think about a closed type of structure.
Let's start with open canopy. It is a high canopy, the main function of which is protection from direct sunlight. Such a building is many times cheaper than a fully closed. It is well ventilated and it will not be hot or stuffy. However, the construction will not save you from mosquitoes, drafts, and it is uncomfortable to stay in it for the night. 
Closed type. This gazebo will cost quite expensive, since you will need to pay a considerable amount for materials for the walls and, as an option, the foundation. The functionality of the closed gazebo is many times greater than the open canopy. However, in such a building will be very hot during the day and stuffy at night. The advantages include the absence of mosquitoes, protection from rain, drafts, various animals. Closed building is more suitable for the northern regions, in which summer is not particularly hot, and spring and autumn are cold. 
Stationary and mobile
The main difference between fixed and mobile facilities is weight and size.
If you can use any materials you like (within reason) to create the frames of a stationary building, then only light and durable ones will be suitable for mobile, otherwise special equipment will need to be fitted to transport such a structure.
In addition to the materials used, stationary and portable buildings differ in shape, length, height.
The mobile option is more like a covered shop than a full-fledged building. This gazebo can accommodate no more than 6-7 people, and its height will not allow you to stand at full height. Of course, you can build one that suits you in all respects, but you should understand that any mobile version should be small. 
Most often, portable gazebos are made open, since, returning to the properties of polycarbonate (strong thermal conductivity), you will get a stuffy little room that will heat up to unimaginable temperatures.
Summarizing the above, we can conclude that the mobile version is being built to hang out for one family, does not imply a long stay in adjustment, but serves as protection from the sun and a short rest on a hot day. A stationary gazebo is a capital structure in which you can put a sofa or a sofa, add a table, chairs, place any vegetation, turning the gazebo into a cool oasis.
To the suburban area is fully consistent with all your future ideas, read how to properly equip the garden plot.
Difficult designs and easy canopies
Variations in terms of the complexity of the construction are directly dependent on the above types of pavilions.
Complex designs - These are large fixed structures that look like a small house. Such a construction requires perfect drawings, a lot of resources and time to build. As a result, you will get a kind of "summer kitchen", where you can invite your friends in spring, summer or autumn. 
Light construction looks more like a beach canopy, which has four pillars and a polycarbonate roof. The building does not require special knowledge and large expenses, however it has the same pros and cons as an open gazebo.
So, it turns out that if you want to build a capital gazebo and "stuff it" with furniture for a comfortable rest, then it is worthwhile to build a closed stationary gazebo and count on significant waste. Once again we remind you that a bulky building cannot be mobile, so weigh all the pros and cons before creating drawings and purchasing materials.
Variety of shapes
Both complex and lightweight buildings can have a variety of shapes. At your request, a gazebo can turn into a kind of dome, be made in the Greek or Gothic style. And you can build a regular rectangular or square. This form will facilitate your work with the drawings. 
Important! Round, dome-shaped and other complex variations of polycarbonate pavilions require detailed drawings. They are best purchased at a specialty store during the purchase of materials.
An interesting option is a modular gazebos, which are a semicircular canopy, consisting entirely of polycarbonate. This gazebo does not provide for the construction of additional supports, is movable and quite light in terms of installation. The modular option is usually used to create greenhouses, however, in our business, it can be successfully used.
Choosing a place
Depending on the sizes and functions, the arbor can be placed in various places.
Capital construction requires a flat surface on which a small foundation for stability is initially built. The soil in the selected area should be dry, which indicates a low groundwater table. It is undesirable to place a gazebo in an open area, it is better to build it near tall trees. So you can minimize the amount of light and heat that will fall on the roof. 
Also, do not build a shelter in the lowland, because during rain the soil can sink under the weight of a gazebo or there will be waterlogging.
Mobile arbors can be installed in any place where you will be comfortable, as they can be moved at any time.
Such plants and flowers as Kobeya, sweet peas, ipomoea, castor bean, ferrous balsam, mallow, clema, chubushnik, Floribunda roses, clematis, lemongrass, actinidia will decorate near your arbor.
How to build a gazebo do it yourself
Finally it’s time to build a polycarbonate gazebo, paint the drawings and dimensions, indicate the necessary tools and materials.
The construction is carried out in the following steps:
- drawing creation;
- purchase of all necessary materials;
- purchase of tools and consumables;
- installation work;
- decor

Necessary tool
We start with the collection necessary tools. We need these:
- Bulgarian;
- a circular saw;
- drill;
- screwdriver;
- hacksaw;
- hammer;
- chisel;
- big scissors;
- shovel;
- pliers;
- gloves;
- building goggles and a respirator (optional).
How to choose materials
In order not to forget the consumables, let's start with them. "Consumables" include: drills, nails, glue on wood (if wood is used), screws, sandpaper, paint or varnish, cement, brushes, cleaning rags, various bolts and nuts.
The difficulty lies in the choice of basic materials from which the framework and the various elements of the arbor will be constructed. You can contact a specialized store where you will be given detailed advice on the choice of material you need, depending on your preferences and how you see your gazebo. 
Standard for the construction of using wood, iron, aluminum (more suitable for stationary), stone or brick. You can purchase a mounting profile and make a frame or individual elements on its basis. That is, any of your desires can be realized, if the selected materials are suitable for the drawings.
To make the suburban area more cozy and comfortable for rest, place on it a pergola, a gazebo and a bench, which you can do with your own hands.
DIY installation
Before installing a gazebo for selected drawings, we recommend that you conduct several structural tests that will give an accurate idea of whether this option is right for you or not.
First, on the basis of the drawing, you can make a mock-up of cardboard or paper and visually see if the idea matches reality or not. Secondly, you can turn to three-dimensional modeling. On the basis of drawings, a professional in his field will make a computer model for you, which, with the help of the program, can be tested for strength and viewed from various angles. 
Well, a small digression ended, and we proceed to work.
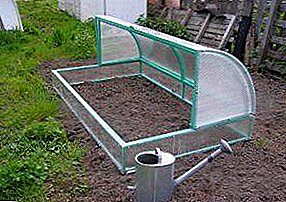
1. To start prepare the place. We remove all trash, stones, plant debris. If necessary, we level the territory. Next, we divide it roughly so that it is clearly visible where the supports will be located.
2. Let's take the foundation. Immediately determine the type of initial construction, which can be tape, columnar or monolithic.
Important! For the construction of a mobile arbor foundation is not required.
We describe the option with the most popular and simple foundation - columnar. The first thing to do is to dig a recess of 0.5-0.7 m in the entire estimated area of the gazebo. Next, we fall asleep a layer of sand and gravel 5 cm thick, which will make a pillow. In the next step, the installation of the supports and the further pouring of concrete are carried out. The supports must be fixed in two directions and leveled by level so that the structure is stable and level. After concreting, you need to wait a few hours and cover the entire area with a film to protect it from precipitation. After completion of the work we wait for 2-3 days until the concrete completely hardens.
3. After pouring the foundation and installing supports, go to floor covering. You can use boards or a cheaper option - the main thing is that it is durable and more or less durable.
We will describe a wood coating version, on the basis of which you will be able to install using other materials.
Standard start with a floor frame, which will consist of wooden bars 5 × 15 cm. We install logs after 40-50 cm in order to achieve maximum structural strength.
Important! Bars should be installed strictly horizontally.
Further we fix floorboards to the frame. Here it is worth a little to clarify the following: at the time of purchase, indicate that the boards are needed for an arbor. In this case, you will be offered a moisture resistant version that will last longer.
To fix the boards or other coating can be either with screws, or using ordinary nails.
4. Now based on racks roof mounted from polycarbonate. Remembering which carbonate is better for a gazebo, stop at a thicker coating, not less than 0.8-1 cm in thickness. If the gazebo is portable, you can restrict yourself to a thin thermoplastic (not less than 0.3 mm). 
Along the perimeter we connect the upper ends of the racks with wooden bars 10 × 10 cm (or mounting profiles). We make L-shaped cuts in bars and connect them to each other. The trim is fastened to the support with nails, which must be at least 12 cm long. Next, we cut out the supporting truss trusses and fasten them in pairs. It is worth paying attention to the fact that the nails are clogged at an angle of 45 °.
After fixing the frame, we mount the necessary amount of rafters using self-tapping screws. The rafters are arranged in such a way that during the process of fastening the polycarbonate the sheets would slightly overlap each other. It is not necessary to mount the rafters so that the pieces of thermoplastic only touch each other slightly, otherwise you will get a "holed" roof.
We finish the work by fastening the thermoplastic. During installation, use self-tapping screws and gaskets, placing the latter between the material and the metal screw to get better insulation. After installing the roof, “insulate” the entire structure with liquid nails, foam or aluminum tape.
This construction gazebos completed. Next, we discuss the decoration of the canopy and the installation of furniture.
We create comfort and coziness
To make the gazebo not seem empty, you need to install the necessary furniture, hang decorations and place flowers.
Did you know? Starting from the 18th century, gazebos and pavilions began to appear in the Russian Empire in the magnificent parks of royal residences and noble estates. Up to this point, such structures were called "attics", as can be judged by the stories of those times.
Best of all in the gazebos monochrome wooden furniture looks, having a natural color of wood, without bright inserts or unnatural colors.
Creating a color tandem, you can use a variety of stylized under the sea theme decorations (steering wheel, marine grid, shells or starfish). So your gazebo will look like a ship's hold.
You can also think of such an option: the floor of the gazebo is carpeted with sea sand or small shells, palm trees are placed in the corners, pictures of the oceanic beaches are attached to the wall, or wallpaper with the sea view is stuck to the whole wall.
At this stage, you can embody any fantasy. The time spent on the decoration of the gazebo will bring you a lot of positive emotions, and a cozy atmosphere will help you relax and unwind from the problems. 
At this point we finish the creation of a polycarbonate pergola. Во время планировки чертежей и самой постройки помните о том, что это - ваше произведение искусства, которое не обязано быть идеальным. Drawings are needed only for clarity, therefore, during the installation and further decoration you can experiment, based on the basics described in this article.