Today, gardeners are trying to surprise not only by planting original and rare plants, but also by decorating their plots. Ladybug, hand made is a very extraordinary craft and addition of garden compositions.
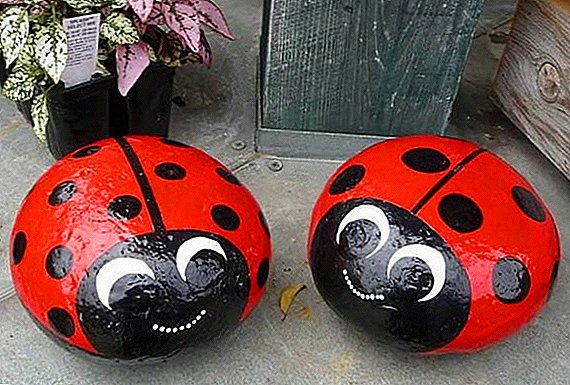
From stones
For the manufacture of ladybugs, we need:
- black gel pen;
- the pencils;
- several brushes;
- acrylic paint and varnish;
- some glue for glue
 First, wash and dry the stones well.
Find out what is the use and harm of a ladybug in the garden.Dilute the water with PVA glue in equal proportions and lightly smear the stones with this solution. This way we will level every stone, eliminate roughness and prevent paint absorption. After the glue dries, apply a white acrylic paint, slightly diluted with water. This will make the upper layers brighter and juicier.
After the acrylic layer has dried, you can start drawing basic contours with pencils. 
Then we draw the insect with paints, first with two layers of red, and after the black we arrange the front and back parts.
At this stage, we must get a few blanks before more laborious work - detailed drawing. Let's start with the black dots on the wings with a thin brush, and continue with thin lines on the body using a black gel pen.
White paint is used for the muzzle: we draw eyes, eyelashes and a smile in front. Acrylic varnish give a glossy shine and fix the painting. 
The choice of a place where to place the made masterpieces depends only on your imagination.
Did you know? Despite the beauty of these insects, ladybugs are real predators in their world, exterminating many insects harmful to cultivated plants.

From plastic bottles
Very simple and effective you can make a ladybug from plastic bottles. They will not be very similar to real insects, but will be a good decoration of your garden.
Take a few colored plastic bottles, size at will and something suitable for the role of an insect head (a round chestnut or ball). All this will eventually be attached to each other with universal glue.
In the role of the body will be the lower part of the tank, which we cut out with scissors. For plausibility, we take only a small portion of the entire bottle. 
Apply the characteristic black spots on the cut-off part with paint. On transparent bottles, the picture will look less convincing than on color. But the situation can be corrected with acrylic paint and indelible markers.
As a head, you can use something round, even the cap from the bottle itself. 
 If there are available old unnecessary toys, then you can borrow from their eyes and make the insect even more convincing. You can also just draw them.
  With mustaches have to work hard. These can be glued hooks or wire. If the head is made of something soft, then the antennae can be attached by simply piercing it.
To create an original element of landscape design, read how to decorate a tree stump at the dacha.
Of balls
For the manufacture of ladybugs from the balls you need to take:
- balls;
- primer;
- acrylic paints;
- sandpaper;
- tassels.

For the manufacture of insect fit any oval or spherical object. This example uses golf balls. Take sandpaper and polish the roughness on the ball, then primed with a spray. After the primer has dried, apply red paint. Then apply the main elements of the insect's appearance with a brush: wings, spots. For peepholes use white paint. To protect against environmental influences we will cover our bugs with clear varnish.
 We place our creations on our site and surprise our loved ones.
If you want your garden to become a little fabulous, see how to make flowerbeds from wheel tires, stones and crafts.
From helmets
For making a ladybug from a helmet with our own hands, we will take the helmet itself, paints of a suitable color and a brush. Suitable construction, mining and even children. Buying them is not difficult, but some craftsmen still prefer children's bicycle or toy helmets.
Let's color our plastic blank with one color. Then black paint in the middle of a strip. This will be the site of the insect wing closure. Decorate the rest of the space with black specks. 
The front part is decorated like a muzzle - the mouth and eyes are drawn. We give a good dry to our product and fasten it to a wooden surface with small screws.
Important! In this way, you can not only decorate your garden, but also close the stumps of felled trees for the safety of children.
From bowls
To make a ladybird from a bowl, it is necessary to perform the same manipulations as with the helmet, due to the similarity of these two items. 
Read how to build such enclosing elements for the suburban area, such as a fence of gabions and wattle fence.
From cement
We need the capacity (old ball, cut in two). It is filled with a mixture of cement and sand in a ratio of one to three and water. The consistency should be creamy. Previously the bottom is lined with film or package. This will make it easier to remove the blank from a mold that is best placed in a dimple in the ground or a basin. 
The preform will be frozen for several days. From polyethylene we will not get a completely flat surface. 
We will get rid of the remnants of the film and level the surface with a solution to which we will additionally add tile adhesive. Rubber gloves should be worn to protect hands.  Next, proceed to the markup and painting. To do this, we use crayons, pencils, embers.
  Finishing will be carried out by a multi-colored mosaic tile cut by a tile cutter.
  Glue the tile with tile adhesive. After some time, we rub the seams and cover with water-repellent agent.
Did you know? During the flight, the ladybug makes 85 wings per second.
From clay
It is a bit easier to make a ladybug from clay replacing the mosaic with a simple coloring. 
Successful decoration area will be a fountain. Learn how to build a fountain in the country with their own hands.
From plastic spoons
For the manufacture of one instance of the insect, take three plastic spoons, one flat button, acrylic paints, glue and scissors.  First, decorate the spoons and buttons. Trimming the handles is best done after decorating, since it will be very convenient to keep objects in the process and fix to dry. We paint one spoon black, and two red. After drying, put black spots on the wings.
Important! We cut the handles are not under the root, otherwise our bug can crack.
With the help of glue we fasten the entire structure.
And at the end of the face.  Below you can attach a wire, so it will be easier to place the winged anywhere in your garden or flower beds.
To make the suburban area more cozy and comfortable for rest, place on it a bench, a swing, a gazebo or a pergola, which you can do with your own hands.Whichever way you make a ladybug, Your garden will definitely change, it will become unusual and interesting.