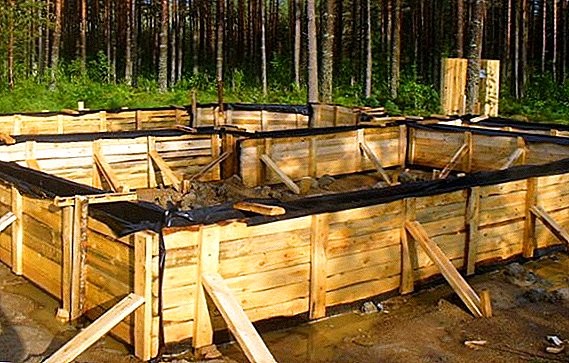
A prerequisite for the construction of the fence is the construction of formwork. The design must be durable, prevent possible bends and deformations, withstand the mass of the foundation.
After reviewing the features, rules and pitfalls of formwork installation, you can safely proceed to its manufacture yourself.
Necessary materials
The key to high-quality, reliable and durable formwork are materials. The abundance of building materials in the markets can significantly expand the arsenal for its manufacture.
For the design fit:
- Metal - universal, but at the same time the most expensive form of formwork, in which sheets of strong steel with a thickness of 1-2 mm are used. Distinguished by this type of ease of installation, durability, ease of processing. A significant disadvantage is the high cost, compared with other species.

- Reinforced concrete - the formwork is mounted from reinforced concrete slabs. Depending on the size of the slabs when pouring the foundation, it will be possible to significantly reduce the consumption of concrete solution, but at the same time maintain the high strength functions of the structure. Minus - large dimensions of the plates, which entails the involvement of special equipment.

- Styrofoam - high-quality, durable and practical material. The design is assembled from ready-made blocks that are extremely easy to install and process. The disadvantage is the difficulty in the selection of some elements, for example, angles, rounding, etc.

- Tree - the most popular option. Most often for the construction of formwork using sheet plywood or boards. They are easy to install, relatively cheap, do not require the use of additional special equipment or special tools. The main disadvantage is the need to install additional reinforcing structures in some cases.

- Handy materials - slate, professional sheets, steel sheets. This type of formwork is very cheap, allows you to build a design of the desired shape without gaps, gaps. Among the minuses can be distinguished complexity in the assembly, low indicators of bearing capacity, the need for additional struts. This option will be the best solution for small buildings.

Formwork Types
There are several types of formwork used in the construction industry, as a strong and durable basis for concrete, reinforced concrete structures.
Learn how to make the fence itself from the netting of the chain-link, from the gabions, woven wooden fence.
Vertical
Vertical type formwork is used for the construction of thin, but rather strong walls, unconventional configuration, columns, some inclined bases. In this case, the load is distributed to the sides, vertically.
The standard set of verticals includes the following elements: angular and linear shields, couplers, struts, holding shields and various fasteners, including locks. 
Horizontal
Horizontal construction is used for the construction of floor slabs. The horizontal has a considerable thickness and is necessarily reinforced with metal rods.
This type of use on surfaces where the load is distributed from top to bottom. The principle of formwork is simple, for installation it will require: supports, tripods, universal forks for fixing beams, beams, and sheet material onto which concrete is poured. 
Oblique
Sloped formwork or architectural is used in the construction of design structures, unique, non-standard structures made of concrete.
Did you know? There is also a fixed formwork, which is a holistic construction in the form of a wall. During its installation produce the assembly of panels or blocks into a single structure. After pouring concrete and adding insulating materials, a monolithic wall is formed.

Requirements
Regardless of what materials are used for the construction of the formwork, it must meet some basic requirements:
- margin of safety: the structure must withstand the mass of concrete, be resistant to bending, deformation, durable, stable, not fragile, retain the original shape;
- simplicity: the product should be easy to assemble and manufacture, if necessary, quickly dismantled and transported;
- Density: the manufacture takes into account the density of the formwork, the fine and precise fit of the boards to each other, the absence of gaps and gaps in the joints. It should have a perfectly flat surface with a planed side adjacent to the concrete;
- standards: it is desirable that the individual parts have a standard form and can be used repeatedly;
- easy disassembly: the form should be easily disassembled, dismantled without serious damage to the integrity of its basic elements;
- dimensions: the dimensions of the individual components must strictly comply with the design dimensions of the concrete or reinforced concrete structure;
- fasteners: the formwork should be assembled and assembled using a minimum number of nails. The best option would be to replace them with clamping wedge boards.

When to clean formwork
The main factors that guide in determining the time for removal of formwork are temperature and concrete grade. It is on the ambient temperature depends on the time of solidification of the casting.
It is noteworthy that the amount of poured concrete solution does not affect its strength. Thus, under equal conditions, the ripening of a large plate and a small block will take place in the same way.
It may also be useful for you to learn how to build a veranda to the house itself, how to make a polycarbonate gazebo, do-it-yourself dog enclosure, a stone grill.
It is possible to specify exactly when to clean the formwork, taking into account the main factors, only after special laboratory tests.
However, for the convenience of developers, special tables were created for the dependence of temperature and time, when the dismantling of the structure will be as safe as possible both in terms of internal chemical processes, and for durability of geometry: 
| Material strength | ||||
| Air temperature | 15% | 30% | 50% | Dismantling time, days |
| +35 | 1 | 1,5 | 2 | 2 |
| +30 | 1 | 1,5 | 2 | 2,5 |
| +25 | 1 | 2 | 2 | 3 |
| +20 | 1 | 2 | 3 | 4 |
| +15 | 1 | 2 | 4 | 5 |
| +10 | 2 | 4 | 7 | 7 |
| +5 | 3 | 6 | 10 | 10 |
| +1 | 5 | 8 | 12 | 15 |
After 9–28 days after pouring, again, depending on the temperature, concrete will gain 98% strength, and the remaining 2% will gain throughout the life of the structure.
Important! Premature removal of the structure can lead to such negative consequences as: mechanical damage to the base; sharp dehydration due to an increase in evaporation area; decrease in hydration (evaporation of moisture), because of which the material will not be able to gain sufficient strength.

Step-by-step instruction
Formwork for the foundation for the fence is made in a few simple steps.
For arranging your site, you will be interested to learn how to make a decorative waterfall, garden swing, fountain, trellis for grapes, a rose garden, a bed of tires, a dry stream, a bed of stones, rock ariars.
Step 1: Measurement and Markup
The first and one of the most important steps, which the masters often ignore, is marking the territory and taking measurements.
Before carrying out land work, it is necessary to mark the territory for future construction and mark the entire perimeter, which will make it possible to identify obstacles, obstacles in digging up the soil, for example, stumps, ditches, communications, etc.
You can also face elevation differences at the starting point and finish, so it is very important to take into account all the nuances and only then proceed to the second stage - digging a trench.
The marking is carried out with the help of a cord that is attached to the wooden or metal stakes. With the help of roulette angle expose and check the size. 
Step 2: Trenching
The trench for fencing is dug out with a substantial margin in width, which is connected with the necessity of fixing the shields with side bars that dig into the ground.
It is important to remember that the depth of the ditch should be 10-15 cm higher than the recessed part of the base. In this case, the excavation of the soil carried out around the perimeter of the formwork.
Important! It is not recommended to pour concrete directly on the ground. For strength and durability, a layer of gravel and sand is laid on the bottom of the trench.
Step 3: Installing the vertical inner bars (construction fins)
In the middle of the trench along its walls it is necessary to dig special holes under the vertical bars, with a section of 50x50 mm. To the bars entered firmly and vertically, it is recommended to loosen the ground a little.  When pouring a foundation of 20 cm, the distance between such piles should be 120-130 cm, with 30 cm of the foundation - about 1 m. The bars should protrude slightly above the trench, as this will be needed later to fix the formwork, to ensure its rigidity and reliability.
Step 4: Install the shields (wall structures)
After the vertical internal bars will be exposed, proceed to the collection of shields. It is especially important to ensure that the boards are located strictly vertically at the same distance. After the installation of the shields in a vertical position is completed, sand and gravel are covered with a layer of 7-10 cm in the ditch. 
Step 5: Shield Binding
With the help of horizontal wooden slats and long screws, vertical bars are fastened, constantly monitoring the accuracy of the installation of shields during fixation. Thus, there should be a single construction of the shields. To reinforce the canvas, from the outside of the ditch fall asleep ground or gravel. 
Step 6: Installing the side external stops
In order for the design not to burst out from the outside, install side external stops, which are perfect for cutting plywood sheets. The width of such sheets should be equal to the depth of the fill.
The stops firmly move in the gaps between the sand and the boards. After pouring concrete, under its weight a piece of plywood will be pressed against the tree, thereby ensuring smoothness and reliability of the casting.
Step 7: Preparation of the reinforcement cage for the foundation
When the place for the installation of the formwork is ready, prepare a reinforcing frame of three horizontal layers of reinforcing rods. Each layer is located one above the other, and the topmost row should be at least 10 cm below the surface.  Horizontal rods are interconnected by appropriate dimensions by welding. Formed long rods, which are welded to the vertical short rods. So it turns out the design in the form of a cell frame.
At the same stage, support columns are installed, which are welded to the fixture. The columns are buried to a depth not less than the depth of soil freezing.
Important! Installation of pillars is mandatory when installing massive fences and fences.
Step 8: Concrete Preparation
The next step is to make concrete. For this you will need:
- cement;
- rubble;
- sand;
- water;
- plasticizer.

Did you know? The plasticizer can be replaced with liquid soap, which is added in a small amount to the finished solution. This will give the elasticity of the mixture and allow it to spread evenly.
The technique of preparing concrete is quite simple: cement is mixed with sand and rubble in a ratio of 1: 3: 2, water is gradually added to make a rather plastic, but not liquid solution.
It is recommended to add cold-resistant components to the mixture. As for the brand of cement, it is more rational to use the most common - M200 or M250.
Step 9: Filling the Mixture
After the concrete is prepared, the structure is filled. 
There are two ways to fill the formwork:
- filling with layers;
- fill in a continuous way.
The fill method will depend on the amount of concreting. Since the formwork area for fences is usually small, continuous filling can be used. To do this, concrete is carefully poured into the structure, regularly distributing it around the perimeter with a shovel.
Do not forget about the tamping mixture. To this end, on the shields formwork systematically tapping with a mallet. When the concrete completely fills the structure to the desired level, it is left to freeze.
Important! To prevent the separation of concrete, the surface of the mixture is moistened with water and evenly spread.
Step 10: Coverage
In order to protect the formwork from winds or moisture in case of rain, around the perimeter of the construction they stretch the PVC film. A few days later, when the concrete grabs, the coating is removed, as rainwater is no longer able to have a negative impact on the mixture. 
Step 11: Disassembly
Dismantling of the structure after the concrete has set in the reverse order. The first step is to remove the planks on the bars located horizontally, then remove the vertical piles, move the boards to the edge of the trench, and at the end remove the planks from the plywood. All disassembly work is done extremely carefully so as not to damage the foundation. 
Features of the formwork on the slope
Ideal flat areas do not exist, and often have to do the formwork on the slope. If the ground level has drops of just a few degrees, less than 10, then no special actions need to be taken.
In order to provide your family with fresh vegetables and greens in the winter, it will be useful for you to learn how to make a greenhouse from plastic pipes with your own hands, a greenhouse from polypropylene pipes, how to build a Polycarbonate nursery greenhouse, a Butterfly glasshouse, a Breadbasin greenhouse, and greenhouse on Mitlayder.Otherwise, the problem can be solved in two ways:
- set the fence in line with the terrain;
- use the drop down ladder principle.
The first option, although simple to implement, but is not very aesthetic, so many developers prefer the second. The construction of the formwork on the slope is somewhat different from the horizontal installation, and the main differences relate to digging a trench.
With a strong slope, it is recommended to build a stepped-type pit — erect each individual step with ground support. At the same time it is necessary to strictly observe the angle of inclination to prevent the shedding of the earth.  Work should begin with the lowest point, gradually moving up the slope. Immediately after the formation of the steps, a formwork is installed, into which the reinforcing elements are laid.
Preparation of the solution, its pouring are carried out in the same way as for horizontal installation.
Nuances and recommendations
In order to build a foundation for the future fence with your own hands, you must have certain skills and knowledge of construction.
Some of the recommendations and advice of professional builders will help to facilitate the task as much as possible and perform it at the proper level. 
When constructing formwork, it is necessary:
- make sure that there are no gaps and gaps between the bottom of the shields and the bottom of the ditch;
- fix the plywood in the inner part of the trench, and the pillars behind the shields;
- screw screws at a 45 degree angle;
- ensure that there are no protruding nails on the inside of the structure, otherwise problems may arise during dismantling;
- It is not recommended to carry out laying work in hot weather, since high temperatures may lead to evaporation of water in concrete. If it is not possible to transfer the construction, it is necessary to cover the surface with sawdust, which will allow to preserve moisture;
- All work should be carried out in stages, without haste, strictly adhering to the rules.
 Making a solid, high-quality formwork for the foundation for the fence is not easy, especially if a person has not previously dealt with construction work.
But, following all the recommendations of experts and choosing the right material, you can build a reliable foundation that will serve for many years and become a practical “blank” for hundreds of fillings.