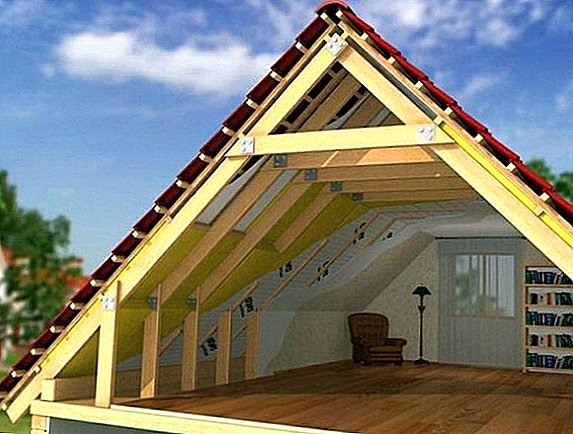
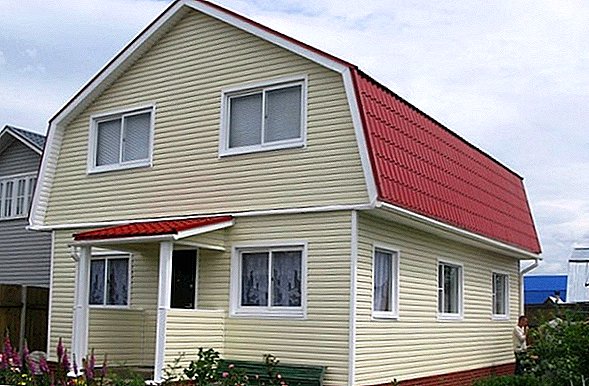
The attic room is not always used efficiently, so it is worth considering the possibility of arrangement mansard roof, significantly expanding living space in any private house. Of course, this task cannot be called too easy, but nothing is impossible, and with certain knowledge you can cope with it yourself. All that is needed is to strictly adhere to specific stages of work and follow safety regulations.
Measurement
The calculation scheme of the attic roof is quite simple: it is necessary to take into account not only the useful, but also the deaf space of the attic room. It is considered to be useful to consider an area where the distance from the ceiling to the floor is more than 100 cm, and all other areas, respectively, will be deaf and unsuitable for life.
They can be used for arranging shelves and other structures of economic purpose.
It is mandatory to calculate the total area, for which you will definitely need a plan for a specific roof. Divide all the available space into several simple shapes, take measurements of each of them, and summarize all the values obtained. This figure will be the total area of the roof.  In a separate order, it is worthwhile to evaluate the permissible angle of inclination of the roof slope, because if it exceeds the value allowed for construction, then the total area of the attic will significantly decrease. This moment is very individual and is calculated taking into account the size of the attic and other important parameters.
For example, if the house is in a quiet area, then the angle of inclination is better to increase, even if the usable area eventually decreases. With a large amount of precipitation, they will quickly go from the roof, without loading it. This is especially true for regions with harsh and snowy winters.
Important! The size of the attic on the second floor of the house must fully comply with its general parameters in order for the foundation and walls to withstand the construction. If possible, it is advisable to calculate everything in advance, drawing up a drawing of the planned structure.
Project development
When choosing a project for a future attic, first of all, one should take into account the mutual dependence of its size on the inclination of the roof. The mentioned residential part of the house should reach a height of not less than 2.2 m, although with direct roof slopes one should not be surprised at the reduction in the width of the room, which we have just mentioned.
To maximize the living area, with the desired height of the ceiling in all places, you should consider the option of a sloping sloping roof, when the lower rafters are placed at a 60-degree angle, and the angle of inclination of the upper is chosen according to the individual preferences and climatic characteristics of a particular area.
Do not forget about taking into account the distance between the floor and the ridge, the value of which should be about 2.5-2.7 m. With smaller numbers it is impossible to call this space a mansard.  For an accurate calculation of the parameters of each structural element and its correct drawing, it is necessary to proceed from rectangular shapes - a section of the future attic. Given the width and height of the planned room, it is almost impossible to make a mistake in the values of the angles above the slopes of the roof, the dimensions of the ridge, rafters and other important structural elements.
If it is difficult for you to orient in all the necessary values, then you can start the measurements from the middle of the width of the frontal part of the wall. From here you can calculate the height of the ridge, the placement of the wall pillars, calculate the size of the cornice overhang and the height of the ceiling in the room.
Also, when performing all calculations, it is necessary to take into account the weight of the roof, the expected load from the snow, the weight of the batten (along with the counter grille), insulation, steam, waterproofing materials, the angles of the slopes, the total span, the pitch of the batten and rafters.
Important! Each individual design has its own individual number of different connecting points, of a very different structure. To better understand the features of the connection of all elements converging at a particular point, it is desirable to draw each such bundle separately.
Even if you are completely confident in the correctness of the developed project and the accuracy of all measurements, before taking on the job, it is advisable to show your drawings to a specialist who can notice even the smallest inaccuracies that can reduce the quality of the final result.
Video: pros and cons of the attic floor
Preparation of materials and tools
No construction work can do without standard tools, represented by a hacksaw, hammer, construction stapler, ax, tape measure, level and some other devices. In addition, when building a mansard roof, you will also need:
- drill;
- screwdriver;
- knife;
- paint roller or brush;
- a device for cutting the roof (for example, scissors for metal or angle grinders);
- hacksaw, supplemented with a chain or circular saw.
From working materials it is necessary to prepare a wood treated with an antiseptic for organizing the system of rafters: a thick bar for Mauerlat, diagonal rafter legs and a ridge, as well as a thinner one for creating rafters and jumpers. The crate will be an OSB board or plate, and thin planochka can serve as a counterbath.
Important! To create a broken roof you will need more materials than to build a flat one, but if you want to organize a larger space, then you have to spend money. In addition, you should not forget that for the sake of safety, the construction of the truss system is desirable to be carried out using fire-resistant and environmentally friendly materials, and all wooden parts must additionally be treated from parasites.
Eco-friendly or mineral wool, as well as foam or other similar materials are well suited for insulation. Finishing inside the structure is done with the use of veneer, lining, drywall and other materials suitable for you, and tiles, slate, bituminous products and tin will be good roofing materials.
Mount mount
When using wooden bars, a mauerlat (the base for rafter legs attached to the capital side walls of the building) is the upper log, and in stone, block and brick buildings this detail is fixed by means of studs or an anchor fixed in the walls during laying (with a gap of no more than 2 meters).
The alignment of the power plate is performed along the plane of the wall from the inside, and its outer part is later sealed with decorative material.  Most often, the timber Mauerlat, made of dry needles, differs section of 100-150 mm (suitable for small and medium-sized houses). A part of the desired length is sawn off from it, and after straightening the anchor studs, they are put on it, pressing it slightly with light hammer blows and tightening the nuts.
At fastening of a mauerlat to an upper crown of a wooden surface the same wooden pins are usually used.
An equally important issue at this stage of work will be the organization of good waterproofing. For these purposes, you can use roofing felt or other durable materials with waterproofing properties.
Read more about how to self-roof with ondulin.
Mauerlat is always needed if you are planning the arrangement of the roof frame with rafters resting on the top of the wall with a beveled end or notch.
When designing a mansard with a width corresponding to the width of the structure, the lower ends of the rafters will come into contact with the external supports, in the role of which powerful beams placed across the long walls are used. The number of supports always corresponds to the number of truss pairs.
Video: various ways to mount a power plate
The beams are fastened to the wall in the same way as fixing the power plate, but in any case, the fixing units should be as strong as possible to prevent the roof from moving due to wind loads or other external factors.
Installation of attic floor beams (puff)
At this stage of the organization of the attic you will need coniferous timber with a cross section of 100 x 200 mm. The beams are placed either on the mauerlat, which protrudes 0.3–0.5 m beyond the plane of the walls, or into the masonry pockets provided for them.
In the first version they are fastened by means of corners and screws, and in order for all the parts to be even, they are placed in a specific and concretely stored sequence: first go the extreme ones on the level, and then, along the stretched cord, they are equal to the intermediate ones.
The distance between the beams in this case is 50-100 cm, although the option of 60 cm is considered the most convenient (it makes it possible to place insulation boards without cutting them). To even the height, the bars can either be cut to the desired length, or simply put lining of the boards.
In the second case when placing these elements in special masonry pockets, their ends must be waterproofed and wrapped in roofing material. The alignment of the "parts" is performed in the same way.
Video: installation of wooden floor beams
Installing uprights
Racks are made of timber with a cross section of 100 x 150 mm and mounted on the ceiling beams placed on the edge. To pre-select the height and line of installation will help pre-created drawing, and to align the racks in compliance with all requirements using a plumb and level.
Before final installation, the elements are temporarily fixed in the perpendicular direction by cuttings - along the length and width of the axis of the roof itself. Such measures allow you to fix them without the slightest error in placement in any direction. To create these stitches fit any board nails nailed.
Did you know? Today, penthouses in their homes are occupied by both middle-class and wealthier citizens, but this was not always the case. In the XIX century, these apartments were the cheapest, because in the summer it was terribly hot in them, and it was easy to freeze in the winter. Mostly poor writers, poets and artists who could not afford more comfortable housing lived in such apartments.
Between the racks located at the edges, the cord is stretched and already all the remaining racks are aligned along it, adhering to the step corresponding to the step of the floor block (it turns out on the rack for each beam). All of them are mounted in the same way as the extreme ones, as a result of which two rows of identical pillars are placed opposite each other. 
Installation of runs
When the rack will take their places, you can proceed to the installation of runs on them. Usually these structural elements are made of 50 x 150 mm planks and fixed with 150 mm nails and corners with self-tapping screws. The girders, made of 50 x 200 mm board, must be laid on the girders (they are placed narrowly down to increase stiffness).
Since the girders will not be subjected to serious loads in the process of application, this section of the board will be quite enough, but if you want to eliminate the likelihood of deflection and increase reliability during installation, you can substitute temporary supports created from boards 25 mm thick or more. At the top, bolts are always fastened with one or several temporary bars until the installation of rafters.
Moreover, the boards should not be located in the center of the puff, but at a distance of 30 cm from it, so that they do not interfere with further installation. By installing the racks, runs and bolts, you get a fairly rigid structure that selects a portion of the internal space of your attic. In the future, to increase its strength, all elements are additionally held together with contractions and struts.
Video: how to install runs
Lower slings
The lower rafters are made of 50 x 150 mm planks immediately after making a 25 x 150 mm thin template (this option is easier and can be processed more quickly). Details of the required length lean against the upper girder and mark on them the form washed down, then sawed it out.
We recommend to learn how to build a formwork for the foundation of the fence, how to make the fence itself from the netting of the chain-link and gabions.
The template is applied to the run at the installation points of the rafters, and with full coincidence, the top of all parts can be screwed according to the layout. However, the lower ends that are in contact with the mauerlat near the overlapping beams must be constantly cut in place. Fastening rafters occurs through the corners with screws and nails.  Thanks to correctly fixed rafters, the entire load on the walls will be distributed as evenly as possible, protecting the structure from various atmospheric influences.
Strengthening the roof
When performing a mansard roof of a broken type, it is possible to increase the rigidity of the whole structure with the help of interrafter runs. For their organization fit bars with a cross section of 100 x 150 or 100 x 200 mm, installed between the upper ends of the uprights. They serve as a kind of struts and provide better stability of the truss system of the attic.
Upper hanging rafters
These structural elements are most often presented in the form of an L-shaped structure, the legs of which are end-to-end connected, with the use of a metal or wooden fixing plate, or by cutting in half-wood, using bolts for the connection. To begin with, it is advisable to fit one of the rafters so that after dismantling it can be used as a template.
Important! Hanging rafters set in the event that the distance between the parallel walls of the room does not exceed 6.5 m.
Prepared parts are mounted in the usual manner: first, the extreme elements, and behind them all the others, with constant alignment. Unlike the lower slit rafters, these structural elements of the mansard roof rely only on the power plates located on the supporting walls of the facade.  The easiest way to calculate the mounting location of the upper rafters is by initially marking the center of the roof. It will help in this temporary stand attached to the power plate and extreme draw, placed from the end of the roof so that one side of the board runs along the center of the future coverage. Rafters are aligned precisely on this edge.
Crate
The crate is perpendicular to the counter-lattice, which, in turn, is attached to the rafters on top of the waterproofing. It must fully comply with the type of roofing material and may be both solid and sparse (the step between adjacent laths must correspond to the size of the roofing sheets).
A waterproofing is placed on top of it, after which you can proceed to the installation of the roofing itself (for example, corrugated flooring). In order to fasten wooden crates in this case, nails or screws are used.
Video on how to lath the attic
Laying vapor barrier membrane, insulation, waterproofing
Given that the attic is a living room, it is not surprising that it needs good waterproofing and insulation. In the role of the material for the performance of all works in this case, mineral wool is used, placed in the interglacial space.
It is known that every home requires the presence of skilled hands. Read how you can make a walkway from wood cuts with your own hands, glue different types of wallpaper, insulate window frames for the winter, and build a veranda.
The main sheets of insulation open in accordance with the size of the space between the rafters. It is also worth considering the fact that sheets of mineral wool are placed on a pre-laid vapor barrier layer, and on top of them lay a layer hydro steam insulator.
Video: how to carry out insulation, vapor barrier and waterproofing roof mansard
Despite its multi-layered nature, this design still leaves the air space between the vapor barrier layers and the mineral wool, as well as between the mineral wool and the steam and vapor isolator. All the air channels formed under the rafters as a result contribute to the ventilation of the structure, but only they must be brought into the zone of the ridge. The quality of insulation from this will only increase.
Installation of drippers
Kapelnik can be easily called the apron of the overhang, and in fact, it is a metal strip that attaches to the eaves and the gable and protects the building from precipitation. For installation of slats-kapelnikov need to perform several simple steps.
Important! On the strips of the described parts, the manufacturer applies a special film coating that protects the product from damage during transportation. It must be removed before using them.
After the eaves part of the batten has been strengthened (it helps to avoid its deformation as a result of precipitation), the drain gutter hooks are installed. Then, the cornices are mounted one at a time, but only so that they appear stretched and not move freely.
Первая из них крепится с помощью саморезов, с сохранением шага примерно в 20 см, а вторая должна заходить внахлёст с первой, не меньше чем на 20 мм. Крепление происходит с помощью всё тех же саморезов. 
In order to prevent moisture from penetrating the wooden crate through the holes made, it is advisable to use rubber sealing elements under the screws. If stiffeners interfere with the joining of parts, then it is better to trim them with special scissors.
After each element is securely fixed by screws, a control inspection is performed to determine the fit density.
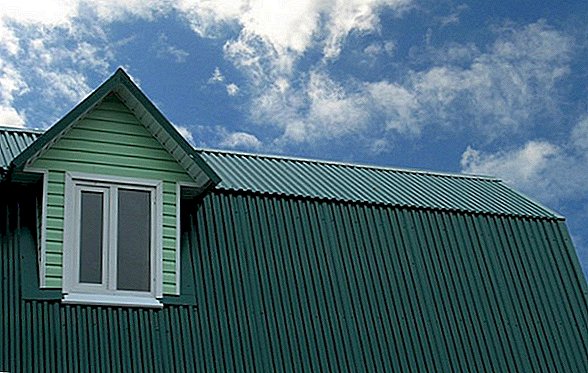
Coating installation
The final stage of work on the construction of the attic is the installation of the selected roof covering, after which it will be necessary only to install a drainage system and you can enjoy the finished structure. Nevertheless, there are certain peculiarities in the choice of the roof, and it is not only about individual preferences.
The floor for the attic, above all, depends on the slope of the roof, because not any flooring will be equally suitable for absolutely straight, and for the broken top of the house. Consider the most popular types of modern coverage:
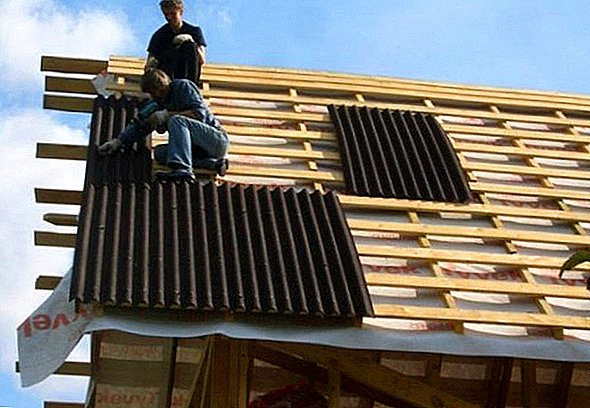
- Decking - will be an ideal option with a minimum slope of the roof of 12 degrees. The peculiarity of its installation is the need to create an overlap in two waves, as well as a device for a continuous flooring for a flat roof.
- Metal tile - a good option for mansard roofs with a minimum angle of 14 degrees. For small values, it is better to buy a high profile, always applying a frost-resistant sealing agent to the joints.
- Membrane materials - can be used already from two degrees of inclination of the roof of absolutely any configuration.
- Roll materials suitable for covering the surface with a slope of 3 to 5 degrees, if they are expected to be used in three layers, and from 15 degrees when organizing a two-layer coating. The lifespan of this roofing variant depends on the quality of the seals of the joints, since rainwater and other sediments can get through them.
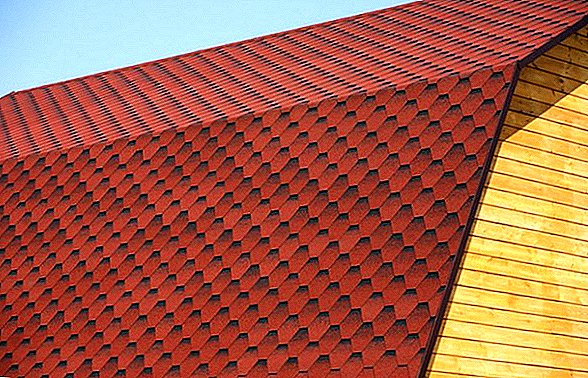
- Soft tile - Often used on roofs with a slope of 11 degrees, although in this case the installation of a continuous batten is a prerequisite.
- Natural tile. The minimum angle of inclination of the roof for such a surface should be 22 degrees, since on surfaces with a smaller slope, such a coating will look not so aesthetically pleasing.
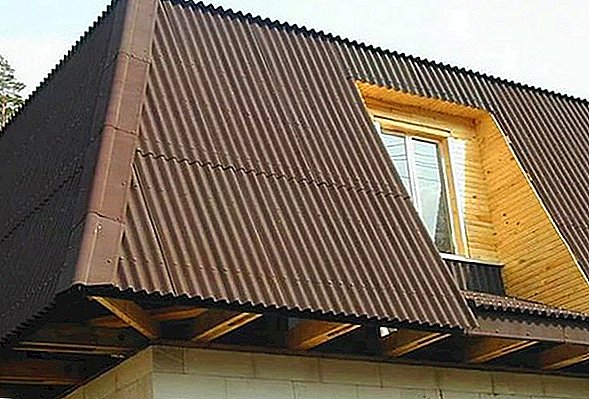
- Ondulin. It is used with a minimum angle of inclination of the roof of 6 degrees, although even in this case, most likely, you will need to pre-install a solid foundation.
- Asbestos cement slate. The minimum possible angle of inclination for its installation is 22 degrees. Considering that the highest humidity is always concentrated at the junction points of the sheets, in this case it is recommended to reduce the discharge of the rows only if the slope exceeds 30 degrees.
- Tes, shingle, shingles and other artificially created wooden coatings can be mounted at a minimum angle of 18 degrees, but the smaller the angle of inclination, the greater should be the overlap of wooden shingles.

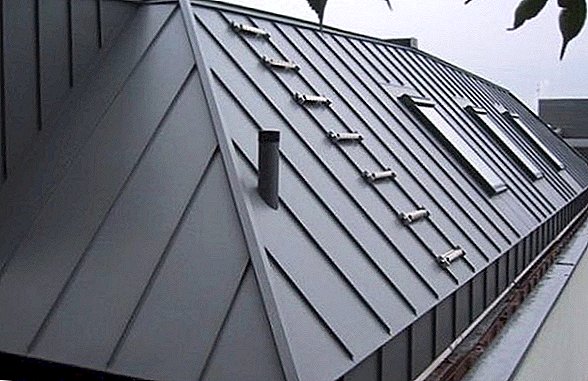
- Faltsevy roof. Despite the fact that most suppliers note that the minimum possible tilt angle is 8 degrees, the practice of using the material confirms the possibility of using it even at a value of 4 degrees. However, in any case, with a slope of less than 25 degrees, the execution of double folds will be a prerequisite.
- Reed. In comparison with previous materials, the angle of inclination of the roof for the successful application of this flooring should start from 35-45 degrees. Use at lower values leads to stagnant zones and sediment seeping deep into the covering layer.


Skate mount
The ridge is located at the very top of the roof edge, formed as a result of the contact of the roof slopes. The various parts attached to the edge can also be attributed to the constituent parts of this element. It is at this point that the roof roof ventilation takes place.
Did you know? For the first time, people found out about profiled sheeting back in 1820, for which today we have to thank Henry Palmer, a British engineer and architect who first began to be engaged in corrugation.
The process of mounting the ridge is also the process of arranging its run, which connects the ramps of truss systems.
The method of installation of the specified element directly depends on the type of roof, which means that it is worth thinking about when choosing a particular coating material. For example, when buying asbestos cement sheets. The shaped elements reminding a gutter will ideally approach them.  They are fixed on the boards or ridge beam by means of nails for attaching slate sheets, with rubber gasket on them. It is also mandatory to perform waterproofing of all the elements of the coating, and the ridge bar is covered with ruberoid tape.
To fix all the ridge elements, first assemble a special bar with a cross section of at least 70 x 90 mm. Further, on two sides, two crate bars are fastened to it, and to simplify the task of mounting parts, special brackets can be attached to the central wooden bar to hang suspension bridges to them.
Important! When choosing a sub-board, please note that it should be 10–15 cm thicker than battens.
Ridge cant attached to the center, and for the convenience of this task, its top face should be rounded. This form ensures a more durable connection of all parts of the ridge, and to prevent rotting and mold development of wooden parts, it is better to beat them with ordinary roofing material along the entire length, applying enamel or paint on top.  The ridge overlap is obtained by combining two skates placed on adjacent slopes, after which the main ridge is fixed, extended by 10 mm.
Consider the option of mounting the skate on the metal flooring:
- It is necessary to make holes on two skates, exactly the same as from the flat bar side.
- Then two holes are drilled on the longitudinal axis of the bar hump line. Just make sure that they cross the crests of the covering waves at the cuffs.
- The skate is mounted over the end strips, and its edge must go out no less than 2-3 cm.
- When mounting a flat element, it is necessary to follow the obligatory joining of all parts with an overlap of about 10 cm or even more.
- In the process of connecting the elements of the semicircular ridge, the connection is made along the stamping lines.
- Be sure to consider the possibility of combining the ridge strip with the angle of the covering material. If necessary, you need to adjust the angle of the bar to the angle of the slope (if necessary, you can safely bend and unbend it).
- It may well be necessary to install the additional sub-board, which is placed slightly above the upper crate, but with an 80-mm gap remaining between the slopes themselves and their sub-ridge boards for good ventilation of the free space under the roof.
Video: installation of professional flooring and installation of the skate
The final installation of the ridge strip is performed by pulling the screws to the highest parts of the sheet metal. The pitch of the self-tapping screws is usually within 0.8 m.
On this independent organization of the mansard roof is considered fully completed, and the final result will depend on the accuracy of all the above actions. Of course, doing the work with your own hands seems to be a better option than the remuneration of workers, but in some cases the opinion of experts is really important, which you should never forget.