About the usefulness of the bath has been known since ancient times. In the bath, the human body is not just cleaned, but treated with steam, and as a result of this treatment, slag and toxins are eliminated through the release of sweat. Bathing procedures will provide excellent health and increase immunity.
Russian bath or sauna
Of course, everyone chooses himself what to attend - a bath or sauna, but in order to make the right choice, one should know what is the difference between a bath and a sauna. The main difference is in the microclimate. Let us explain in more detail.  Bathhouse On average, the air humidity in the street is 40-70%, in the bath the air is 65% humid, and this allows you to stay in the steam room for 15-20 minutes. Rest and cooling of the body - 5-10 min.
Learn how to properly equip the garden area, align it and plan.Sauna. Humidity in the street is 40-70%, in the sauna the air is 3-8% humid, which allows to be in the steam room for a session of 5-10 minutes. The interval between sessions is at least 40 minutes. With good health, only two or three sessions are recommended.
 In the steam bath determines the microclimate, in the sauna - the air temperature. It is hot steam that makes the body breathe and intense sweating is the main indicator. In wet air, the bath has a higher thermal conductivity than in a dry sauna, which means that the bath has a less aggressive effect on the body than in a sauna.
Project development
This process should begin with deciding whether to choose a bath type: as a separate structure or an extension to the house. And when choosing, one should take into account that a separate building is safer in terms of fire, and a bath in the form of an extension will make it necessary to equip thorough waterproofing, ventilation and sewage.
The hands can also make gabions, rockeries, ladybugs, verandas, cellars, garden fencing, solar wax refinery, barbeque, gazebo and garden swing.Directly the project can be developed by yourself or take advantage of ready, for example, from the Internet. As a rule, bath facilities are of two types:
- two-story, with a room for rest on the second floor;
- one-story, with a waiting room, a steam room, a shower room and a lounge.
Did you know? The word "bath" comes from the Latin "balneum", which means "banishing sadness and illness."
 It is desirable to arrange the entrance to the building on the south side - here in winter it will melt snow faster and, therefore, it will be necessary to clear the space in front of the entrance less often. But the windows should be located on the west side - natural light in the bath will get more, especially - in the evening.
Choosing a location and location
The right choice of the location of the bath is a guarantee of its good functionality and maximum convenience for visiting. And in this issue should consider the following recommendations:
- the minimum distance from the bath to any buildings (house, fence, shed ...) - 5 m;
- the building plot should be dry, away from water bodies, dampness and slopes - under the influence of excessive moisture, the foundation of the building can give a shift;
- the ground in the area must be with a sandy, sandy-stony or gravel base - such a ground is not subject to swelling.
Learn how to choose a lawn mower, pumping station, a dry closet, a gasoline trimmer and a mini-tractor to give.
Necessary materials
The bath can be made of various materials, natural or artificial:
- wood;
- stone;
- bricks;
- concrete structures.

Important! If you build a wooden bath, then it is better to use wood as a material, which was felled in winter - this kind of wood has a denser structure and high resistance and decay.
Construction process
This process involves several sequential steps:
- The choice of location.
- Layout and drawing.
- Foundation laying.
- The construction of walls, roof and floor.
- Furnace and chimney equipment.
- Internal improvement.
Foundation preparation and casting
The quality of the foundation depends on the durability and strength of the structure. Its significance is indicated by the fact that the cost of the foundation is about 25% of the cost of building the entire building, and the alteration of the foundation will cost half the amount spent on the entire structure. Therefore, on the construction of the foundation will tell in detail.  The most common types of foundation for the bath are:
- tape
- pile
Tape
Its feature is that the tape is laid under all external and internal capital walls, with the same cross-sectional shape along the entire perimeter. Also, the tape foundation is used when a risk of irregularities of the base occurs with a small depth of its laying.
Video: Ribbon Foundation
The procedure for the construction of the strip foundation is as follows:
- Site preparation. It lies in the fact that all rubbish is removed from the site and the turf is removed. Stones, pieces of brick, etc. stored separately - they are useful as a filler when mixing the solution.
- Markup. Using a tape measure, a square and a rope, sequentially mark and place the stakes on the corners of the outer contour. Pay particular attention to the fact that the angles are strictly 90 degrees. After placing the pegs, a validation of the markup follows. It is made as follows: two diagonals are measured with a rope. In the ideal case, they should be the same, the difference is allowed, but not more than 2 cm. The inner perimeter of the building should be at least twice the thickness of the wall: for a wooden bathhouse from a bar - 25-30 cm, for a brick house - 35-40 cm. Using this calculation, determine the internal contour.

- Removal of soil under the foundation. Select the ground for bearing walls by marking. Then clean the walls of the trench from the crumbling ground and pour water well, if necessary, strengthen them using boards or boards made of chipboard. The depth of the trench under the foundation is determined by local climatic conditions, but in any case it should be at least 50-70 cm. To avoid possible difficulties with installing the formwork, the width of the trench should be made 10-15 cm more on each side. The bottom is horizontal, with a minimum tolerance.
- Cooking grounds. The bottom of the trench is covered with layers of coarse sand. It would be useful to add gravel or gravel. The crushed stone (gravel) layer 10 cm thick is well rammed and filled with water, and the backfill of sand should not exceed 20-30 cm.
Create a waterfall and fountain with your own hands.
- Manufacturing formwork. To do this, you will need trimmed boards not less than 0.3-0.35 cm thick or a chipboard of 0.2-0.22 cm. The form is assembled in the form of shields and installed in a trench, while its upper edge must exceed the foundation level by 10-15 cm. They are fastened with wooden bars, connecting the shields with each other using screeds or nails. The outer sides of the formwork are reliably supported with the expectation that, when casting, the concrete does not open. In this case, the more the better. With significant differences in height on the site (more than 0.8 m) in these places, the formwork is set by expanding its lower edge at an angle of 5-10 degrees. However, the ideal option is a special collapsible formwork: the work and worries are less, and the payment is only for the rental of the device.
- Establishment of reinforcement in the formwork. 12-16 mm armature is laid in a trench like a skeleton, the armature is tied with steel wire. Under the lower rods are placed pieces of bricks and stones, thus making a gap between the reinforcement and the bottom. Finally, the formwork is reinforced along its upper perimeter with a block of wood. To ensure ventilation in the middle of the foundation, pipes made of ceramic or metal with a diameter of 6 to 8 cm are laid along the perimeter at a distance of two to three meters from each other.
- Pour concrete solution. M250 or M300 cement is used, here too - the more the better. In the extreme case, and the M200. The solution should have the composition: three-three and a half parts of coarse sand (30-45%) and gravel (70-55%) and one part of cement. First, a dry mix is prepared: sand, cement and mix until homogeneous, pour in the appropriate vessel or on a sheet of metal, and then add gravel and again mix everything well. Then concrete is prepared: a little water is poured into the finished dry mixture and everything is mixed. The greater the moisture content of gravel or sand - the less water, but usually water makes up 60-70% of the mass of cement (in a cold season, water is heated to 35-40 degrees, in the summer it is better to be cold). Gulf of concrete: the main condition - the continuity of the fill; concrete is poured in layers of 15-20 cm, immediately leveled, rammed before the appearance of cement milk. Remove the entrained air by piercing the filled composition with a probe. For additional shrinkage of the composition on the formwork tap with a hammer. Next comes the screed surface around the perimeter with the help of smoothing a bar of wood.
- The completion of the concrete work: after three to four hours (when the cement grabs), the foundation is covered with easily-waterproof materials (sawdust, burlap, etc.) and watered every 4-5 hours for the first two or three days, after watering, covering with polyethylene film to prevent excessive evaporation of moisture . After seven days the formwork is removed. The gaps between the foundation and the ground are covered with sand and tightly tamped. Approximately in 20-28 days the foundation is finally formed, then proceed to further work, while a couple of layers of roofing material are placed on the upper surface for waterproofing.


Important! When erecting a strip foundation, welding of reinforcing rods is not allowed - this may deform the entire foundation.
Pile
Used with unstable soil, on sand, peat, etc., as well as on soils that freeze to a depth of more than one and a half meters. The main piles with the distance between adjacent from one and a half to two meters are placed under elevated loads, at corners, piers and along the perimeter of the walls, and between them are intermediate. Most often, piles with a diameter of 20 cm are used, but this is the case when the more - the better.  Piles use metal screw or bored. The iron screws are screwed in even by hand, but they “take away” the heat - you will have to additionally insulate the subfloor. Bored, albeit time consuming, will help save money. The depth of the piles is determined as follows:
- on raised ground - below the freezing level;
- on loose and unstable soils - to the level of the bearing layer.
Did you know? Some ancient Roman terms could simultaneously accept up to 2500 people. These were complexes of buildings with an area of up to 10-12 hectares.
The order of construction of the foundation on bored piles:
- Preparatory work on the site. First, the perimeter of the building being constructed is marked, then it is strongly recommended to remove the turf from the marked area and fill it with rubble. This is necessary in order to avoid in the future under the structure of decay of vegetation with all the ensuing unpleasant consequences. The next stage is marking the lines of pile location. The marking is done using pegs and ropes stretched between them. It is important that the marking pegs are set vertically (this is easy to check with a plumb), and the ropes are stretched horizontally (checked by the building level). If everything is in order with the first and second stages, then the diagonals of the rooms should be checked. They can deviate only a few millimeters, otherwise in the future there will be big problems.
- Calculation of the number of piles. When calculating, consider the following: the distance between the piles is no more than 2 m; nodal supports - at the corners and in places of separation of partitions; between the nodes - intermediate piles at a distance of less than 2 m. This calculation is for a bathhouse on one floor of non-heavy materials, for two-story buildings the frequency of the supports should be increased. In case of solid ground, the supports are installed infrequently, in case of loose or unreliable they need more.
- Determination of well depth. On roughened soil: the freezing depth in the winter season plus from 30 to 50 cm. On unstable soil: the depth of the solid layer plus 30-50 cm.
- Preparation of wells. They are made where the piles should be. A hand-held drill with a diameter of 20 to 30 cm is used, preferably with a composite handle, this will allow drilling up to 4-6 meters.
- Preparation of piles. It is desirable to use piles with an extended base - this will increase the chances that the structure will remain in place when the soil heats up.
- Filling holes. Several buckets of gravel (first) and sand are being tamped into the finished well and tamped down with sand. Top - concrete with gravel, it will be the sole of the pile. After the mortar solidifies, the formwork is immersed in it, then a reinforcing frame is inserted and everything is poured with concrete.
- Formwork preparation. The most common framework for pouring concrete are pipes made of a mixture of asbestos and cement with a diameter of more than 20 cm. The advantages of such a framework: pipes are not subject to rotting; good strength; the smoothness of the outer surface of the pipe (with swelling of the soil the structure does not warp).
- Reinforcement supports. It is made to harden piles. The essence of reinforcement is that several reinforcement rods with a diameter of 0.8-1 cm are inserted into the supports, which are interconnected by wire or thin reinforcement. Longitudinal reinforcement rods should be at least 5 cm from the wall.
- Pouring concrete. In the tube inserted into the well, a fabricated structure for reinforcement is placed. Place around the circumference of the pipe filled with gravel with sand or earth, while tamping well and maintaining a strictly vertical position of the support. Then proceed to pouring the pipe with concrete. Concrete mortar is made from the calculation: 1 part of cement (grade not lower than M300) into 3 parts of medium grain sand. In the dry state, the components are mixed and a little more than 1 part water is added - the qualitative solution should resemble sour cream. To increase the strength of the concrete composition should remove the air trapped in the solution. To this end, a long pin pierce the solution, which has just been poured, and swing the pin in different directions. The air leaves and the solution settles a little, then it is added to the desired level. This procedure should be done on each support.
- Final work. A steel sheet is placed on top of the finished pile, on which the roofing material is laid - head. Pile foundation is ready. If there is a need, a grillage is fastened to the piles from above (a bar with a section of at least 20x20 cm, treated with an antiseptic). You should wait a few days - and you can start building walls.

Important! The foundation must be 10-15 cm above ground level. If the base is not provided by the project, it will be 60 cm.
Wall construction
Walls are one of the most important structural elements of a bathhouse. As a rule, they come from bricks, foam blocks, framed and from log cabins. Consider each view in more detail.
Brick
Sequencing.
- The construction of the corners. A solution (2 parts of sand to 1 part of cement) is applied on a dry foundation with a layer of approximately 2 cm. Then, a solution of the corners is applied to this solution. At first, several bricks of the neighbors' corner are laid out, and then a string is stretched strictly horizontally between them. This is necessary for the proper removal of the first row. It also displays the vertical, horizontal and uniform size of the seams horizontally. At the corners make a partial laying of 5-6 rows. Before laying bricks are moistened, especially in the heat.
- Walling. Depending on the pattern of masonry and bridging of bricks, masonry is laid directly on the walls. Brick dressing can be single-row or multi-row, it depends on the size of the building and whether there is a second floor. It is important to determine what the insulation will be: a mineral wool or an empty space of 6 cm, subsequently filled simply with air or expanded clay. Determine the type of insulation needed during the construction of the walls.
Important! When laying the first row of walls is used exclusively solid brick.When building the second and next rows, you can use bricks with small defects or half (a quarter) of bricks, it is important that they are placed in the inner side of the wall. Another important detail is the density and thickness of the seams. For the reliability and external aesthetics of the building, the seams should be from 10 to 12 mm.
 When building walls should be aware of the window and door openings. They are left in the places defined by the project. At the same time, in the sidewalls of the apertures, a pair of brick-sized wooden corks covered with roofing felt are installed. В готовых проёмах делают деревянные вертикальные перемычки или опоры в виде досок, одним краем упирающиеся в нижнюю боковину проёма, а другим - в брусок, приложенный к верхнему краю проёма. Также во время возведения стен устанавливаются двери и окна.
Из пеноблоков
The construction of the walls of foam blocks is similar to the construction of brick. Before laying the initial row, be sure to take care of high-quality waterproofing, so the appropriate material spreads under this row, and it should be noted that only sand-cement mortar is suitable for the first laying. 
And then the following steps:
- Using the building level to reveal the corner of the foundation, which is most elevated.
- Starting from the highest angle, gradually move to the center, paying attention to the evenness of the masonry blocks. The seams are as thin as possible (for better joining of the blocks). All flaws in working with the solution are eliminated immediately. You can use special glue for foam blocks.
- The next row is done by shifting the blocks in half - the same as in the brickwork.
- Each laid row with a building level is checked for a “horizon”: the detected irregularities are eliminated by tapping a mallet on them, if the irregularity still does not go away - use a grater.
From the log
For a better understanding of the process of building walls from a log house, it is useful to define the terms:
- "crown" - a series of logs in the wall;
- "frame" - consistently laid one on the other crowns;
- "chalice" - protruding beyond the walls of the log of the end of the logs;

The sequence of walling:
- A crown of four logs, pre-hewn for better adherence to the foundation, is built: 2 logs are placed parallel to the waterproofing, and a second parallel pair is laid perpendicular to it, which is connected to the first one in a bowl.
- In the same way put the next 4 logs, forming the second crown.
- Places where logs are connected, warmed (caulk).
- The crowns are connected to one another with square shkanty.
- When the desired height is reached, the ceiling beams are laid on the frame.
Important! Excavation of the seams is carried out twice. First - after the construction, the next time - a year and a half after the installation of the log house.
Frame
According to the project prepared in advance, the frame stands are prepared from 150 by 50 mm boards.
Also build a greenhouse made of polycarbonate, wood and polypropylene pipes.
Algorithm of actions:
- The establishment in the corners of the two main racks and several intermediate - between them.
- Plating assembly. It is made from the corner and consists in attaching the sheets of cladding material to the frame posts with screws. An important point - control of the vertical sheets (using the building level).
- Simultaneously with the assembly is the establishment of the following racks and attaching them trim.

Materials for exterior plating:
- siding;
- metal siding;
- lining;
- block house;
- die
Ceiling
It is known since school years - warm air tends upwards. And this should be guided in the arrangement of the ceiling. The main thing - to avoid the accumulation of condensate and heat preservation. And this can be ensured by the correct insulation material.  Nowadays, for this purpose they use:
- mineral wool;
- ecowool;
- penoizol;
- Styrofoam;
- expanded clay;
- clay;
- sawdust.
Floor and ceiling insulation
Consider the option of insulating the ceiling with expanded clay - an inexpensive and reliable material. Procedure:
- Laying vapor barrier membrane. It is produced with an overlap of 12-15 cm.
- Accurate sizing of the joints using metallic adhesive tape.
- The steam insulation of the rafters and chimney is slightly higher than the calculated level of expanded clay. Steam insulation material is attached with masking tape or construction stapler.
- Creating a layer of mashed clay approximately 10 cm and tamping it. This will create additional thermal insulation.
- Backfilling and leveling on claydite surface.
- Gulf surface cement-sand screed.
Did you know? The Scythian bath had a very unusual construction: three poles covered with felt panels. It was heated by cannabis seeds, which, when burned, create intense heat.

Procedure for insulating the floor with expanded clay:
- Laying waterproofing bituminous material on the concrete surface. Produced in a 10-centier "overlap" with approaching the walls of approximately 15 cm.
- Alabaster attachment of beacons around the perimeter of the floor to demonstrate the thickness and flatness of the floor.
- Processing wooden lags antiseptic.
- Backfilling of expanded clay. Layer thickness - 15-20 cm. If possible, it is better to take a mixture of fractions.
- Watering backfill with a mixture of cement, water and primer - for better grip fractions.
- After a day - install metal reinforcing mesh.
- Pouring cement-sand screed in 3 cm, waiting for complete drying.
- Fixing waterproofing material.
- Install flooring.
Application of waterproofing
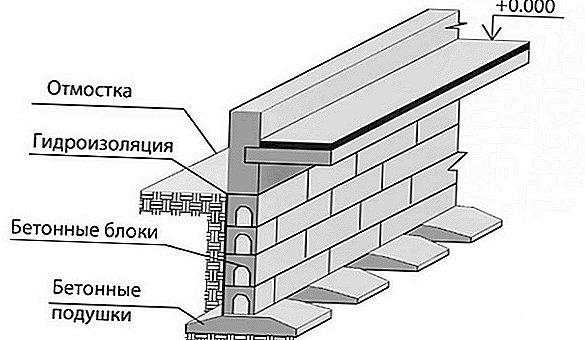
Foundation waterproofing happens horizontal and vertical. For horizontal insulation, ruberoid is used, laid in three layers on the surface of the foundation. The vertical begins at the level of the base of the base, and at the top it joins with the horizontal. It can be oklechnoy (used polymer membranes or bitumen-polymer materials in rolls, it is also possible to use mastic for coating).  Insulation walls. The bottom line: laying in a certain way strips of waterproofing material (most often use foiled materials).
  Floor waterproofing. The floor in the bath is better to do concrete (at least in the steam room and washing), because wood will rot quickly due to high humidity. Concrete floor can be insulated with bitumen or polymer mastic. There is also a variant of insulation, when plywood is attached to the subfloor, and waterproofing is placed on it, a reinforcing mesh is placed on it and a cement screed is poured.
  Waterproofing the ceiling. Here also prefer to use foil materials.
Roof erection
Roof can be of two types: gable or shed. In the first case, it is more functional, but more difficult to mount, in the second - the opposite. It is extremely important to correctly identify:
- the angle of the roof;
- overhang length;
- form of rafter system.
The minimum angle of inclination is 20 degrees, in snowy places - at 45 °.
- Mounted carrier beam.
- Mounted ceiling beams.
- Insulating and waterproofing works are performed.
- Mounted roof.

The order of construction of the gable roof is somewhat different:
- Installed ceiling beams.
- Raising trusses gather.
- Assembled farms are installed.
- Going purlin.
- Mounted roofing.
- Thermal insulation works are performed.
Did you know? During the Middle Ages, a visit to the bath was not approved by the Catholic Church - it was thought that this was a concern for the “vessel of sin” - the human body.
Furnace installation
The installation of the furnace is made in stages:
- Choice stove.
- Arrangement of the floor.
- Install the stove.
- Installation of mounted tank.
- Mounting the heat exchange system.
- Pipe erection.
- Commissioning
- compliance of the dimensions of the stove with the area of the steam room and the whole building;
- power and speed of heating water and air;
- reasonable fuel consumption;
- price.
 Stove for bath.
Did you know? None of the bans in the world, except the Russian, do not use brooms.When installing the stove should comply with the conditions:
- distance to the ceiling without special thermal insulation - not less than 1 m 20 cm;
- distance to the bath walls or partitions - not less than 32 cm;
- the door should open comfortably.
Read also how to get rid of the old paint, pokleit wallpaper, insulate the windows in the apartment.
Pipe Mounting:
- As few knees as possible, ideally a straight pipe with a height of at least 5 m.
- The height above the roof and roofing ridge is not less than half a meter, the distance from the ridge or parapet is at least one and a half meters; if the pipe is removed from the roofing ridge by one and a half to three meters, its installation at the ridge level is allowed.
- The pipe must be higher than the high extensions to the bath.
- Installation on the spark detector tube.
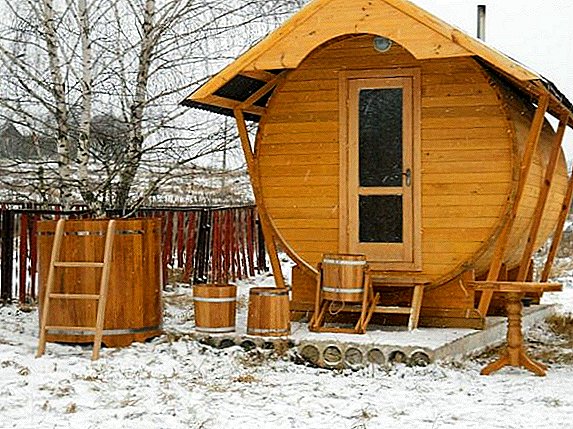
Arrangement of bath
Waiting room. For its decoration, good lining or board of 20 mm from aspen, pine, birch or fir - these breeds have a pleasant smell, they are moisture-resistant and do not emit resin.
Did you know? According to the beliefs of the Turks, it is in the Turkish bath that it is best to drive out demons from a person.Steam room In this room, experts recommend linden for finishing, but other breeds are not prohibited. The main requirement: the material should not be treated with chemicals (antiseptics, etc.).
 Office for washing. For decoration, use tile, natural stone or moisture-proof, rot-resistant wood. If there are metal elements in the compartment, they should be drowned as deeply as possible in a wooden sheath to prevent burns.
  Required bath attribute - font. Nowadays, the fonts are the most diverse both in form and in the type of material from which they are made:
- from a tree;
- from plastic;
- from metal;
- from concrete.
Small pests often spoil not only mood, but also things, furniture, plants, products, learn how to get rid of moths, cockroaches, mice, wasps, moles, mole rats, ants, springtails.A bath is a unique interaction of four elements: water, fire, earth and air. Therefore, since ancient times, it was considered a holy place where, in the literal sense of the word, it is possible to wash off fatigue, stress, soothe a long-suffering soul, and a body exhausted from everyday worries. Accepting the power of the four elements, a person is charged with vitality and energy, and this is especially good in a bathhouse built with his own hands.
Reviews:
We have a bath on a shallow foundation, only two cinder blocks, the earth, however, is dense, loamy. Drain removed about five meters from the building, and in general, built approximately according to your scenario: roofing material, and his frame. One is bad - from the floor it is very cold in the frost, apparently raised to a small height above the ground. So to build a bath with your own hands is not such a difficult task.Allbina
//forum.derev-grad.ru/forum-o-banyah-f147/kak-postroit-banyu-svoimi-rukami-t3434.html#p9116
It is better to do a bath with your own hands by buying a log house and collecting it yourself on the site. The advantage of such a bath is that it does not cool for a long time compared to a foam block bath. Moreover, to build a log house, where each log is numbered, much easier and faster than building a foam block bath.Alexander Cherkasov
//forum.derev-grad.ru/forum-o-banyah-f147/bani-foto-svoimi-rukami-t4698.html#p8528