Whitewashing is the most elementary of all finishing works and is an ideal way to refresh the room. However, this type of treatment today is used infrequently. When you made the decision to refresh your home, it was whitewashing the ceiling, it is important to find out how to do it properly. Today we will tell you what whitening methods exist and how to make repairs on your own quickly and efficiently.
Preparing the ceiling for whitewashing
Before work it is necessary to prepare the room: remove excess furniture or cover it with plastic, remove lamps, chandeliers, cornices, prepare tools and accessories.

Remove old whitewash
To apply fresh whitewash, you must first remove the old coating. The most affordable way is to wash it off with water. To do this, moisten a small area of the ceiling using a brush, roller or spray. When the previous layer swells, it is scraped off with a spatula, spatula, or scraper. This manipulation is carried out on the entire area of the ceiling.
Important! To enhance the removal effect, some citric or acetic acid can be added to the water.
The former white coat can be quickly removed using a grinding machine.. However, in this case, you should protect your eyes and respiratory organs from dust.

Removing traces of dirt
After the finished paint layer is removed, the ceiling is carefully examined for rust, mildew, grease and other stains.
We recommend that you read about how to remove the old paint from the walls and glue the wallpaper.
Rusty traces and drips can be washed off with a suspension of copper sulphate. Regular stains are simply washed off with water, and soot is cleaned with a solution of hydrochloric acid (3%).

Fat is removed with soda ash dissolved in warm water.
Alignment process
Cleaning stains and whitewash is important before the process of refreshing the room itself., but in order to whitewash it down evenly, the entire ceiling should be repaired, repairing cracks and other flaws with cement-based putty.

Ceiling joints taped with a special tape and then putty. When the ceiling is dry, the putty is treated with sandpaper and put a primer. Only after it dries (not earlier than in a day) do they get to work.
Did you know? Have withfishing "repair" - French roots, b originally it had to do with equestrian units of the army. “Repair” meant replacing old horses with youth.
Choice whitewash
It is possible to cover the ceiling with several options: with chalk and lime. Both materials are environmentally friendly, but each of them has its positive aspects and disadvantages.
a piece of chalk
This material is suitable for those who aim to achieve the maximum depth of whiteness of the ceiling. Ground construction chalk meets all sanitary and hygienic standards, does not cause allergies and is ideal for processing both residential and auxiliary premises, and for the hallway.

Among the drawbacks of the chalk solution, it is worth noting that over time it gradually crumbles, leaving excess dust in the room. In addition, this whitewash is not waterproof and is not suitable for finishing work in the bathroom and in rooms with high humidity.
Important! If the ceiling was originally covered with lime, then it is not recommended to treat it with chalk, since later on the surface may appear stains, which will seriously spoil the appearance.
Lime
This material has a high bactericidal quality. good resistance to moisture and not bad masks minor surface defects.

However, when finishing the bedrooms and especially the children's room should take into account the individual response of residents to hydrated lime. It can cause allergies.
It will be useful for you to read about how to insulate window frames for the winter, how to put a light switch and a power outlet with your own hands.
Tool preparation
Qualitatively and evenly, the ceiling can be covered with a spray, roller or brush. Beginners should not use the spray gun, as there is a danger of splashing walls. It is better to give preference brushes.

It should be made of organic materials with a nap not shorter than 15 cm. Before finishing, in a few hours, the brush is soaked in water so that it becomes softer and stronger. The advantage of such a tool - whitewashing from it is easily washed off.
The roller is also not bad for beginners. It allows high-quality and fast finishing work. When purchasing a roller, you should take care of the pallet, which will be whitewashed.
Did you know? For gluing stones at the construction of the Great Wall of China, a solution mixed with rice porridge was used.
If you already have skills in applying the solution or the surface area is quite large, it is better to use a spray gun, vacuum cleaner or garden sprinkler.

Whitewashing process
So, the material is selected, the ceiling is prepared, you can proceed to the process of coating.
Preparation of the solution
Based on the selected material, the specificity of the preparation of the solution is different.
We advise you to read about how to build a cellar with ventilation, a sheepfold, a chicken coop, a veranda, and also to make a gazebo, garden swing, bench, pergola, barbecue, fence with your own hands.
Based on chalk
To prepare the chalk solution you will need (per 10 sq. M of surface):

- 5 liters of warm water;
- 30 g of glue (carpentry or PVA);
- 2.5-3 kg of chalk;
- 15-20 g blue (used to prevent the appearance of yellow spots).
The consistency of the chalk mixture should be such that it does not flow without a trace from the object.
Important! In order not to overdo it with the amount of chalk, it is added in small portions, reaching the required consistency.
Lime based
For the lime work, you will need:

- lime - 2.5-3 kg;
- edible salt - 70-100 g;
- aluminum alum - 150-200 g;
- water.
Video: Cooking whitewash for the walls
Ways of applying the solution on the ceiling
There are three main ways to whiten the ceiling. All of them are easy on the method of execution, but some nuances should be considered.
Very often, uninvited guests appear in apartments and private houses, which cause a host of problems for the owners. Learn how to deal with bedbugs, cockroaches and moths.
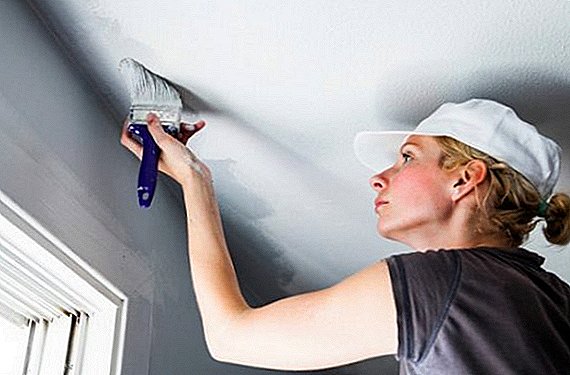
Brush
The easiest and most popular way to apply whitewash on small square patches is maklovitsa. Dipping a brush into a container of whitewash, it makes W-shaped gestures on the surface, thus imposing a layer upon a layer.

When applying the solution with a maklovitsa, it should be remembered that the first level is superimposed on the window, and the second - on the contrary, so as not to leave marks from the brush.
Roller
If you paint with this tool, then whitewashing will fall flat, no stains and plaques will be formed. To achieve the desired effect, the solution will have to be applied in two layers. The second layer is applied after the first dries.

Only one roller will not be enough. Additionally, you need a container for the solution, any object for stirring and a special paint tray. In addition, you will have to stock up on a small brush to cover the ceiling at the joints - you will not be able to do it with a roller.
Main advantages of the roller:
- whitewash material is saved;
- the coating is an even layer, without stains and streaks;
- no bristles left;
- if the roller is equipped with a long handle, no stepladder is needed;
- high performance in large areas.
Sprinkler
You can apply whitewash and spray gun (spray) or a vacuum cleaner (if there is a special nozzle). If you carry out the procedure correctly, you get a good result.

The device works in this way: under pressure, the air enters the spray gun, takes the necessary amount of white and sprays them together with the air.
In order to regulate the flow of paint, there is a special opening on the sprayer, during the closing and opening of which the intensity of the jet is regulated.
Before painting the solution is thoroughly mixed, poured into a container and closed.
Important! Capacity must first be moistened. This ensures better adhesion of the mixture to the surface.
Putting whitewash on the ceiling, be sure to monitor the surface, trying to prevent the appearance of drops, which later lead to divorce.

To evenly paint, spray it in a circular motion. In this case, the gun must be kept at a distance of 70-100 cm from the surface.
For a better result, you will need to apply 2-4 layers, which will allow you to hide minor defects.
Technology of applying the solution
Whatever whitening method you choose, there are general rules for working:

- Drafts and open sunlight should be avoided during drying. Otherwise there is a great risk that the paint will crumble.
- It is better to impose a limy solution on the moistened ceiling. Then whitewash will fall better and will not leave stains.
- Should not rush. Layers should be applied in even circles.
- Despite the chosen method of finishing, you should first brush over the joints and in all corners, and only then proceed to the main work.
- Do not make the composition too thick - the consistency should resemble fresh sour cream. Otherwise, the paint will not go evenly.
- For a homogeneous layer, all components are filtered, freeing the solution from excess debris and lumps.
- It is necessary to apply not less than two layers, observing between each technological break. So you can achieve uniform whitewash.
- Previous whitewashing is desirable to remove completely. Then the chances of a lack of divorce and stains will increase.
- Overlaps between the layers should be 4-5 cm. This will save from unstained areas.
Did you know? Chalk is one of the components of the earth's crust. The percentage of its content in it - 4%. And more than 20% of sedimentary rocks consist of chalk and limestone.
Precautionary measures
Compliance with safety regulations is required for all types of repair work. And whitewash is no exception. First of all, you should protect the body, eyes and respiratory organs. Therefore, finishing should be done in protective glasses, a respirator (can be replaced with a gauze bandage dipped in water), gloves, a kerchief and special clothing (the overalls are ideal).

As you can see, whitewashing with their own hands is feasible for anyone who decides to refresh their homes. Observing the above rules, even a novice can finish the ceiling almost perfectly.
Reviews from the Internet: