The warm floor today is no longer a luxury, but a necessity: this solution allows you to control the thermal climate in the house and significantly save electricity during the heating season. On the benefits, as well as the types and rules for installing underfloor heating will be discussed in more detail.
Advantages of a warm floor
The warm floor system is not new: 5 thousand years ago, the method of warm floors was used in Turkish and Egyptian baths. Such durability of the method indicates the presence of clear advantages and merits.  Among them are the following:
- thoroughness - warm floor is not able to fail. Once you install such a system, you will no longer worry about the leakage of pipes and the need to replace them, as is the case with central heating;
- good uniform warming up - a heated floor can be used as an additional source of heating or as a main one, completely abandoning central heating: heated floors can evenly heat the air at a distance of up to 2.5 m - this is the standard height of ceilings in apartments;
- economy - when installing a warm water system, you save up to 60% of electricity, which is especially noticeable when heating large rooms and territories;
- no need for additional devices and equipment - the floor heating system is equipped with a special device that completely controls the process and outputs data to a special monitor;
- possibility of self control - you can always set the temperature you need, turn off the system in case of departure, or keep it at minimum levels;
- modernity and compactness - This system allows you to abandon the traditional bulky sources of heating, to expand the space and give the interior lightness and relevance;
- availability - among the existing options for a warm floor, you can choose one that is suitable for any wallet and will satisfy the most sophisticated consumer.
Learn how to make a blind area with your own hands, remove the whitewash from the ceiling, lay the paving slabs in the country, arrange the front garden beautifully, and pave the paving tiles for the summer cottage yourself.
Types of floor heating
Today, there are 4 main types of warm floors, distinguished by the power source. Each of them has its advantages and disadvantages.
Water
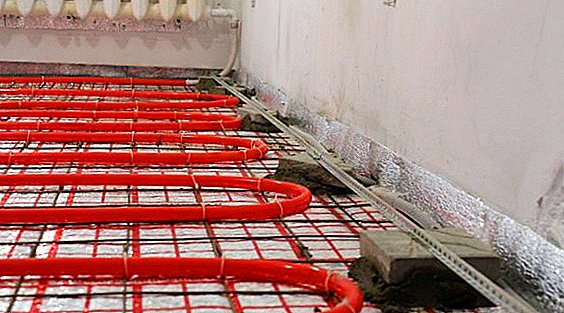
This method is used mainly in new buildings or private cottages and houses. The water floor heating system does not connect to the central heating riser - this is prohibited, since the water, passing through the floor tubes, returns to the riser already in a significantly cooled form, and, as a result, your neighbors will have not hot, but only slightly warm water. Installation of a water floor system takes place with the help of an individual heat exchange riser, which can be installed only in a new building or in a private house. Scheme of water floor heating.
Going to do repairs, it is useful to learn how to glue wallpaper, how to make plumbing in a private house, how to put the outlet, how to make a plasterboard partition with a doorway, how to put a light switch, how to install a flowing water heater, and how to sheathe plasterboard walls.Video: when it should be, and when there is no to install a heated floor Despite this limitation, this method is one of the most popular and effective: firstly, it significantly saves electricity, and secondly, it is absolutely harmless - it does not emit infrared rays and magnetic radiations. Also, the installation of this type of system does not require large financial expenditures, besides, even in case of loss of electricity, you will not be left without heat.
Did you know? Heating elements, which are used to heat modern homes, can be completely different shapes and sizes. So, in the Korean market radiators in the form of pigs and even tyrannosaurs are presented.This system is suitable for all floor coverings: it is harmless and non-toxic. The two main drawbacks of the water system are the possibility of leakage of pipes and the lack of full control of temperature control (it will depend on the initial water temperature).
Electric
In comparison with the water method, the electrical system has a wider opportunity for use: it is suitable for both residential buildings and offices and various technical and industrial premises. A clear advantage is the ability to fully perform thermoregulation, to program the temperature for a certain period.  In the event of a breakdown, it will take very little time to establish the cause, and there is also no risk of flooding the floors (unlike the water system). Also, when installing such a system, it does not take much time and bulky equipment - the electrical system is installed, as a rule, in 2-3 hours. The negative factors of the electric floor are:
- inefficiency, high cost of consumption;
- increased danger of electric shock due to improper installation or operation;
- additional costs for RCD and grounding;
- the presence of an electromagnetic field that can adversely affect meteo-dependent people;
- wood flooring damage: natural wood cracks and cracks under the influence of an electric heating element;
- a slight reduction in the height of the ceiling (sometimes when laying heating elements the floor rises to 10 cm);
- the need for powerful and high-quality wiring, especially when heating large areas;
- dependence on electricity - in the event of a blackout you will be left without heat.
Video: which electric floor heating is better
Important! A significant part of the deficiencies of warm floors is due to their improper installation and operation. To avoid this, use the services of only professionals and carefully follow the instructions for proper use and care of the warm floor.
Film
The film model works on the principle of infrared radiation: when an electric current passes through a heating element, an electromagnetic wave is formed, which raises the temperature of everything around it. This principle of sunlight - they warm not the air, but objects, which then give their heat to the air. Thus, the film element gives its heat to the floor and floor covering, and through it all the air in the room is already heated.
Prepare window frames for winter.The main advantage of such a system is a quick and uniform heating of not only the floor, but also the entire room - in a short time infrared rays can heat up even a very large area. In addition, the advantages of this method are quick installation, preservation of floor height, no need for pre-screed, electrical economy, air saturation with ions, antiallergic effect and the absence of excessively dry air (unlike the electrical system, which is able to overdry the air).
 Disadvantages are the need for a flat floor surface (sometimes plywood is placed under the film to achieve perfect smoothness), infrared radiation, which can adversely affect weather sensitive people. Also, infrared flooring is used only in open areas that are not cluttered with furniture: when such a warm floor comes in contact with furniture, excessive heating and disabling of both furniture and other devices (especially electrical ones) can occur. As a result, the infrared system is used quite rarely, although in its effectiveness it occupies a leading position.
Install the air conditioning system at home, and lay the paving slabs in the country.Video: infrared film warm floor installation
Cable type
This method is also called thermo-matt - thin cable tubes are mounted on mesh mats. Such mats are always laid on cement or sand screed. In this type of system, the heating element is carbon powder - carbon, located directly in thermomata. Mats come with one heating dwelling or two: double-core ones are safer, and they are recommended to be used in rooms where people spend most of their time: children's rooms, bedrooms and kitchens.  The advantages of such a heating system are efficiency, coverage and heating of a large area, the absence of infrared radiation. Floor height also does not change. The disadvantages are the need for a special screed and the possibility of drying the natural wood covering or wooden furniture, so cable thermomats are laid under tile, tile or laminate.
Remove the old paint from the walls of different materials.Video: installation of a heated floor thermomat
Pipe Layouts
When installing a heated floor, an important step is to choose not only the type of system itself, but also the method of laying the pipes. There are three main ones - snake, snail and combined method.
- Snail (spiral) - one of the most commonly used pipe laying methods. When mounted in this way, the pipes are first launched around the perimeter of the entire room, and then in a spiral, tapering towards the center of the room. A huge advantage of such a system is the uniform distribution of heat throughout the carrier, which excludes heat losses and thermal wells. In addition, it is possible to control the installation step — lay the pipes at a distance of 8 to 50 cm. Today, the cochlear laying method is the most reliable and efficient, besides, it is the least labor-intensive to install (the pipe does not bend much, but forms smooth transitions). With the installation of such a system can be managed even alone. The snail layout allows you to warm the premises of various shapes and sizes without any difficulty. It is not necessary to cover the entire floor with a snail, for example, you can go around those areas that are not needed for heating, for example, the space under the cupboard or sofa.

- Snake - significantly less used method of laying pipes. Due to the fact that the pipes are arranged as a snake, a number of drawbacks and inconveniences of this method arise. The first and most basic drawback is that some heat loss occurs, especially with a water heating device - the pipes only heat the floor on one side, and when they reach the end of their circuit, they have time to cool down. From here you get a hot floor on one side of the room, and a little warm - on the other. Also a disadvantage is the difficulty of installation: due to the fact that the pipes often and strongly bend (at an angle of up to 180 °), they become more fragile and often deform later. This method of laying is usually used for small rooms, not cluttered with furniture (enveloping furniture in the "snake" way is very troublesome and difficult), or for heating very small narrow spaces (for example, a corridor).
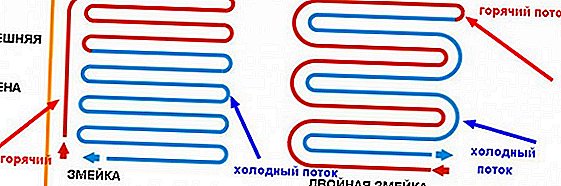
- Combined - consists of a combination of both a snail and a snake, or the duplication of a single method (double coil of a snail or a snake). This method is used to more intelligently provide heat to the room, for example, in places where strong heating is not needed, a snake is laid, and where more heat is needed, the tubes are laid by a cochlea. Doubling the coils of both the snail and the snake is used for greater heat transfer and a better warming up of the room.


 Sometimes not only styling techniques are combined, but also the systems themselves - for example, they put water and electrical systems together. This is rational for cases with drops of electricity: if you turn off the electricity, you can warm the room with the help of a water system. Video: styling rules
Heating system design
Before you start laying a warm floor, it is necessary to design and consider all the details of this process. First of all, you need to determine whether the warm floor will be the main source of heating or auxiliary. In the case of a thief, it is possible to do without design, but if the heated floor is the main heat sink of your house, nothing will work out without careful planning.
After the function of the underfloor heating is determined (main heating or auxiliary), the system that is most efficiently suitable specifically for your room is selected directly. We have already figured out that in apartments with centralized heating, the installation of a water system is undesirable, but the electric one could not be better. For large areas, it is best to use a film type with infrared radiation, and for kitchens and baths with a tiled coating - cable type.
We align our site, and build a cellar, a veranda and a perlog.After the tasks are defined and the type of floor heating system is selected, the design of the project itself begins. It is necessarily necessary when installing a water system (in the new building, official services will be able to mount such a system only on the basis of an approved project), as well as for an agreement with builders or contractors. Such a project can be done either independently or entrusted to installers.
Video: two mistakes in the design of warm floors
The project must indicate:
- the plan of the apartment / house, where the measurements of windows, the height of the walls, the area of the territory, etc., are indicated;
- description of the material of the outer wall, types of windows and door partitions;
- the required temperature that should be in the rooms;
- location of a water boiler or electrical panel;
- location of risers and grounding;
- apartment design project indicating the location of the furniture.
Did you know? The first system that warmed the home was invented by the Romans 200 years BC. er They used an underground furnace that heated the space under the floor.
Installation
In order for heated floors to last for a long time and not deform over time, it is necessary to pay a lot of attention to their installation. Even if you have not previously laid such a system of warm floors, you can read the relevant literature, perform this procedure qualitatively and correctly. 
Calculation rules
There are standard schemes and calculation rules that have been successfully applied for many years. So, for the water floor heating system there are such rules:
- for every 10 meters square, 16 mm pipes are used, whose length is 65 meters;
- water pump is installed on the flow of 2 liters of water per minute;
- the distance between the laid pipes should not exceed 15 centimeters;
- The recommended laying pattern is a snail.
Important! Please note - when installing a water heated floor, the difference between the temperature of the boiler and the floor surface itself may be 15-20 °.For electrical, infrared and cable systems, there are such rules:
- The installed capacity of the heater must exceed the heat loss by 30%. So, for bathrooms the power is set at 150 watts per square meter, in the kitchen, respectively, up to 140 watts, on the balconies - up to 130 watts, in rooms located on the 1st floors of buildings - up to 200 watts per square meter;
- the optimum pipe spacing on an area of 10 square meters is 10 cm, length - up to 60 cm;
- The recommended installation is a cochlea or a combined scheme.

Mapping
Before installation, a scheme is drawn up, on which is indicated:
- pipe layout plan for the selected area. And if the installation is meant immediately in the whole apartment, then the plan should be a common, with the location of the pipes on the entire surface of the housing. Be sure to take into account the location of the furniture;
- taking into account the height of windows and doorways, as well as the location of central heating batteries - floor heating pipes are not located near the batteries, the minimum indent is 20 cm;
- the location of electrical or water communications under the floor - often all the extra electrical wires are hidden in the “cake” of the heated floor, which improves the appearance of the room;
- screed calculation - in large areas do not pour a monolithic screed, and break it into pieces;
- the location of pipes near the doorways - this will not damage them later when installing dowels;
- If possible, avoid sharp turns of pipes in the diagram - remember: strong bends reduce the effectiveness of pipes.
Did you know? The human body feels the temperature in +42 ° C as "warm", but above +45 ° C - it is already "hot" or "hot."
Foundation preparation
After designing, calculating and drawing up the layout scheme, the base for the pipe installation is prepared:
- the floor is leveled using a pre-concrete screed - this is necessary for a perfectly level floor: there should not be a difference in height, any cracks or slopes;
- small irregularities can be filled with sand, large cracks are leveled only with a concrete tie;
- for a water heated floor, after the initial leveling tie has been completed, waterproofing is applied - it prevents the concrete and the insulation from getting wet;
- after installation of waterproofing it is recommended to carry out test work: test the floor for tightness of the connection and check whether leaks occur. If there are flaws in waterproofing, they need to be addressed.
- thermal insulation is laid over the waterproofing (this is done for both water and electrical systems) - it can be a heat insulating mat, foam concrete or a polystyrene plate. Its function is to provide heat retention and prevent leakage.
Video: foundation preparation Remember - infrared plates can not be laid in a "wet way", for example, the alkaline environment of cement can deform it strongly. Therefore, these plates are stacked only on a dry substrate. After the base has been installed, the installation of the collector cabinet begins.
Installation of a collector cabinet
Collector cabinet, water or electric, is located on the wall near the floor surface - it is always the same for all pipes in the area. Inside this cabinet, all heating elements are joined to the main heat supply of the house, and floor temperature control elements are also installed in it. In some cases, the cabinet is not mounted on the wall, but is located in a special niche on the legs. The height of a standard cabinet is from 650 to 750 mm.
Video: collector for warm floor
Pipe laying
The pipe is laid as follows:
- Insulation fit reinforcing mesh with the selected cell size.
- The tube is laid from the collector cabinet, and the reserve is left for fixing the pipes to the collector node. It is best to perform the entire circuit from a single pipe, without couplings - this significantly reduces the possibility of leakage.
- The laid pipes, with preservation of the pitch, are fixed on the reinforcing mesh with plastic clamps. These clamps are not tight to prevent overstressing of the material.
- Direct laying of the pipe takes place exactly with the pre-made pattern. If for any reason there is a deviation from the scheme, it must be fixed on the design scheme. The pipes should not intersect or closely adjoin the partitions or the wall (at least 20 cm of indentation must be maintained) - otherwise the heat transfer conditions will be violated.

System connection
This stage determines whether the installation was done correctly and whether there are any problems in the work performed.
- The ends of the pipes are stacked on the inlet to the collector cabinet. They are trimmed with a pipe cutter (for a smooth cut).
- A compression fitting, a nut, a split ring and a nipple are put on the ends of the pipes. Press ticks crimped split ring. The cap nuts are tightened with a wrench.
- Where the ends of the pipes are taken out of the floor, protective metal corners are additionally installed (protection from mechanical damage).
- In cases where the warm floor has several circuits, the system is balanced. The protective caps of the balancing valves are removed from the manifold assembly, and the valves themselves are screwed with a key up to the stop.
- The system is connected (a current is started in an electric floor heat, in a water one, water is pumped by a pump).
 The scheme of connecting the heated floor to the heating system.
Tests
Heated floor must be checked for leaks. This is done either with water (for a water system) or with compressed air (it is injected by a compressor). The required pressure of water or air is determined in accordance with the project. Such pressing of the water floor laid on the concrete pavement is carried out before pouring the final concrete screed.
Important! Manufacturers of warm floors always check the systems in the factory, issuing a warranty certificate. Therefore, if during testing some problems were discovered, most likely it is the result of improper installation or design.But if such a floor is laid on a wooden base or with a polystyrene floor heating system, pressure testing is done immediately before stitching the pipes with plywood sheets. Heating circuits are checked alternately - each circuit is filled with water until the air is completely displaced. To do this, open and close the thermostat valves or flow meters. After conducting this kind of test, the pipes are closed with a final coupler.

Screed
The final screed is one of the last stages in the installation of a warm system:
- Concrete (usually brand 400) is kneaded. On the floor are exposed beacons.
- The water floor system before the coupler must be filled with water or air - this is done to avoid deformation of the water pipes.
- The tie is laid out on separate sections, leveled by the rule, the evenness of the beacons is checked.
- After casting the screed gains its maturity within 27 days. During this period, you need to make sure that its top layer does not dry out (otherwise cracks will appear), for this purpose, the concrete screed is sprayed with water and covered with a film that retains moisture.
Did you know? A person feels warm or cold with the help of special thermoreceptors, which are located over the entire surface of the body. They are of two types - some react only to heat, and others - only to cold.
Coating
The final coating is laid on top of the concrete: the tile is laid on tile adhesive, laminate and parquet - using a special substrate, while linoleum is laid immediately on a concrete screed. Please note that for a warm water system the coating should be chosen especially carefully: if, for example, an electric or infrared floor can be quickly cooled in case of overheating, the water pipes will remain hot for a very long time, which can deform the natural wood and laminate from the inside. Therefore, the laminate is best used for infrared floors, plates - for water, parquet and natural wood - on the electric floor.  Selection and installation of flooring are the final step in installing a floor heating system. We reviewed the basic rules for selecting and installing a floor heating system. Underfloor heating today is a necessary system in every modern home: it is not only practical, convenient and safe, but economical. Of course, such characteristics prove that warm floors are not only possible but necessary to be installed: this will significantly reduce costs and have heat in the house all year round.
Video: floor coverings
Reviews from the network