If you are a household owner, this article will help you in organizing the heating of the incubator. You will find out which heating elements exist and which models are most effective. We will also focus on homemade incubators - detailed instructions for several models will be offered to your attention.
Heater Purpose
In order for normal chicks to breed from a normal fertilized egg, certain conditions must be observed in the incubator. The purpose of the heaters is to create conditions that are as close as possible to those that the hen bird creates for its future offspring. 
Ideal conditions are possible only with properly selected heating elements. The percentage of hatchability directly depends on the heater. It is the main part of the incubation design, which provides optimal conditions for the process of breeding chicks.
To do without such elements is almost impossible. In the case of underheating, the development of embryos will slow down significantly, and many individuals will simply die.
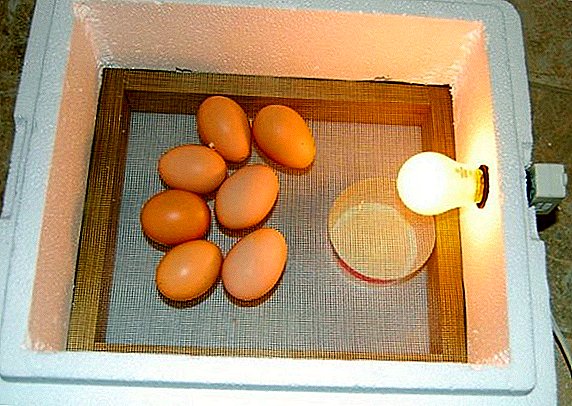
The heating element in the artificial "hen" is a separate part that creates and maintains the required temperature indicators during the entire incubation period.
Did you know? The Chinese managed to synthesize a chicken egg. Falsifiers have hidden their names. However, scientists were able to uncover the technology by which the fake was created. So, the shell is made of calcium carbonate, and the content is simulated using food additives, coloring matter and gelatin. Outwardly, it is very difficult to distinguish a fake from a real egg, but the taste of the product is completely different.

Incubator Heater Types
Each type is characterized by certain advantages and disadvantages, correlating which you can decide which heater is most effective for your household.
Heat films
Heating films quickly pick up the temperature and just as quickly cool without inertia. The film itself does not warm the air. The technology consists in heating the object that is in front of the film, and the object itself heats the space.
Heating films are more often used on an industrial scale. The advantage of the product is that it consumes little electricity, but at the same time it is capable of keeping heat at the required level for a long period.
If you want to feed the film from the battery, then you will need to purchase a suitable inverter. It is necessary to lay a reflective substrate under the thermal film. This measure will allow heat to remain in the incubator. 
The main drawback of the film heater is the difficulty in replacing it (one cannot do without the help of a specialist). Another disadvantage is the high cost of the product. In addition, the film is not so easy to find on sale.
Thermal cords
Carbon fiber cords, like films, quickly pick up the temperature and cool quickly. There is also no thermal inertia, so there is no passage in temperature. Cords are usually used for hatching in industrial machines.
This heater is very long. The only thing that can destroy it is mechanical damage to the braid, and then - fibers.
Despite minor flaws, the heat cord is one of the best types of heaters on the market. You can safely connect the product directly to the thermostat - the cord does not dramatically change the resistance, so it will not fail. 
Important! It is very important to correctly calculate the length of the thermal cord, without making mistakes. Otherwise, the consequences can be the most unpleasant, even the fire. Therefore, winding is carried out with utmost care.
Infrared
Every day, infrared heaters are becoming increasingly popular. These are products of a new generation, devoid of the minuses peculiar to their predecessors. Such heaters are resistant to moisture, they consume several times less electricity, allow you to accurately regulate the temperature in the “mother hen”.
But their main advantage is that they evenly distribute heat, while spending a minimum of electricity. This makes it possible to save a lot, since the heater must function continuously for 18–20 days.
The only drawback is the need to stock up additional lamps, since during damage it is almost impossible to find suitable lamps in the house. 
The essence of the device under consideration is the heat exchange between the egg and the air - the heat from the radiator's surface is transferred directly to the heated eggs, and the air inside the hen is heated from the heated eggs.
Tenovye
TEN heating of an incubator is also widespread. TEN is one of the most reliable (safe) methods of heating with low electricity consumption.
Unlike incandescent bulbs, the heating element does not create illumination in the incubation chamber. Eggs are in the dark, that is, similar to the natural conditions (as under the hen). By the way, today most of the EU countries have already abandoned the use of tube heaters in "hens".
Heaters transmit heat evenly around the perimeter of the chamber. Plus, these devices do not take up much space in the incubator. 
However, heaters have a number of disadvantages. First, there is thermal inertia, which is dangerous because of the risk of overheating of the eggs. Secondly, it is required to isolate metal parts, since they are subject to rusting. In addition, the built-in heater will be difficult to change in case of breakage.
Did you know? Some people from just one type of chicken eggs attend a sense of horror and panic. The scientific name of this phobia is ovophobia (literal translation - "fear of oval objects"). The reasons for the formation of this fear has not yet been found. Around the world, one in 1,000 adults suffers from this phobia. Ovophobia was even famous "horror king" Alfred Hitchcock.
Lamp
Lamp heaters are most in demand among owners of home farms. This variety is good to use in that it can be easily replaced if damaged. For this, any other lamp available in the household will fit.
Regarding the minuses - the heat is often unevenly distributed, significant temperature differences are created. This disadvantage is especially noticeable when using incandescent bulbs. 
Halogen ceramic lamps also have several disadvantages. It is difficult to apply them in practice due to the fact that they radiate heat in a specific way. Sometimes it is very difficult to control the level of heat supplied.
Another disadvantage is the continuous transmission of light, which is not the case during the natural process of breeding chicks.
Basic requirements for an incubator
For the full development of embryos and hatching healthy chicks, a special microclimate must be organized in an artificial "hen". The main requirements in this case are temperature and humidity.
It will be useful for you to learn how to choose an incubator for eggs, how to choose a household incubator correctly, and also familiarize yourself with the main characteristics of incubators such as Blitz, Layer, Cinderella, Stimulus-1000.
Therefore, the future incubation chamber should be designed in such a way that you can constantly and freely monitor the level of temperature and humidity (that is, the device must be equipped with a thermostat). 
Maintaining the eggs of most species of birds is carried out at a temperature of +37.1 ° C to +39 ° C. Underheating and overheating are not allowed. First, the eggs must be heated to the required maximum, shown for a particular bird species, and in the last days before sampling, the indicator should be reduced to a minimum.
An exception to this rule is quail eggs - during the 17 days of incubation, the constant temperature should be maintained at +37.5 ° C.
The following are the required temperature conditions for different types of poultry:
- holding temperature chicken eggs - + 38-39 ° С, necessary indicator in recent days - +37.6 ° С;
- figure in the first days of aging duck eggs - +37.8 ° С, in the last days - +37.1 ° С;
- desired temperature in the first days of aging goose eggs - +38.4 ° С, in the last days - +37.4 ° С;
- required rate in the first days of aging turkey eggs - +37.6 ° С, the indicator in recent days - +37.1 ° С.

Humidity should also change. Install a humidity controller and make sure that until the moment of inclination the humidity indicator in the chamber was 40-60%, and between the naklev and hatching moment of the chicks was maintained at 80%.
And just before sampling, the moisture index must be lowered again to 55-60%.
How to determine the optimal size of the incubator
The dimensions of the artificial "nesting place" must be calculated in advance. The choice of dimensions depends on the volume of production to which you are aimed, as well as on the number of eggs placed in the chamber at a time.
Medium-sized equipment (length - 45-47 cm, width - 30-40 cm) can accommodate the following (approximate) number of eggs:
- Chicken - 70 pieces;
- duck (turkey) - 55 pieces;
- goose - up to 40 pieces;
- quail - 200 pieces.

In addition to the above, the size of the fixture is influenced by the type of heater and the fixing position of the heating lamps. The material from which you expect to build an incubator is also important - if the chambers are the same capacity, the foam model will be more voluminous than the cardboard version.
Did you know? Sometimes chickens lay eggs without yolks.
Automatic model from the refrigerator
The second-hand case of the refrigerator is perfect for creating home-made "nesting". The internal space of the refrigerator reliably maintains the set temperature. Another plus is that sections and shelves of household appliances can be easily applied under trays for eggs.
At the same time, the internal volume is quite enough for installation in the lower part of the fluid exchange system, which will allow controlling humidity.
Before proceeding with the immediate assembly of artificial "hen" on the basis of the refrigerator, let us dwell on some important points. 
According to the recommendations given in the previous sections of this article, select and install a heating system, as well as a thermostat.
In addition, to ensure ventilation on the ceiling and in the floor of the product by all means, make holes. To prevent air from penetrating into the fiberglass layer under the skin, insert plastic or metal tubes of suitable size into the spans.
Learn more about how to make an incubator from the refrigerator with your own hands.
The standard function of turning the tray with eggs in this design is performed by a special mechanism, which is mounted as follows:
- Place the gearbox at the bottom of the refrigerator.
- Then place a frame made of wood that will hold the trays. Mount them in such a way as to ensure the tilting of the trays by 60 degrees in the direction of the door and the same amount in the opposite direction. The gearbox must be firmly fixed.
- Attach the stem to the motor with the egg tray at the other end of the motor.
How to make a home incubator from the old refrigerator: video
Now you can go to the immediate arrangement of the incubator:
- Drill several passes for electrical wiring and one pass-through for ventilation system in the upper wall of the refrigerator.
- Drill a minimum of 3 spans of 1.5 cm in the floor of the case.
- Finish the interior walls with foam.
- Then you need to convert old shelves in trays for eggs.
- From the outside of the refrigerator, install the thermostat, and from the inside fix the sensor.
Learn how to choose a thermostat for an incubator, whether you can make a thermostat with your own hands.
- Install a pair of small fans near the lights at the top of the camera.
- Cut a small opening in the door, sealing it with transparent plastic. This will be a viewing window.
Automatic foam model
Expanded polystyrene is considered one of the best in terms of convenience materials for the assembly of homemade "hen". The material is popular not only due to its affordability, but also due to its excellent insulating ability. Many are also attracted by the light weight of expanded polystyrene and the simplicity of working with it.
Incubator from polyfoam of own production: video
Step-by-step instruction:
- The sheet of foam will be divided into four equal pieces; they will be used for mounting the side walls of the structure.
- Another sheet cut into two equal parts. Cut one of them into two more pieces so that the first one is 60 cm wide and the second one is 40 cm. A sample with a size of 50x40 cm will be used for the bottom of the chamber, and a piece with a size of 50x60 cm will be its lid.
- Cut a 12x12 cm span in the future cover and seal it with a transparent plastic - this will be the future viewing window.
- From the same fragments obtained after processing the first sheet, glue the supporting frame.
- Next, fix the bottom. To do this, apply glue on the edges of a 50x40 cm sheet and carefully insert the sheet into the frame.
- After assembling the box, proceed to the careful gluing of the body with tape, due to which the structure will gain strength.
- Cut two more equal polystyrene foam bars (6x4 cm each). Lock the legs inside the chamber to the bottom along the long walls.
- In short walls (40 cm long) at a height of 1 cm from the bottom of the structure, make three passes with a diameter of 1.2 cm to ensure the movement of air flow. The distance between the aisles should be the same. It is desirable to burn all holes with a soldering iron.
- To ensure that the lid is securely fastened to the structure, glue the foam plastic bars (2x2 or 3x3 cm) along the edges of the lid. And in order for the bars to accurately enter the device, the distance between them and the edge of the sheet must correspond to 5 cm.
- Next, outside the cover, install the lamp holders. Make it arbitrary.
- Lock the thermostat outside the cover. And install its sensor inside the incubator at a height of 1 cm from the level of eggs.
- When fixing the tray with eggs, make sure that the gap between the tray and the walls of the chamber is 4-5 cm. This is required to guarantee optimal air circulation.
Important! To keep the warmth for as long as possible in the home-made “nesting place”, glue all the walls on the inside with insulating foil.
Model out of the box
A cardboard box incubator is the cheapest of all the options offered by home incubators, but at the same time the most fragile. The model is quite simple - it will take no more than 2-3 hours to assemble the product. Production of the cardboard model in many ways resembles the manufacture of analogue of expanded polystyrene.
Incubator from the cardboard box do it yourself: video
Sequencing:
- Find a medium sized unsuitable box in the household (for example, length - 56 cm, width - 47 cm, height - 58 cm). On the inside, gently glue the box with felt or several layers of paper.
- Do in the box a couple of passes for the wiring. From the inside, fix three bulbs (25 watts each). Cover the remaining gaps with cotton wool. Bulbs should be positioned 15 cm above egg laying level.
- Provide ventilation systems. To do this, make in the walls of the box a few small holes.
- Cut a viewing window in the upper wall (approximate dimensions - 12x10 cm). Through this window you can keep track of everything happening inside the artificial "nesting". Do not forget to close the window with transparent plastic.
- Separately engage in the manufacture of wooden trays for eggs, fastening rails, which will be mounted trays, as well as the door.
- Inside the incubator, place the thermostat to control the temperature. And to maintain optimal humidity at the bottom of the chamber fix the vessel with water.
Important! Cardboard "hen" is undesirable to place on the floor. To ensure natural air circulation, it is better to install the product on wooden bars up to 20 cm in size.
Now you know how to equip an egg incubator yourself. This is not a very time-consuming process, but before installation it is recommended to work hard on the project so as not to miss the possible nuances that may arise during the manufacturing process.