Poultry farmers often resort to obtaining a new brood with the help of incubation. This is due to the fact that many duck breeds have lost their maternal instinct and do not hatch eggs. In the other case, mass reproduction of a new generation may be required, which is possible in such a large number only in the conditions of an incubator. When breeding ducklings with an incubator at home, it is necessary to know some basic rules, following which will be the key to a healthy and viable brood.
Which eggs are suitable for incubation
The process of incubation begins with the selection of egg products. This is a very crucial moment, since the viability of future offspring depends on the quality of the eggs.  And you need to pay attention not only to the appearance, but also to the purity of the eggs, because polluted shells will cause reproduction of dangerous pathogenic bacteria, which then can mow half of the young herd.
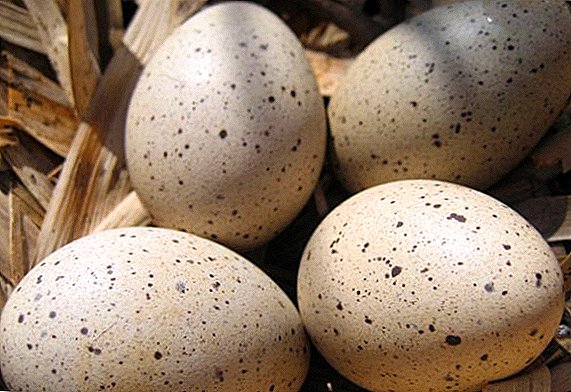
Important! A duck egg intended for a bookmark should look perfect - about the same size and oval or roundish, perfectly smooth and clean.
The main points that you need to pay attention to when selecting:
- weight - duck eggs are large enough, their weight should be from 75 to 100 g;
- form - it should be ordinary, one can say classical, without undue deformation, not elongated, not round and not distorted;
- the shell is clean, without pollution, smooth and thick, the color is usually slightly with a greenish tint. The main thing is that there should be absolutely no defects on the surface - neither chips, nor scratches, nor cracks or deformations, without growths and nodules.

Rules for storing eggs
- Only fresh egg products can be put into the incubator. Storage is allowed only for 5 days (maximum week), but no more. The storage form is a tray made of plywood, the storage temperature is about +12 ° C (minimum temperature is +8 ° C), and the humidity is within 70%. Also think about good ventilation.
- During storage, the eggs must be turned from one side to the other 90 ° several times a day. This will avoid displacing the yolk in any direction that will prevent the embryo from sticking to one of the sides of the shell.
- It is important in what position to store the product. So, it is better to place small duck eggs in such a way that they look with a blunt end at the ceiling, and sharp - down. But large ones are recommended to be placed so that they are in a semi-inclined position.
- In any case, it is best to lay the eggs as fresh as possible in the incubator. It is recommended that the poultry house be thoroughly cleaned in the evening, paying special attention to the nests so that the eggs are not contaminated and bacteria cannot settle there. But in the morning you can start collecting. Ideally, you will spend every hour collecting — in this case, completely clean, healthy and absolutely fresh specimens will fall into your incubator.

Additional egg scanning
Ovoskopirovanie - so-called process of x-raying eggs under a light source - an over-scope Ovoskopirovaniya allows you to verify the viability of the embryo.
Learn what an ovoscope is and how to make it yourself, and also, learn how to properly equip eggs.
This procedure also helps to detect previously inconspicuous defects - for example, microscopic cracks, defects under the shell, moldy spots or spilled yolk.
Translucence is the method by which it is possible to determine the state of the yolk and protein inside and to identify incompatible with the vital functions of the deviation.
For example, under the translucent egg must meet the following requirements:
- the yolk should be located only in the center, without the slightest shift to the side;
- the yolk should not be absolutely immobile and stick to the inner surface of the shell;
- also, the yolk should not hang from side to side without any binding to the center;
- the protein looks completely transparent and there are no additional spots or inclusions;
- the air chamber should be small in size and located only on the side of the blunt end or very close to it;
- there should be no dark spots inside;
- The presence of two yolks is unacceptable.
 If an egg meets all these criteria and there are no external damages or defects on it, then it is considered viable and suitable for incubation.
Do I need to wash before laying
On this issue, many poultry farmers argue. The reason for the dispute is that duck eggs themselves are rather dirty, unlike the clutches of other birds.
Learn how to wash and disinfect eggs before laying in the incubator and how to properly disinfect the incubator.
In addition, the ducks themselves during hatching often touch the clutch with wet paws, and this does not affect the quality of the offspring.
Therefore, some farmers are of the opinion that washing the shells is useful and even necessary to get rid of pollution and possible bacteria.
Important! To avoid the loss of young stock, it is not recommended to wash the duck eggs before laying in the incubator.
However, in fact, this procedure is not entirely desirable. Washing eggs is a process that violates the microflora on the surface of the shell. During washing, the cuticle on the surface is damaged, which ultimately affects the hatchability of offspring.  It is best to initially select pure egg products. Fulfillment of such a condition in itself provides some guarantee that the shell contains the minimum number of pathogenic bacteria.
However, despite the external purity of the eggs, they still need easy, but mandatory disinfection. To do this, just drop each egg in a weak solution of potassium permanganate for a couple of minutes.
All manipulations must be carried out very carefully and carefully, as even the slightest scratch or chip on the shell will adversely affect the final brood.
Egg laying
The process of laying egg products in an incubator begins with placing the device in a specially designated room. It is recommended that other poultry or animals should not be kept in the incubation room, this room should be used only for breeding ducklings.  An important parameter of this room is humidity. It should be exactly the same as in the hen's nest and nest.
After that, the prepared duck laying starts to be immersed directly in the incubator. Check the products again for quality, enlighten with an ovoscope, examine every millimeter of the shell.
It will also be useful for you to learn how to choose high-quality eggs for incubation, as well as see the table for incubating duck eggs at home and the characteristics of growing ducklings from the incubator.
Further actions should be as follows:
- The incubation apparatus before laying the egg products is preheated to the required temperature.
- All trays before being placed in the incubator are well washed out and cleaned.
- It is necessary to put a container with water in the incubator pan, which is necessary for humidifying the air and maintaining the required level of humidity.
- Egg products are carefully laid in the incubator, placing it horizontally - this is the most optimal position for duck eggs. And although they occupy more space this way, it means that fewer ducks will come out of one incubator, but the hatchability in ducks in this position is much higher.
- The first to lay the apparatus of the largest copies, and after 4 hours - medium and small.

Incubation mode of duck eggs: table
After laying the egg products in the incubator, the process of incubation begins. In ducks, this period is quite long.
Important! If you have a modern incubator with the function of controlling humidity, temperature, air circulation and turning eggs, then you are freed from almost all the difficulties associated with incubating breeding ducklings.
All this time, you must carefully and daily monitor the incubation process and perform the necessary actions:
- At the time of laying in the incubator in the apparatus, the temperature should correspond to +38 ° C heat. This temperature regime must be maintained during the first 7 days, after which it is reduced to +37 ° C. Humidity at this time holds up to 70%. The position of the eggs during the day must be changed at least 4 times.
- All the rest of the time (from the 8th to the 25th day of incubation) the temperature is kept at +37.8 ° C. Turn the eggs up to 6 times a day, and the humidity is reduced to 60%.
- From the 15th to the 25th day, the products in the incubator begin to cool. This is due to the fact that duck eggs have a large heat transfer, and, so that they do not overheat, during this period, twice a day, you just need to open the appliance door, ventilate it for about a quarter of an hour (about 15-20 minutes).
- In the last days of incubation (from the 26th to the 28th), the temperature is slightly lowered to +37.5 ° C, but the humidity is increased to 90%. At this time, the eggs are no longer turned and do not air.
- From the 27th to the 29th day, the process of breeding chicks lasts. Ducklings should not be taken out of the apparatus until they are completely dry.
 This whole process is clearly shown in the table.
| Period | Dates, days | Temperature, ° C | Humidity,% | Turn, once a day | Cooling, once a day |
| 1 | from 1 to 7 day | + 38-38,2 ° C | 70 % | 4 times | - |
| 2 | from 8 to 14 day | +37,8 ° C | 60 % | 4 to 6 times | - |
| 3 | from 15 to 25 days | +37,8 ° C | 60 % | 4 to 6 times | 2 times for 15-20 minutes |
| 4 | from 26 to 28 days | +37.5 ° C | 90 % | - | - |
Important! To control the process of incubation, periodically carry out the procedure of ovoscoping. Translucence is done on the 8th, 13th and 25th days of the incubation period. Those instances in which no development is observed or any irregularities and defects are noticeable must be removed from the apparatus.
Stages of embryo development during incubation
During the incubation period, the duck embryo goes through 4 stages in its development. Taking into account these stages, the conditions of the regime inside the incubator are adjusted. 
- The first stage. It starts from the first day of laying the egg products into the machine and lasts for a week. During this time, the embryo has time to grow to 2 cm in length. He has a heartbeat, laid all the internal organs. The embryo at this time begins to need more oxygen, and the oxygen contained in the yolk becomes insufficient for it. Air consumption begins through the pores in the shell. During this period, it is extremely important to warm the eggs to +38 ° C and keep them at high humidity up to 70%.
- Second stage Lasts for the next week - from the 8th to the 14th day of incubation. Now the temperature needs to be slightly reduced (to +37.8 ° C), but the ventilation should be increased. To do this, you can open additional ventilation holes in the incubator. Just at this time there is a laying of the skeleton of the future duck. By the end of the 2nd stage, namely from the 15th day, you can begin to cool the eggs. This is a prerequisite for waterfowl, because their eggs contain a lot of fat and little water, but because they have a large heat transfer. The heat inside the eggs themselves can reach +42 ° C, and this temperature is fraught with the fact that the embryos will overheat. To avoid this, egg products must be further cooled. To do this, simply open the door of the incubator for 20 minutes. At this time, it will not be superfluous to slightly spray the egg products from the spray gun with warm, clean and distilled water, the temperature of which is about +27 ° C.
- Third stage starts from the 18th day of embryo development. At this time, he was almost finished his formation. Humidity now needs to be reduced to 60%. The heat in the eggs reaches + 40 ... +42 ° C, so you need to continue to cool and spray them twice a day.
- Fourth stage The incubation period starts from the 26th day. There is a direct withdrawal of ducklings. Since the shells of duck eggs are hard enough and ducklings find it hard to dam, it can be slightly softened. To do this, it is enough to increase the humidity inside the incubator, so during this period the humidity is increased to 90%.
 The incubation period ends with the hatching of chicks from eggs.
Did you know? An egg with a frozen embryo can be determined very simply: if you take such an egg in your hand, it will immediately cool down, because eggs without a developing embryo are not able to keep the temperature.
What day do ducklings appear
From the first day in the incubator until the birth of chicks to the light passes from 26 to 28 days. Usually, the spitting process starts on the 26th day and can last a little more than a day. Some late individuals can hatch only by the beginning of the 29th day, but not later.
These dates relate to the most common types of ducks, although other breeds may have longer. For example, the incubation period of a musk duck lasts from 33 to 36 days.
Check out the features of incubating musk duck eggs.
From the moment of the first inclination to full hatching, it takes about 24 hours. Moreover, at the first signs of inclination, all incubation products are transferred to the output trays. The pioneers are left in the incubator for some time until they are completely dry. 
And then transferred to a special room where the temperature would be about + 27-28 ° C.
Frequent newbie mistakes
Despite the fact that breeding ducklings is a rather unpretentious affair, nevertheless some novice poultry farmers make mistakes, which is why there is a high mortality rate not only of hatched chicks, but also of embryos during the incubation period.
The most common mistakes include:
- Too long storage time of egg products before laying in the incubator. After all, the longer the eggs lie, the less their hatchability in the end. They age, lose their properties, so the output of the chicks survival can be only 70-75%.
- Lack of disinfection. Duck laying is highly susceptible to infection by various fungi, mold and bacteria, for example, salmonella. After hatching, the chicks will be sick and unviable.
- Non-simultaneous laying of eggs in the incubator. This leads to a violation of developmental stages, their asynchrony, ducklings hatch at different times.
- Overheating germ. This leads to their death. Under natural incubation, overheating does not occur, since the hen-hens quite often detach themselves from the nest, and the future offspring during this time have time to cool down. In the incubator, the risk of overheating is very high. Therefore, it is necessary to regularly cool egg products and additionally spray with water from a spray bottle.
- Insufficient moisture. Compliance with this parameter affects the health of chicks and the ease of nesting their shells.
- Excessive moisture. This causes too much amniotic fluid to appear. It is dangerous to drown chicks in it even before they hatch.
- Overcooling during airing. May lead to the fading of embryos and cessation of development.
- A small number of coups. Because of this error, the chicks can stick to one side of the shell, which will cause developmental deformity, and the ducklings will hatch unviable.
- Too long illumination by an ovoskop. This is fraught with the fact that the eggs can overheat, because the ovoscope has a fairly strong heat transfer, so the scanning should take no more than 2 minutes.
 In general, the process of incubating duck eggs at home is not the most difficult thing and can result in a good brood if you follow the basic rules of incubation. Interference to ducklings survival becomes gross errors in the violation of temperature and humidity regimes.
Did you know? If a duck egg is applied to the ear at the last stage of incubation, then inside it you can hear the sounds made by the duckling - rustling, movement, and even squeaking.
It is also very important that all actions performed with incubated egg production clearly correspond to the stages of embryo development. In this case, you can count on a healthy and strong duck brood.