Self-made snow-removing equipment is very popular among summer residents and residents of the countryside for many years. And it is not surprising, because every owner of the dacha area faces the problem of snow removal in winter.
Of course, this can be done manually, armed with a shovel, but it will take a lot of time and will require physical effort.
Another option is to purchase a special snowblower, if available. But if the plans are not a superfluous purchase, then the snowthrower, made with his own hands with the help of an old engine tool, which was probably stuck in every garage, can help out. How to do this, and will be discussed in this article.
Did you know? The first rotary snow machines were invented in Canada. For the first time such machine was patented by Robert Harris, a resident of the city of Dalhousie (New Brunswick) in 1870. Harris called his car "Railway screw snow excavator" and used it to clean snow from railway tracks.
Auger Snow Blower - what is it
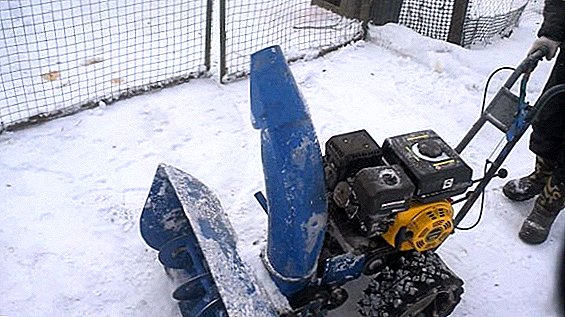
In order to properly make a homemade snowthrower with your own hands, it is necessary, first of all, to understand the design of its main mechanisms. Any snow plow consists of one main work item - This auger, which is located inside the welded metal body. The screw is a rod (shaft), along the longitudinal axis of which there is a continuous spiral surface. The shaft rotates on the bearings and thus drives the spiral profile. 
The principle of operation of the snow auger
By the method of cleaning snow, snow machines are divided into single-stage (screw) and two-stage (screw-rotor).
How does a single-stage auger machine work
The principle of operation of a single-stage or auger snow blower is that the raking, grinding and dropping of snow occurs only due to the rotation of the auger. And there is a jagged and smooth working edge of the screw: smooth - for cleaning loose snow; cog - for hard, icy snow cover.
Screw machines, as a rule, are lighter than screw rotors and can only be non-self-propelled. These are the so-called shovels on wheels that need to be pushed forward, which is why they rake the snow and throw it to the side. Snow auger is driven by an electric or gasoline engine (two-stroke or four-stroke). These machines are good because they are quite easy to operate, compact and inexpensive. 
The principle of the two-stage machine
The two-stage, or auger-mounted, snow blower has a slightly different structure. The first stage of its design provides for the snow to be raked by the auger; the second stage - the ejection through the chute is carried out using a special rotor - the impeller discharge.
The screw a in such models of rotor snow blowers is arranged by the standard principle of a screw shaft, with a smooth or gear edge. The screws can be metal steel or rubber, rubber-plastic, steel-reinforced, depending on whether the snow blower or self-propelled.
The impeller of the snow blower in two-stage rotary screw machines has from three to six blades and can also be made of different materials, depending on the intensity of the work that it will have to perform. This can be either plastic (for simple models) or metal (for a more extensive area of work). 
DIY snow blower - where to start
For self-production of a snow plow with your own hands, you must first determine the type of device, based on specific needs. You can build both single-stage and two-stage model. If you live in places where heavy snowfall is a rare phenomenon, then a screw machine will be enough. For those who live in the region with severe, “generous” winters, you will need a two-stage rotary snow blower.
Engine selection: electric or gasoline
 According to the type of engine snowplows are electric and gasoline. Machines with electric drive are designed for work in the vicinity of the house and from the outlets. Features of electric snow plows that they are more economical to use, but less maneuverable. Petrol engines on snow machines are considered more versatile, however, their price and maintenance costs, respectively, are higher. Therefore, the choice will again depend on what specific amount of tasks the snow thrower needs to perform.
Important! If you choose the option of a homemade electric snowthrower, then it is worth considering that the standard household electrical wire at a subzero air temperature becomes brittle and loses elasticity. Therefore it is recommended to use cords of the type PGVKV, KG-HL, SiHF-J or SiHF-O.
Installing the engine or use the tiller
The engine selection stage can be skipped if you have decided to design a snowthrower on the engine block: the unit itself will fulfill this role.
If the car is with a gasoline engine, then you should use an internal combustion engine that can be taken from an old motoblock or lawn mower. A working capacity of 6.5 l / s will suffice. The design provides for installation of the engine on a quick-release platform, in order to facilitate its maintenance and repair, if necessary. It is also recommended to make a manual start of the engine, since when installing the generator and the battery, the weight of the machine will increase significantly, which will make it less maneuverable and difficult to drive.
You can construct a snowblower on the electric motor. In this case, it is worth remembering that this option significantly limits the radius of the machine. In addition, electric motors are afraid of moisture, so it is mandatory for them to install high-quality waterproofing. 
How to make a snow blower with your own hands
Manual snow plow consists of the following mandatory elements: a wheel frame (a control stick is attached to it), an engine, a fuel tank (if the car is equipped with an internal combustion engine), a snow-catching bucket or blade with guides (skis) and a snow relief pipe. It is necessary to provide that the future snowplow was based on an easy and strong platform at the same time.
How to make a snow blower motoblock
In winter, the walker can be used for snow removal. The easiest way to assemble a snow plow is with the help of a special factory-made snow plow. However, skilled craftsmen advise not to spend too much on the factory nozzle, but to assemble a snowplow for the motoblock with your own hands from the available materials and spare parts. There are three options for snow cleaning attachments to the walk-behind tractor. 
First option - these are hard rotating brusheswhich are well suited for newly fallen snow, as well as for those places where there is a possibility of damage to the decorative covering of sites. Such brushes fasten under a canopy of the rotating screw; the width of their grip reaches 1 m. You can also adjust the angle of grip in three directions: forward, left, right.
The second version of the snow plow for motoblock - this is a hanging shovel with knivessuitable for already stale snow. Such a prefix is connected to the traction device with a universal hitch. The bottom of the shovel is covered with rubber to avoid damage to the surface and the shovel itself. Such a snowplow works on the principle of a mini-bulldozer: it loosens a layer of snow, captures it and moves it to the dump. The width of the grip at a time also reaches 1 m.
However, the most effective snow removal attachment to the walk-behind tractor is rotary snow thrower. The main elements of the design of this nozzle are a conventional screw with a paddle wheel. Rotating, it captures the snow, which moves upward with the help of the wheel. Passing through a special socket, snow is thrown far beyond the site. This is the most productive version of the nozzle, allowing you to capture a mass of snow up to 25 cm thick.

Now we will look at step-by-step recommendations on how to make snow strippers with a rotary-type attachment with your own hands. The design is a metal case with a screw shaft inside. You can use a finished screw shaft or make it yourself.
So, to rotate the auger shaft, use bearings No. 203. The housings for the auger are made of aluminum and are mounted on the sides of the snowthrower with bolts, which must be tightened with nuts. The drum in which the rotor is spinning can be made of an aluminum boiler of 20 liters: it must be attached to the front wall of the case with rivets with a diameter of 4 mm.
The rotor for the snowthrower is driven through the adapter system by means of the rear power take-off shaft of the motor-block. If the snow blower nozzle was purchased in finished form, then such adapters are included with it. If the nozzle is made by hand, you must purchase them additionally.
You also need to make a torque mechanism, which would be transferred from the motoblock to the snow thrower. The A-100 belt and the pulley designed for it are suitable for this. Thus, by means of a V-belt coupling, the torque is transmitted from the engine to the shaft of the motor-block connected to the shaft of the snow-cleaning head. 
Important! Bearings need to choose only closed, it is necessary to exclude hit of snow in them.
Do-it-yourself snow blower: making auger and frame
Let us now consider how to make a screw, frame, as well as additional tools needed for the snowthrower, assembled with his own hands.
For this you need to cook:
- sheet metal or iron box for the manufacture of the screw and its body;
- steel angle 50x50 mm for the frame - 2 pcs .;
- plywood 10 mm thick for side parts;
- metal pipe for a snowthrower handle (0.5 inch diameter);
- ¾ inch pipe for auger shaft.
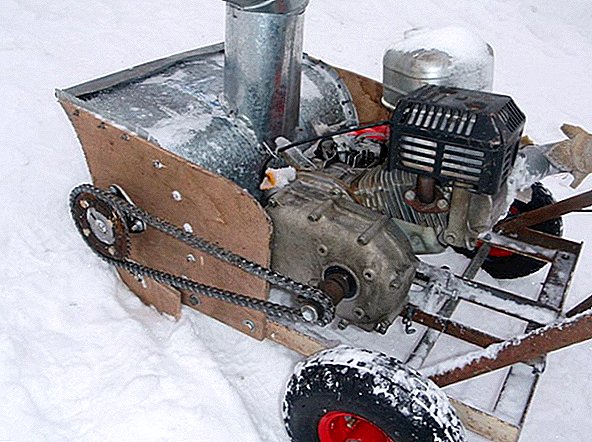
Since the auger will rotate in self-centering bearings No. 205, they also need to be placed on the pipe. A piece of plastic pipe with a diameter of 160 mm, which is fixed on a pipe of the same diameter and placed directly on the auger body, will be suitable for snow throwing.
To make a screw for the snowthrower yourself, you need:
- cut from prepared iron 4 discs;
- discs cut in half and bend each spiral;
- weld in a spiral on the pipe four disk blanks, on the one and on the other side;
- on the edges of the pipe wear bearings.

The machine is ready for operation.
Tips for making a snow blower do it yourself
In order for the self-made snow plow to serve as a reliable household assistant as long as possible, you need to follow some recommendations:
- It will not be superfluous to add special safety bolts or bushings to the design of the machine in order to avoid fragments of ice or stones getting into the engine;
- choose high-quality bearings, as they play an important role in the durability of the snow plow;
- when choosing a drive, give preference to a belt rather than a hard one, since there is a chance that constantly moving parts may jam if stones or ice hit;
- snow plow from motoblock requires storage in warm in winter. This eliminates the need to spend time warming up the engine;
- periodically replace the oil for the gearbox; in the winter, use a more liquid one, since at low temperatures it is subject to rapid thickening.