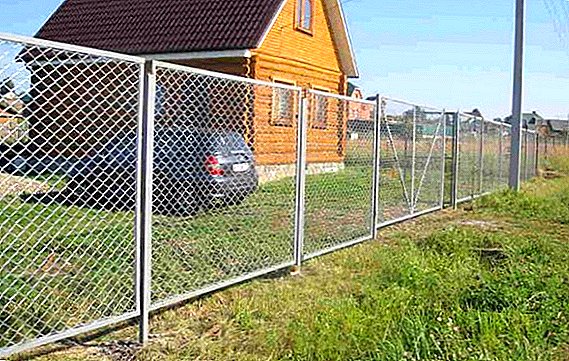
Owners of country houses, summer cottages, as well as residents of the private sector in cities often face the problem of installing fencing. High quality fence on a concrete foundation requires significant investments of forces and financial assets. This can be justified if you have a large area outside the city, where you want to reliably protect yourself not only from your neighbors and passing vehicles, but also from stray animals. Small areas within the city or in the holiday village are most often enclosed with a grid as a rabbit, which does not obscure the green spaces, and its installation takes a little time even without the involvement of professionals.
What you need
To install the fence took as little time as possible, you need to prepare in advance and calculate the amount of necessary material and tools.
For installation of a fence from a grid of the chain-link you will need:
- The grid the chain-link in the counted quantity with a small stock.

- The pillars.

- Wire for fastening chain-link to the posts.

- Fasteners (plates, brackets, clamps, nuts, bolts) - depending on the chosen method of installation.
- Hammer.

- Pliers.

- Bulgarian.

- Apparatus for welding.

- Materials for the preparation of concrete (if necessary concreting pillars).

To determine the required number of chain-link, pillars and other fasteners, the first thing to do is measure the perimeter of the fence. The simplest and most reliable version of the measurement - on the tensioned cord.
To do this, you need to drive in the pegs at the corners of the area that will be fenced, and pull on a strong thread, fishing line or wire, the length of which is subsequently measured. The measurement result will be equal to the required number of meters of mesh.
It will also be useful for you to learn how to make a wicker wooden fence, a fence of gabions.
However, be sure to add a couple of meters of stock. The fence posts are installed on average at a distance of two and a half meters from each other, but no closer than two meters.
Knowing the size of the perimeter of the fenced area, it is easy to calculate the required number of supports and, accordingly, the approximate number of fasteners, which, however, varies depending on the chosen type of fence design. 
Types of designs
Main types of designs of fences from the chain-link:
- Tension fence without guides. The easiest to install and affordable option for finance. To install such a fence, it is enough to dig up the pillars and cover them with a grid, attaching them to the supports with wire. For such a fence suitable pillars of any shape from any material. This design is perfect for a temporary fence or fences inside the site.

- Tension fence with guides. This type differs from the previous one by the presence of two longitudinal guides, which can be either wooden (timber) or metal (pipe). This design looks more solid and holds its shape better, but on heaving soils it is not recommended to install a fence with metal guides due to possible gaps when moving the soil.

- Sectional fence. This type of fence is a series of metal sections-frames welded to the posts, in which a chain-link is installed. Mesh frames are made by welding from a metal corner. Grid mounting is also carried out by welding. Such a fence is the most sustainable, seemingly more presentable, but also more expensive option.

Grid
Today the grid the chain-link is made several types:
- Non-galvanized. The cheapest and short-lived. Such a grid requires mandatory painting, as after a short time after installation it will necessarily begin to rust. Service life in unpainted form - no more than three years. Suitable for temporary barriers. For more solid designs in recent times almost never used.

- Galvanized. It does not corrode, is durable, easy to assemble, does not much exceed the cost of a non-galvanized steel sieve, has become widespread and firmly takes the lead among other types in terms of sales.

- Plasticized. This type of chain-link appeared relatively recently and is a wire mesh with a special protective coating. Combines all the positive qualities of galvanized mesh with greater aesthetics. Very durable, but also more expensive.

- Plastic. This grid is made entirely of plastic and is available in different colors with different shapes of cells. It can be used for boundary fences between neighbors or for fences inside the plot. As a fence from the street, plastic mesh will not work because of its insufficient strength.

Important! When choosing a plasticized chain-link, you should familiarize yourself with the quality certificate of the goods offered for sale, as poor-quality coating may not withstand the weather test, as a result of which it will crack and rust.
Another criterion for distinguishing the types of chain-link is the size of the cells. Basically, the cell size varies from 25 mm to 60 mm. However, there are also meshes with a mesh size of up to 100 mm.
The most suitable for the external fence is considered the size of 40-50 mm, but the poultry yard is better to protect the grid with smaller cells through which even the smallest chicks will not be able to crawl.
To decorate the suburban area you will be interested to learn how to make a flower bed with stones, rock arias, a dry stream, a garden swing, a fountain, trellis for grapes, a decorative waterfall, how to make beds from wheel tires, a rose garden, how to decorate a stump in the garden.Having defined the type of chain-link and selecting the option that is suitable for all parameters, it is imperative that you carefully examine the roll for damage and deformation.
 Even a slight curvature or curvature of the wire when installing fencing can lead to a serious problem.
The edges of the chain-link must be bent. Moreover, the "tails" of the wire should not be shorter than half the length of the cell.
Did you know? The grid was invented and patented at the end of the nineteenth century by the bricklayer Karl Rabitz, and at first it was used in plastering walls.
Pillars
The basis for the fence of the chain-link are the pillars, which, depending on the type of construction and the soil under it, either simply dig into the ground or are concrete.
For the installation of fencing of the chain-link, the following types of supports can be used:
- Wood. Since wood is a short-lived material, such supports are suitable only for temporary fence. The undoubted advantage is their low cost. Before installing the wooden poles must be leveled in height and the underground part must be treated with water-resistant mastic. The above-ground part of the support must be painted to extend its service life. The desired size of the wooden post is 100x100 mm.

- Metallic. The most optimal type of support for rabbits fencing. They are characterized by durability, reliability and durability and most often represent a hollow profile of a circular (diameter from 60 mm) or square section (recommended size 25x40 mm). The recommended metal thickness is at least 2 mm. The treatment of such pillars consists of priming and painting. Any fasteners are easily welded onto them. You can also buy ready-made poles with hooks to secure the mesh.

- Concrete. Such supports can be made independently or purchased ready-made, especially since they are relatively inexpensive. The disadvantages of this type of support include the inconvenience of their installation due to the severity and complexity of mounting the grid.

Step by step installation
Installation of rabbits fencing is carried out in several stages.
Learn also how to make a gazebo for a summer cottage with your own hands, a veranda to the house, a brazier made of stone.Marking territory
To mark the territory under the future fence, you need to drive pegs in the corners of the fenced site and tighten the construction thread. At this stage, the necessary materials are also counted.
Then it should be noted the place for the installation of supports, which will stand apart from each other at a distance of 2-2.5 m during the installation of the tension fence. When installing a fence with a slag or a sectional fence, the step between the pillars may be 3 m. 
Pillar installation
The installation of supports should be started from the corner ones, which are recommended to be dug deeper, since they will account for the main load of the whole structure. To install the pole (let's take the metal one as the basis), it is necessary to dig out or drill a hole in the previously marked place.
The depth of the pit should be 15-20 cm greater than the depth of soil freezing. On clay and loamy soils, it is recommended to increase the depth of the pit by another 10 cm. 10-15 cm of gravel should be poured to the bottom of the hole for water flow, and a layer of sand should be on top.
Then a pillar is installed in the pit, pretreated with an anti-corrosion compound. If the design of the fence is lightweight, and even more temporary, the supports can be installed without concreting.
In this case, after placing the pillar in the pit, free space is filled up with alternating layers of stone and soil, each of which is carefully tamped. In the case of installing a sectional fence or a tension fence with guides that will increase the load on the supports, it is better to concrete the posts.  For this, a cement mortar is prepared from sand and cement in a 1: 2 ratio, to which, after mixing, two more parts of rubble are added. When all the loose parts are added and mixed, water is poured.
It is necessary to ensure that the solution does not get too liquid. The finished solution is poured into the pit around the pipe. Concrete must be flattened and compacted with a bayonet spade and left until it is completely cured, which usually takes up to seven days.
After the corner posts are installed, the others are installed in the same way.
Important! It is necessary to control the vertical installation of the support with the help of a building plumb. To make it easier to fit the pillars in height relative to each other, it is recommended to stretch the cord between the corner supports ten centimeters from the top.
Stretching the mesh and fixing on the supports
For different supports using different types of fasteners. The fastening of the net to metal posts is carried out with the help of hooks and welding, for wooden pillars staples and nails are suitable, and a chain-link is attached to concrete pillars with wire clamps.  Consider in detail the option of stretching the mesh on the fence with metal pillars. It is necessary to begin stretching the chain-link from the corner post.
After fixing the edge of the net with hooks, it is recommended to thread a thick rod (reinforcement) through its cells and weld it to the support. Further the chain-link stretches hands to the following column.
It will be more convenient to do this if the reinforcement is pulled through the grid cells at a distance slightly higher than before the support, for which two people will be pulled - one closer to the upper edge and the second to the lower edge.
In order to provide your family with fresh vegetables and greens in the winter, it will be useful for you to learn how to make a greenhouse out of plastic pipes with your own hands, from polypropylene pipes, about the features of assembling the Nurse House greenhouse, Butterfly House greenhouse, Breadbox Greenhouse, to collect a greenhouse on Mitlayder.The third person can secure the chain-link on hooks of support. Then the grid can be welded to the pole, using a threaded one or several rods.
In case the roll is finished between the supports, it is enough to simply join two sheets of the chain-link by removing the extreme spiral element of one sheet, then overlap to connect both parts of the grid and re-insert the removed element. 
Important! In order to reduce the load on the corner supports, it is better not to bend around them with the net, but by separating the cells, fix the workpiece with the help of a welding machine and pull on further with a separate blade.
After tensioning the chain-link in the manner described above, in order to avoid sagging the upper edge of the grid, it is recommended to pass a thick wire or reinforcement through the outer cells, which should also be welded to the posts. The same can be done with the bottom edge. Such a fence will be more robust.
After the installation of the chain-link, it is necessary to bend and weld all the hooks on the supports, as well as to paint the pillars in order to avoid metal corrosion. If you mount the fence as a weldless method, then the painting of the supports can be carried out even before their installation.
Installation of the fence with guides is not much different from a simple tension. The only difference is that, besides the mesh, guides are also welded to the supports. 
Important! It will not be possible to install the tension fence from the chain-link on the sloping section, since it is very poorly mounted in an inclined position. The way out of this situation will be the terracing of the site or the installation of a sectional fence.
The procedure for marking the area and installing supports for the sectional fence is the same as for the usual tension. Metal plates with a section of 5 mm (width - 5 cm, length - 15-30 cm) are welded to the installed posts at a distance of 20-30 cm from the upper and lower edges of the support.
Sections are formed from rectangular frames welded from metal corners (30x40 mm or 40x50 mm), into which part of the chain-link of the required size is welded with rods.
Sections are installed between the posts and welded to the plates. After completion of the installation of the fence is covered with paint.  The fence from the grid of the chain-link, which is quickly and easily mounted, will protect your site from intruders, not obscuring it and not hindering the natural movement of air. 2-3 people who are familiar with the work of the welding machine can easily cope with its installation.
To emphasize the individuality of your site, the fence can be beautifully decorated or unusually painted, and if you want to hide from prying eyes - the climbing plants planted near the fence will help you with this.
A do-it-yourself fence is the pride of the landlord. Do not be afraid to try yourself in the installation of fences, and let you succeed!