Drywall - one of the most popular positions in hardware stores. Many, seeing the size of these sheets, imbued with respect for the masters working with such a coating. Although, in fact, there is nothing tricky here: we need only calculation and some manual dexterity (and also a fair amount of patience). Let's try to summarize the experience of installing drywall and highlight points that need to know those who are planning to do on their own.
Preparation of materials and tools
It all starts with the selection of the drywall itself - in terms of its qualities, the coating should be suitable for a specific location.  The label "specialization" indicates:
- GCR - Before you sheet for rooms with normal humidity;
- GKLV - it is moisture resistant material that can be placed in the bathroom;
- GKLO (fire resistant) - used for cladding walls to which are adjoined stoves, fireplace or chimney pipes;
- The most reliable category is GKLVO - fire-, moisture resistant base is used to work with attics or attic.
We advise you to read how to glue wallpaper and insulate the windows in the apartment.
In addition to the drywall itself, you will need other materials with tools. Their list will differ depending on what method of cladding is used - gluing to the wall or mounting on the frame.  Resorted to the first, if the wall is relatively flat and measurements along the vertical gave an error of up to 2 cm.
Such a "spread" is quite realistic to smooth by mounting on glue, for which you will need:
- sheets;
- tape for sealing joints (it is better to take a serpyanka net);
- primer;
- gypsum-based putty (basic and finishing);
- special glue;
- knife as reinforced stationery or jigsaw;
- the electric drill with a nozzle mixer;
- building level;
- plummet;
- long (it would be good to 1.5 m) rule;
- a set of spatulas of different widths;
- brush or roller - they apply a primer;
- special grater for working with putty plane;
- rubber hammer - it will have the way when adjusting just glued sheet.
Learn how to install a flowing water heater yourself.

Important! For work in rooms with high (more than 2.5 m) ceilings, sheets of 3 meters are usually taken.
Here you need to add also a pencil, a tape measure and a square - you cannot do without them.
With frame mounting the list of consumables and finishing materials, as well as the measuring instrument remains the same (only glue disappears).
We recommend to read how to put the light switch and the outlet in the apartment with their own hands.True, other components and devices are added in the form:
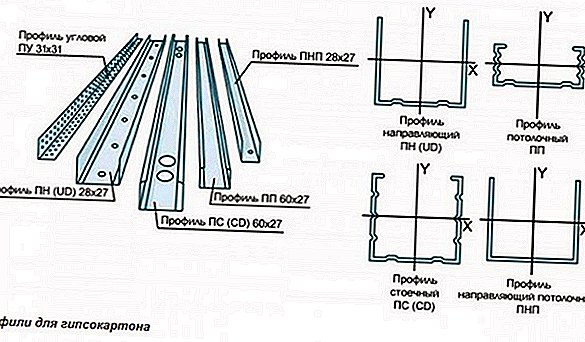
- profiles (guides and ceiling) with extensions;
- direct suspension;
- dowels and screws;
- scissors for metal;
- screwdriver.

Did you know? Drywall appeared in the nineteenth century - the owner of the paper mill Augustine Sakett invented the "construction board" of waste. A layer of 1.5 cm consisted of 10 lines of paper and a thin strip of gypsum.
For complex walls is also useful punch. From the nozzles you will need a wide blade and a cylindrical crown (in case you need to make round holes).
Preparation of the base
All the "props" assembled, and you can proceed. First you have to prepare the walls. 
The algorithm is as follows:
- the found cracks and cracks are filled with a putty or cement-sand composition;
- After drying, the wall will have to be cleaned. To do this, use an emery paper with a grain size of 60-80 units. The passages are made in circular motions, for greater convenience, securing sandpaper on a wide bar;
- more voluminous recesses will require pouring foam. It grabs quickly, and after drying, the excess that has gone outside is cut off with a knife;
- then the wall is cleaned of dust (suitable as a wide brush, and a vacuum cleaner);
- the next stage is a primer. The applied composition must be completely dry;
- after that carry out control measurements.
A separate topic is the preparation of the painted wall. It happens that the paint grabbed tight, and remove it is unrealistic. But there is a solution: to keep the solution, as it should, on the surface make notches.
You will probably be interested to read about how to get rid of the old paint.
Video: how to remove paint from the wall
Important! The exterior wall plating must be preceded by an antiseptic primer treatment. The same applies to indoor floors in rooms with high humidity.
At the same time maintain an interval: about 10 cm in length and 30 cm vertically. For such purposes, they use an ax or a perforator with a wide spatula (the main thing here is to calculate the effort in order not to get too much into the wall).
If checking by means of a level showed that it didn’t work out to completely smooth out irregularities, but it doesn’t make much sense to tackle the framework, simple pre-alignment technologies are used.
First - the use of beacons in the form of small pieces of drywall of any shape. The landmark are two pieces, exposed in the highest and lowest points. They are caught on the glue and set so that the plane goes on the same level. The remaining pieces are placed with an eye to them, and in the sum it turns out a flat "sole", which will facilitate the installation of a large sheet.
You can do otherwise: using the same principle (but without a sheet), screws are screwed along vertical lines with an interval of 20-30 cm. Making sure that the ends of their heads are at the same level, plaster or glue is applied to the entire height of the self-tapping screws, after which such sites should dry out.
Did you know? Surprisingly, in our latitudes drywall has been used since the 1950s: in the construction documentation of the Soviet era, it was designated as a slab.
Before embarking on such manipulations, estimate whether it will be good. If the difference is up to 2 cm over the entire area of the wall, they will give a result, but for a larger “spacing” (especially on different planes) they are not suitable - only frameworks will save the situation. Work with them is described a little below.
Size removal
The correct calculation is half the battle. In the case of plasterboard, a plan or a drawing is needed, which takes into account all the nuances. And there are many of them: the location of windows and doorways, switches and sockets.
All this is calculated at the design stage, taking into account the width and thickness of the sheets - making a rough estimate on paper makes it easier to calculate at what height the contour will be applied under the trim.  The embodiment of such plans begins with the wall:
- a line is marked on the ceiling and floor (end of the future wall). To do this, take a plumb line or paint cord;
- if the frame is being prepared, the cable passing through this location or the sound insulation layer should easily be placed in the gap between it and the wall. But remember that too large a cavity “conceals” the area of the room;
- Pay special attention to the corners. Practice shows that mating at 90 degrees does not always occur: in such places, sheets often have to be cut. How much - it is better to calculate immediately, according to the measurement.
Having figured out all the numbers, proceed to the layout of the sheet. With contours under the usual cutting, everything is clear: straight lines along the vertical and horizontal lines are plotted with the help of a tape measure or rulers, and even better - a level (in any case, it is impossible to do without marks made with his participation).
Important! The edge, which will be turned to the floor, is usually cut to 0.5-1 cm - this will protect it from moisture.

More complex elements (contours under sockets, switches, etc.) require precise hitting on planes. It is good if there are similar overlays on hand that can be "outlined" on a sheet, at the right height.
For round holes take compasses. The hardest thing is with blanks for complex grooves - for applying the marking, it is necessary to make improvised patterns from threads. Even before all these works, it is desirable to keep in mind one feature of this material.
The fact is that during transportation the corners and edges may be damaged - the plaster crumbles. Problem areas are often clipped, which makes adjustments to the plan (do not forget about this, otherwise during the installation process it will turn out that all the holes and cuts have "moved out").
Did you know? The ancient Greeks called gypsum simply and simply - a white mineral.
Preparation of drywall sheets
Checking all the numbers in the measurements, proceed to the processing of sheets. And let's start with shaping, or rather cutting. 
Cutting
Standard cutting technology is quite simple:
- the sheet is laid on a flat, smooth ground. But this is ideal - in practice this possibility is not always there, and then several chairs are saved, on which the workpiece is placed. In this case, the surface should not be strongly springy (otherwise the sheet will simply crack);
- the slot in the marking line is made with a knife, under the ruler;
- the first penetration is on the front side, with plaster plunging into the layer. Pay attention: the knife is held with effort, trying to tear off as little as possible from the line. It is also not necessary to do frequent "sawing" movements with a chisel - just a move with a burial;
- then the sheet is turned over and, after smashing it along the incision line, they pass along this bend.
All this is good, but if you need to do figure cutting, the technique changes (along with the tools). The easiest way to get round slits is with a crown mounted on a drill - this cylindrical nozzle provides a good opening with a minimum of cracks.
Video: how to cut drywall easily If not, holes are drilled at several points in the future circle. There lead the jigsaw blade, which is carried out along the contour - the right way to achieve accuracy.
Complicated rectangular or ornate rounded lines cut through a special hacksaw for drywall. In appearance, this is the same knife, but with teeth and a powerful handle. Working with him requires considerable patience - a good tool, but does not forgive mistakes when used.
Often in the houses there are uninvited guests, from whom it is difficult to get rid of. We advise you to read how to deal with ants, cockroaches, moths, springtails and mice.
Sizing
It is carried out in two ways - using beacons (their installation is described above) and directly at the place. The first method is more reliable in terms of accuracy, while the second is less labor intensive. No wonder that he is most in demand.
Important! When applying the glue it is not advised to distribute it over the entire surface.
 Drywall Lighthouse
This procedure looks like this:
- along the marked area, the walls once again pass a level in order to determine the thickness of the future layer at different points;
- then prepare the adhesive solution. Dry base is filled into water at room temperature, kept for 2-3 minutes and thoroughly mixed by hand or with a mixer until a homogeneous mass without lumps (like a thick paste). The volume of water, the dosage of dry material, as well as the norms of consumption, depend on the specific brand, so read the instructions;
- the finished mixture is immediately applied to the inner surface of the sheet - glue pellets are left there every 30-40 cm. Their diameter is about 10 cm, and height - from 3 to 5 cm;
- the numbers can be corrected: if the sheet at this point goes flush with the wall, put a smaller one, whereas for a larger cavity, a proportionate portion is needed. But in any case, they must be present at the corners of the sheet.

You will have to work quickly: the glue dries completely in 20-30 minutes. Therefore, immediately proceed to the plating.
Plating: technology
This is the most crucial moment, sometimes requiring the participation of an assistant - the sheet with the applied glue delays by 35 or even all 40 kg:
- the sheet itself is placed on small wedges (1 cm each) and gently, but quickly, leaned against the wall, not forgetting to pull the upper edge flush with the ceiling. Here it is necessary, by the way, to use a lever between the wedge and the GSL;
- then the surface is pressed against the wall. To do this, take a wide ruler or a rule exposed on the plane, according to which they knock with a rubber hammer;
- passing this way from the bottom up, the sheet is aligned as closely as possible to the already glued copies;
- do not forget to remove the excess glue - in contact with the wall of the mixture will come out, and it will have to immediately remove (not yet grabbed).
Video: sticking drywall
Regarding the joints, there is one important point: straight edges are fitted, of course, end-to-end, but segments with rounded edges are diluted by 4-5 mm.
The instruction seems to be simple, but in reality everything is complicated by the dimensions of the sheet and its weight, which require a certain skill. Although usually the first 2-3 “pieces” are difficult, after which the work goes much faster.
Seam preparation
Seams obtained during installation also require proper processing. In this regard, the joints obtained by joining sheets with a truncated edge benefit.
Making sure that the surface is level, the seam is simply filled with glue. Although this goes, if the gap is 4 mm or more (narrow seams are inconvenient in processing - it happens that the thick mixture is reluctant to fit into a narrow "neck").
Did you know? In the USA and Western Europe, the role of drywall frames is traditionally given to wooden beams.

For blanks with rounded edges, an interval of 5 mm is important, and over the entire height. If it is smaller, you will have to trim it carefully, bringing the gap to the desired width.
Seam sealing
It is carried out only after the glue has completely dried. After that, the starting putty is prepared (the volumes, doses and proportions differ - carefully read the data on the package).
Truncated seams close up according to the scheme:
- the first layer of putty is laid between the sheets;
- On it (in the center of the seam) they glue a piece of the serpyanka net of the required length, over which another layer is applied;
- having distributed it with a spatula, estimate the level (it is necessary that the top layer is flush with the sheets). If necessary, make an "additive";
- waiting for drying, put a thin layer of finishing putty, which eventually gently cleaned with emery paper.
Video: drywall seams
To work with rounded the seam edges apply the same algorithm. However, it is necessary to tinker with the grid on the bends - to facilitate the task, the putty is mixed a little thicker.
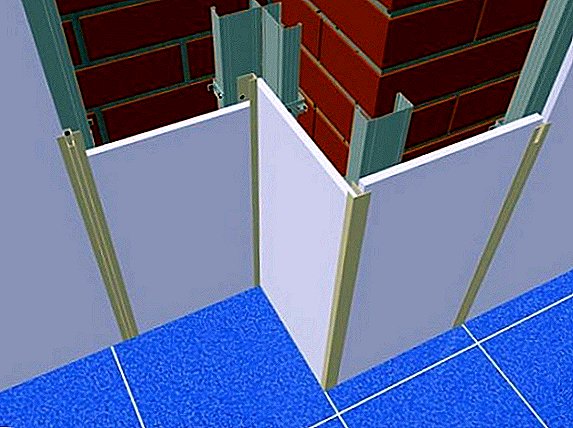
Features of mounting on the frame
We found out that the frames are used when working with very uneven walls. The first stage is of course markup. It is carried out with an eye on the most prominent point, under which future supports will be fitted.
Important! For such work using only galvanized profile.
Lines lead both horizontally and vertically, with transfer to adjacent walls, ceiling and floor. Between the vertical posts leave 0.6-1 m (although you can take 40 cm for stiffness).
Frame assembly starts with the installation of the guide profile, which is attached with dowels. Then, direct suspensions are placed, to which ceiling profiles are brought in (they play the role of struts and keep on screws with press washers).
Video: how to make a frame for drywall
These racks at the time of assembly are not attached to the guides, otherwise the sheet risks going in a wave. But before that, it is necessary to conduct wiring or other communications through the frame and lay a layer of heat or noise insulation there (the mineral wool does a good job).
By myself montage preceded by fitting the sheet to the desired size. It will go faster if the lines pointing to the position of the profile under the sheets are induced. They are connected by screws, in increments of 15-20 cm.
When assembling, the screw head should be slightly buried in the plaster layer - the protruding edges are excluded. But it is important to calculate the force: too much pressure on the screwdriver, you can “flash” the coating through or leave a crack.
The skeleton method is more laborious, but it also has an obvious advantage: during installation, the position of the sheet can be corrected by twisting the fasteners or releasing it.
Did you know? The production of gypsum amounts to tens of millions of tons. So, in 2010, 147 million tons of this raw material was received in the world.
Video: installation of drywall
Further work (mainly with seams) is reduced to the already familiar actions: laying the grid and putty, followed by polishing.
Now you have an idea how to work with plasterboard wall cladding, and what is needed for this. We hope this information is useful, and the results of the repair will be pleasing to the eye. Successes and accuracy in calculations!
Feedback from network users