With the arrival of warm spring days, gardeners begin an active period of planting and watering, as well as preparing and checking all the necessary equipment. For some gardeners, the mere recollection of how difficult it is to disentangle a watering hose causes a panic. To solve this problem will help the reel for irrigation hose. However, its cost to many can discourage any desire to have such a useful device in its arsenal. In this article we will explain how to make a hose reel with your own hands.
What is the hose reel?
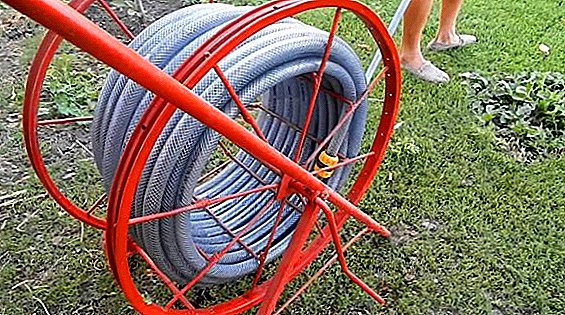
Such a device allows not only to facilitate the storage of the irrigation hose, but also optimizes its use. However, before proceeding directly to the creation of the coil itself, it is necessary to figure out what parts it consists of and what kinds it is.  Regardless of the type, any reel for irrigation hose consists of the following components:
- a drum on which the hose is wound;
- the bracket, which will serve as fasteners coil on the wall of the house;
- water inlet - fastener that connects the pipes;
- the handle with which the hose will be wound;
- and of course, the hose.
Kinds of hose reels
There are several types of reels for the hose and their differences are not only in the material from which they are made, but also in their purpose. Depending on the design, the following types of coils are distinguished:
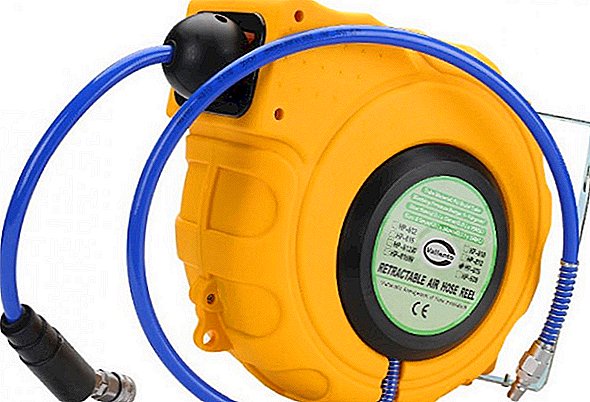
- automatic with fastening to the wall - the advantage of this design is the automatic hose winding system;
- reel with wall bracket - mounted on the wall, and if necessary, you can easily unwind and roll up the hose;

- coil with a rotating axis;
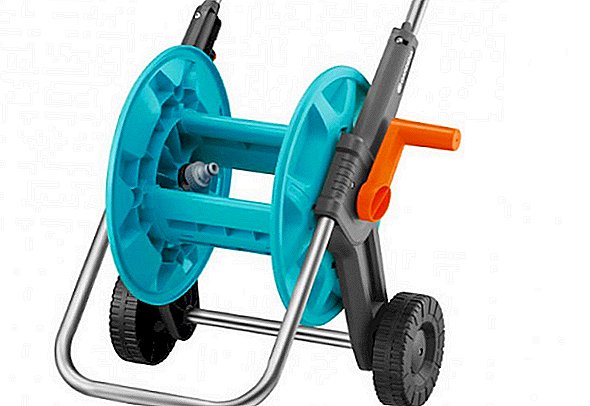
- the mobile reel on the cart which is the most maneuverable option of the coil for an irrigation hose.


Making your own hands
Craftsmen for the manufacture of reels use different materials and create all kinds of designs. Therefore, to create such an inventory can go like an old rim from bicycle wheels, and plastic pipes, and some craftsmen create a coil, even from plastic basins.
Learn how to organize automatic drip irrigation.In connection with such a variety, you need to decide on the material and prepare the necessary tool. But whatever material you choose, you will need a drill, a screwdriver, a jigsaw for wood and a Bulgarian. And to create metal structures, you will also need electric welding.
Metallic
The simplest and most reliable coil design, which will last more than a dozen years, can be made of metal. It will consist of two parts: a removable drum and the base, which can be installed in any convenient place for you. This design of the coil allows you to use different hoses, using only one base.
Video: hose reel
The base is made of two bars of reinforcement, which are welded to each other by two crossbars. The width of the crossbars depends on the width of the coil, which will be installed on it. On the one hand, we sharpen the steel rods so that they can easily pierce the ground. On the other hand, weld two pieces of pipe, while one of them is cut in half. The diameter of the tubes should be 9-10 mm, they will serve as a support for the axis of the coil.
Did you know? For more economical irrigation of the infield, a new promising drip irrigation technology is used.The coil drum is made of wire with a diameter of 5 mm. For procurement, it is necessary to calculate the dimensions of the future reel. This can be done by the formula πR². Using this formula, you can calculate the required amount of material for any diameter of the circumference of the drum. When calculating the dimensions, it is necessary to take into account the length of the hose used and make the construction with a margin so that, if necessary, it is possible to wind the hose of greater length. For the convenience of making such a coil design, it is better to make a special jig in which the wire will be laid, and the cooking process will be greatly facilitated.
Familiarize yourself with the advantages of using drip irrigation at the dacha.Chipboard or plywood can be used to create it. The corners are screwed on it along the selected circle diameter using an M6 bolt. For example, a circle with a diameter of 600 mm will require 16 points for fixing the wire and 17 corners, since a pair of corners will be fixed at one point. Such a point will be a “starting point”, i.e., the beginning of the round will be laid in it and its end will be on it. It is at this point that the entire structure will be welded. Also in the center of the circle it is necessary to drill a hole into which the axis of the future structure will be inserted.
 To form a circle of wire, one end of it is laid at the starting point and in a circle we begin to gently bend the wire. After the wire closes the circle at the starting point, it is bite off and the two ends are welded. After forming the ring, do not rush to remove it from the conductor, since for the rigidity of the structure it is necessary to connect the axis of the coil and its outer edging. As the axis we use a tube with a diameter of 9 mm. The connection is carried out with the help of studs, which are welded to the axis of the future structure and a circle of wire.
Water the garden with a watering system "Drop".In order to prevent the hose from breaking during winding, it is necessary to weld the inner contour of the drum onto which the hose will be wound. To do this, at a distance of approximately 100 mm from the axis, a whole piece of wire or small pieces are welded in a circle, which are interconnected by welding. If you decide to use the second method, it is necessary to weld in such a way as to make a circle.
Important! Welding must be performed flush so as not to cut the hose during further operation.In a similar way we form a second circle, after which you can connect them with rods, which are welded to the studs. Now the coil is already acquiring the appropriate forms. After welding the main structure of the coil, it is necessary to insert its axis with a handle. For the axis we use a threaded spire with a diameter of 8 mm. Fix the spire on the coil with nuts. Thanks to fixing with nuts, the coil axis can be removed if necessary.
 After installing the axis, which is well fixed, weld the handle to one of its sides. To ensure that such a drum design does not fall off the base, it is necessary to put a ring with a diameter of 10-11 mm on it from the handle (so that it can be easily put on the base half tube). This design of the irrigation hose reel has good rigidity, reliability and lightness, and, if necessary, it can be removed from the support and kept suspended in the ceiling of the utility room. This option allows you to store a hose ¾ 35 meters long.
Important! So that your works are not a waste of time, effort and materials, you need to ensure that the winding axis is movable and rotates easily.To create this type of coil, old rims from bicycle wheels can be used, which makes it convenient to store a hose up to 70 meters long.
Wooden
Let's look at another design of the hose reel, which provides for a fixed installation near the irrigation system. The whole structure is made of wood, and pipes are used to supply water, which are also the axis of the structure. The problem in the development of such a design is the combination of stationary water leads with a movable axis of the drum, which is connected to the hose in the coil. To solve this problem, you can use a quick-detachable connection, which is also installed on the factory designs of reels.
Video: hose reel
This connection allows, while maintaining tightness, the connector and fitting rotate relative to each other. Calculating the dimensions of the coil, it is necessary to take into account the dimensions of water pipe fittings. Therefore, for winding a 15 m hose, the boboni’s dimensions will be as follows: outer diameter — 380 mm, inner diameter — 200 mm, width — 250 mm. Plastic pipes can be used as supply pipes, but it is better to replace them with metal ones. When assembling such a coil, it is better to connect pipes without fuma, since they will have to be repeatedly disassembled and assembled. The dimensions of the drum, namely its outer diameter, are calculated from the dimensions of the hose and its length.
Learn the secrets of making drip irrigation from plastic bottles with your own hands.A circle of appropriate sizes is cut out of the chipboard, and for winding it is necessary to cut the inside of the drum. Fastening the outer base and the inside is done with glue and screws. For convenient access to the inside of the drum (axle), it is better to wind the hose on wooden slats. In this regard, we will cut the internal disk in the form of a 12-sided polygon, and the thickness should be 15-20 mm so that the screws can be screwed on. To such a basis it will be convenient to attach the slats.
 One of them needs to be made wider, as it will serve as a drum lock and a rotation axis. Perhaps for such a rail will have to further trim the base. All slats are fastened with screws. Since the coil will be stationary, it is necessary to make a bracket that will hold its weight. For this, it is better to use a larch plank 20 mm thick. We cut this board into bars and glue them together in three layers, and perform the corners with an overlap, then the design will be much more stable and reliable.
You will be interested to know about: the timer and pump for watering from the barrel, as well as read how to choose a hose, sprinklers and drip tape for watering.Additional fasteners in place of the joints can be strengthened with an overlay of 10 mm. After sizing all parts of the bracket, it is necessary to saw off all protruding parts and to sand so that the surface is even and without knots. Having performed such dusty work, it is necessary to drill holes in which the axis of the coil will be fixed. Now the whole structure can be varnished in 2 layers.
Important! To prevent rotting of the wooden structure during operation, it must be treated with anti-fungal mixtures.With two sides of each hole fasten washers that will act as a bearing. We make a hole under them slightly larger than the diameter of the inner part of the washer - this will prevent the structure from seizing when the wood is swelling. To fasten the structure to the wall or to the pole, it is necessary to fix two bearing angles. After the basic design of the coil has been assembled, pipes can be connected using FUM tape.
 When assembling it is necessary to arrange all connections in such a way that during operation the pipes do not unwind. For this, the coil is positioned so that when the hose is rewound, the reel rotates clockwise, then the connections will twist. To unwind the hose just pull it. In this case, the load on the connection will be absent. However, it is necessary to provide protection against the breaking of the hose when fully unwound.
Did you know? In Ukraine, some utilities that provide water services, imposed a fine on watering from hoses in the daytime, its size can reach 1800 UAH.For this it is enough to fasten the PVC coupling and the entire load will fall on it. It remains to make a pen and the coil will be ready. The handle can be made of any suitable material. However, if you want to give a beautiful and at the same time an unforgettable look to your coil, you can make a handle in the form of a steering wheel. And then this unusual thing will not only be useful in your household, but will also become part of the decor.
From plastic pipes
The design of the bobbin for the watering hose can also be made of plastic pipes. It is very easy to make for people who have a welding machine for polypropylene pipes. For the production of such a coil 25-mm pipes are used. The design is not subject to such temporary changes as, for example, rust in the metal system or rotting in the wood. In addition, it has a small weight and can easily move around the entire area of your cottage.
Video: a simplified version of a polypropylene tube reel
The main structure is made from the cheapest polypropylene pipes, and for the manufacture of the axle and the grip it is better to use pipes with a layer of fiberglass. To create such a coil, you will need about 3 meters of a 25-mm polypropylene pipe and 1 meter of a polypropylene pipe with a layer of fiberglass. Facilitate the development of this coil can use already finished drum design. However, if you do not have it, you can do it yourself.
Create a waterfall and fountain with your own hands.To do this, use 2 coasters, from which the bottom will be cut, and it will serve as the side of the coil. For such purposes it is better to use a bowl with a diameter of at least 30 cm. You can cut off the base of the coxae with a hacksaw. To do this, stepping back a few centimeters from the base, it is necessary to draw a line along the entire diameter of the basin. And already along this line cut the bottom. As a basis for winding you can use a sewer pipe with a length of 330 mm. However, since the diameter of such a pipe for winding the hose is very small, it is necessary to cut it along the length and expand.
Did you know? In Russia, the construction of lawns in ornamental gardens began in the 18th century by the personal decree of Emperor Peter.To stiffen the drum structure, the bottom of the coxae can be strengthened with PVC plastic or plywood, from which a circle is cut out and bolted to the side of the future coil. In the process of creating reels, it was possible to use PVC plastic, but after a year this coil would lose its appearance and become unusable, since this material is not strong enough. Expand sewer pipe with 4 spiers. To do this, at a distance of 140 mm from the center of the side, draw a circle and drill through 4 holes into which the spiers will be inserted. For such work, it is better to choose threaded spiers, which will allow fixing them securely on both sides of the base with nuts.
 Before fixing the sewer pipe it is necessary to assemble the core of our coil. To install the axle, we will use plastic pipes that will serve as a water supply. To do this, we drill a hole in the center of the side plates with a diameter of just over a 25 mm pipe. We push the pipe into the hole, but if it moves freely, you can use a rubber layer. Using a welding machine for plastic pipes, weld the tee. One of the ends will serve to supply water, and the other - to fix the axis.
As an outlet for pipes, you can use a chrome-plated fitting, to which it is very easy to attach a hose. After assembling the axis, you can proceed to fixing the base for winding the hose. And since the sewer pipe has a smaller diameter, it must be heated with an industrial dryer. This will allow the heated and soft tube to be easily fixed on the spiers. The gap, which will turn out after cooling, will allow easy access to the water supply system if repair is necessary or to the fitting, if necessary, to replace the hose.
The hands can also make gabions, rockeries, ladybugs, verandas, cellars, garden fencing, solar wax refinery, barbeque, gazebo and garden swing.After finishing work with the drum, you can proceed to the manufacture of a frame base, which will hold the drum. With the help of plastic pipes, tees and corner joints, you can make a movable frame for the coil. This design is very easy to move around the site. The drum is fixed on the frame frame with brackets on the screws.
 An alternative for the plastic frame are metal strips 20x4 mm welded together, and for fixing the axis of the drum a pipe of larger diameter is welded than the pipes in the water supply system. It is possible to fasten two parts of such a frame to each other with the help of polypropylene pipes and washers. It remains only to connect the water supply, fix the watering hose and the hose reel is ready.
The irrigation hose reel is a very useful tool in the hands of any gardener that allows you to easily and conveniently store hoses. And thanks to the removable reels, you can easily change the length of the hose. Having made a hose reel at home, you will receive cheap and affordable equipment that you will use for more than one year.
Reviews from the network