Laying tiles - a troublesome, so it is often trusted masters. But besides the tile itself, there are also seams between the fragments, which also require processing. And at this stage it is quite possible to do it on your own, which you can now see for yourself.
Choice of grout
For the treatment of seams apply compositions of different types, namely:
- Cement based. It's simple - in the process of preparing for Portland cement, latex or hardeners are added, and then mixed with water. Affordable and practical material that even beginners can work with: the mixture is very plastic and does not require special skills for its preparation. Keeps well, but in the bathroom or other rooms with high humidity it is usually not used. A little more expensive ready-mix cement. A wide range of colors allows you to choose the composition under the color of the tile.
- Synthetic. The main component is epoxy or furan resin. Buying such a kit, you will see that the trowel paste is also paired with a hardener. When mixing, a plastic mass is obtained that is resistant to moisture and temperature extremes, and does not fade.
- Silicone (they are also sealants). In fact, it is a mixture of silicone and varnish, most often acrylic. Do not let moisture, but very quickly erased. Another disadvantage - application requires experience and skill.


Important! Going to the store, grab one tile with you - this will greatly facilitate the choice.Another caveat: if, during the lining process, the tile was laid on a deformed surface (sometimes it happens), it is better to take a superplastic composition that not only “seizes” the seam itself, but also additionally keeps the side edges of the plates.
Learn how to make a blind area with your own hands, remove the whitewash from the ceiling, lay the paving slabs in the country, arrange the front garden beautifully, and pave the paving tiles for the summer cottage yourself.Do not forget about the color scheme, or rather its selection:
- Floor seams are not treated with light mixtures - this is at least impractical.
- The light tone of the grout visually connects the individual tiles into a single composition, while the dark composition separates them into fragments.
- In the case of tiles of different shades, the color is chosen with an eye on the floor space. For example, for a small room the tone will suit the lightest tile - this will visually expand the room. The spacious apartments will fit a darker mixture.
- Calm shades of the seam (light gray, beige and others) are used to work with multi-colored tiles laid in the form of a mosaic.
- When processing wall seams, it is desirable that the grout contrasts with the tone of the floor covering (and at the same time matches the color of the interior details).

Did you know? The predecessor of the ceramic tile was a brick covered with a thick (up to 1 cm) layer of glaze. This technology was actively used in ancient Babylon.Having decided on the choice of the mixture, ask the seller whether it will not change color in the cooking process.
Required Tools
In addition to the mixture itself, you will need a simple "props" for work:
- Spatula with a rubber nozzle (the larger the tile size, the wider the edge should be). Sold and sets of rubber spatulas of different widths.
- Plywood for use with flooring.
- A bucket in which the mixture will be prepared.
- Drill with a nozzle mixer.
- Clean rag and sponge - they remove excess grout.
Remove the old paint from the walls of different materials.
Surface preparation
It all starts with preparation. Her algorithm for old walls and new cladding is different, but first things first. 
Old walls
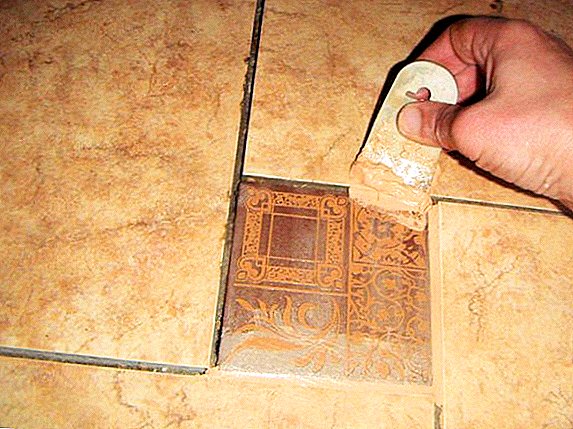
In the case when the old seam has faded or has become covered with mold, but it is not planned to shift the tile, act as follows:
- The old layer is softened by wetting with water.
- Then he is scraped. For this there is a special tool - a pliers in the form of a cutter with a straight edge. Although many old-fashioned work with a nail that requires accuracy.
- In the formed voids lay anti-fungal mastic. For safety, this procedure is repeated, waiting until the first ball seizes (which is especially important for areas near the bath or sink).
Important! If the old seam is strongly grabbed and could not be removed completely, it is necessary to apply a primer under the new mixture (of course, it should dry out).Practice shows that cement and latex compositions are removed without much effort. But to remove the epoxy will have to take a special solvent. It must be used extremely carefully - try to keep the liquid from falling on the lining. After that, it remains to remove the dust from the gaps (a dry cloth and a vacuum cleaner will help with this).

New tile
To work with fresh "laying" start no earlier than 2 days after lining: the tile must be fixed on the surface.
Going to do repairs, it is useful to learn how to glue wallpaper, how to make plumbing in a private house, how to put the outlet, how to make a plasterboard partition with a doorway, how to put a light switch, how to install a flowing water heater, and how to sheathe plasterboard walls.Making sure that she holds tight, carry out the following manipulations:
- A flat screwdriver or a knife removes all marking crosses.
- Remove paraffin or glue residue (if used).
- Thoroughly wipe the tiles with a dry cloth.
- Do not forget to go so far that the empty seams with a vacuum cleaner - so clean the garbage, which did not get a rag.
Preparation of the mixture
Mixtures are offered a huge amount, and each of them is sold in a package on which there is an instruction. There are all the details of the preparation of the composition: the amount of dry material and water (or latex), temperature and consumption rates.
Did you know? In the German city of Metlach, there is still a unique enterprise for the production of small-format tiles from porcelain masses. The factory began work in 1748!For clarity, consider this process on the example of the waterproof composition of Ceresit CE 40 Aquastatic:
- For 2 kg of dry billet, take 0.6 l of water at + 15 ... + 20 ° С.
- The mixture is poured into the water gradually, otherwise it will take a lump.
- Taking the mixer, the resulting mass is mixed until homogeneous (while rotating the drill at 400-800 rpm).
- Seeing that the mixture is "the same", it is left for 5-7 minutes, followed by another stirring.
- After waiting the same time, the grout is applied to the voids between the tiles.
 As you can see, there is nothing tricky. Of course, the dose and quantity, as well as the duration of exposure for different mixtures will be different (for that is the instruction), but we already have a general idea.
Process technology
The main part of the work, too, is within everyone And without a difference, the old layer changes or a new one is laid. This can be seen by reading the process.
Find out what indoor plants are recommended to put in offices, bedrooms, and balconies.
Update old seams
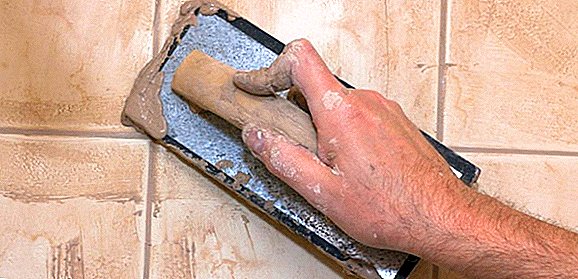
Having prepared the mixture, begin its application:
- Typing a little grout on a spatula, the portion is laid, pushing deep. At the same time try to keep the spatula at an angle (approximately 30 ° to the tile).
- First, the solution is applied across the seams, and only then - along. Begin with the most conspicuous corners, passing them from top to bottom, so as not to spoil the already finished seam.
- Surplus on the tile is immediately removed with a spatula, and then with a damp sponge. They harden quickly, so hurry.
- On the finished seam gently pass trowel (or sponge, wrapped in a dry cloth).
- Aligning the seams this way, wait until they grab a little. This is the best time for the jointing: a piece of cable will fit, which is slightly pressed into the new layer and carried out along the entire length. Part of the grout will fall out or go to tile - remove it.
- Then it remains to wait a day or two. That is how long it will take for the layer to harden and it can be cleaned with fine emery paper, trying not to scratch the tile itself.
Important! You should not wet the sponge too much - so it is no wonder and to wash away a part of the freshly laid grout.
Video: update tile joints
In general, the task is quite feasible. True, with the old walls from time to time there are difficulties - in some places they sometimes act as a "hump". When processing such areas put a smaller solution (which in the future will save time on grinding).
Foaming seams of freshly laid tiles
The technology of applying new seams is almost identical to the work with the old laying - the main manipulations are the same. But there are moments that are worth remembering:
- The voids are pretreated with a primer (if possible, minimizing leakage), and only after it dries out will they scare the seam.
- The direction of the edge of the trowel is also changing - diagonal penetration is more suitable for a new lining.
- Mixes take a little more, in case there are mini-voids under the corners of the tile (the excess will wash off anyway).
- It is advisable to work with small areas: processed one "square" - started another.
Prepare window frames for the winter.Video: how to seam tile seams
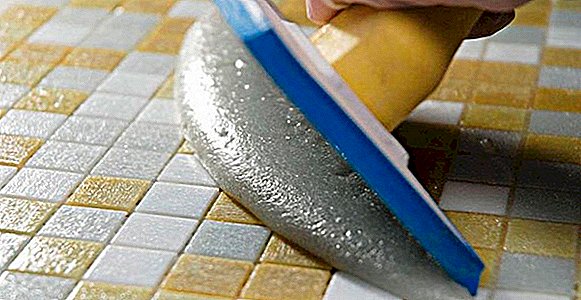
Tile cleaning
It is possible to clean seams and tiles only after complete drying, and ideally in 1.5-2 weeks. The first cleaning of the mixture is usually done by a dry method - a scraper or a soft metal brush passes through the very top of the layer. This removes dirt and dust that has entered the solution during curing. Strong pressure is not necessary, otherwise there is a risk of removing part of the frozen mixture.
Did you know? Among the masters, the outer part of the tile is called "biscuit".At this particular time, a new layer is treated with strengthening compositions: polymers, water-repellent or sealants. They repel moisture, and the drops that fall on the joint flow down, and do not penetrate inside. After waiting for the protection to dry, you can start a thorough wet cleaning of the tile with sponges and rags soaked in water or a special tool.
Video: how to clean tile
Suitable for this:
- Spray and tile care gels.
- Soap solution based on soap or liquid shampoo.
- Weak chalk solution.
- Ammonia. They rub the most problematic places, previously sprinkled with ordinary soda.
- The remaining white stains after wet cleaning are removed after complete drying (with a dry or wet cloth).
We align our site, and build a cellar, a veranda and a perlog.
How to care for tiles
In order for a tile longer to please the eye with its impeccable look, it requires simple, but regular care: at least once a month it is recommended to thoroughly wash the entire surface with special detergents.
Important! Washing the joints, treated with silicone, you should not make a huge effort - this material is easy to exfoliate.Otherwise, the rules for handling tiles are reduced to:
- Timely removal of splashes from the surface (there should be no puddles).
- Periodically wipe with a soft cloth moistened in a solution of vinegar, which adds shine.
- The same applies to alcohol or vodka (although it will take time to weather).
- Careful handling of tiles. It is advisable not to lean against it sharp or heavy tools and other items that can cause a scratch.
- If possible, avoid placing nearby tanks with powerful alkalis - in such a neighborhood tile runs the risk of losing shine.
 We learned how to rub the seams between the tiles. We hope our readers will easily master this technique, and the end result will not yield to anything done by a professional. And may all initiatives be successful!
Feedback from network users