If you want to achieve attractiveness and nobility from the wooden elements of your interior, you just have to age them. And to do it easily at home, by choosing the best way. In this article we will talk about the popular methods of artificial aging of things and their techniques.
Why aging wood
Oddly enough it sounds, but the interior is much more beautiful looking tree, from which blows antiquity.
You can make an original lamp, a stand, a dresser, a table, a wardrobe, a window sill, doors, floors or a garden shop from such material. Any object will radiate comfort and warmth. In addition, today everything is old in fashion.
Did you know? On the globe, there are more than a dozen tree species, which by their hardness equate to iron. They practically can not be processed and drown in water. They are even used in mechanical engineering for the manufacture of structural elements and nails. These are temir-agach, parrotia, yew, azobe, Schmidt birch, ulin, yatoba, sucupira.
If you wait until the natural process of wood wear occurs, it will take a long time. For decades, it is necessary that the natural pattern on the material under the influence of the sun and wind acquire a specific interweaving of dark and light tones.  Indeed, in the cold season the dense fibers, which are the skeleton, are growing. In the summer, loose and light fabric is formed. It was she who erased over time, which provides the board with antiquity.
This effect is successfully used by current designers, thus turning even the cheapest wooden objects into attributes of luxury and style. Without it, you can not create styles of country, Provence, retro, chebbi-chic, vintage.
In addition, the acquired antique furniture will serve much less than the new, but artificially dilapidated.
Provence, Chebbi Chic and Vintage Design
Many popular styles of modern design are characterized by the use of worn and frayed items and details in the interior, pastel tonality and romantic elements of decor.
Did you know? Every year for their needs, people cut down about 15 billion trees of the entire green fund of the planet, adding to it at the same time only 5 billion new seedlings.
Provence
This style was first talked about in the nineteenth century by the French living in the province of the same name. Their traditions in interlacing with everyday peasant troubles and southern nature became the basis for the development of a new direction in design.
Provencal houses were distinguished by their elegance and simultaneous simplicity, reverent attitude to the things of their ancestors. These heirlooms became the personification of the spirit of southern France.  This style is characterized by:
- the predominance of white and all shades of beige;
- fragments artificially faded in the sun;
- a multi-colored palette in a decor, accessories (often there are drawings of flowers, a strip, a pastoral and a cell);
- many elements of wood in the decoration;
- artificially worn ceramic tiles (chipped, raw stone, brick, ethnicity);
- chinaware, forged mirror frames, napkins and textile tablecloths;
- lighting items with elements of forging, cotton and flax;
- enclosed panoramic windows;
- rustic furniture of classical forms with elements of wood, forging and weaving.
Did you know? The tallest tree in the world is considered to be the sequoia from California. Its trunk has grown to 115 meters in height, and in diameter it reaches 8 meters.
Chebbi chic
It is a completely new direction in interior design. It originated in the UK about 30 years ago.
Its basis is the restraint, conservatism, frugality inherent in the British, and the predilection for everything that is old but good.  Shebbi-chic style is manifested in the following features:
- lack of white tones;
- the prevalence of pale shades: blue, pink, lavender, yellow and milky;
- bright contrast colors;
- the use of ceramic tiles for dilapidated painted wood, wild stone or plaster, as well as small floral pattern;
- on a white plastered ceiling, classic stucco to match the gold leaf, as well as bleached fragments of the ceiling;
- imitating aging wood and metal textures;
- of the interior items used are mainly restored antiques, textiles, artificially aged photo frames, antique candelabra, fresh flowers, porcelain dolls and statuettes of angels;
- in lighting there are crystal, forging, cloth lampshades and ancient pendants;
- renovated furniture from expensive wood, painted parts from metal forging.
Did you know? In the United States of America, all handicrafts made before 1830 are classified as antiques, in Canada - until 1847, and in the United Kingdom - until 1917.
Vintage
It was invented by the French, laying the foundations of the uniqueness and underlined originality of old worn interior items.
Initially, this was the name of a wine with long-term exposure, but over time a whole designer style was formed.
Its main feature is the use of antiques, which must exactly match the fashion trends of their era.  Vintage interior peculiar to:
- The prevailing white, beige and milky shades, as well as contrasting ones are burgundy, green, graphite, purple;
- drawings with flowers and vegetation;
- artificially made flaws;
- flooring made of wood, marble or ceramics, but always with the effect of wear;
- no overload in the decor (only precious antiques, photographs, mirrors, paintings, candelabra are used);
- stucco in classic style;
- use of natural materials, forged items, crystal, flax, wool;
- present in the interior of the spirit of restraint and elegance;
- antique furniture made of wood and wrought metal.
Important! For artificial aging, sawn timber from the following wood species is recommended: pine, spruce, oak, ash, larch, walnut, wenge, dussia, methobo, kempas, merbau. The board may have knots and other flaws - this is even for the better.
Step-by-step instruction on wood aging
Modern craftsmen have long mastered many methods of artificial decay of wood. Each of them has its advantages and differences. Find out which ones.
Mechanical
The technique of mechanical stylization of antiquity is carried out in several ways by treating wood with a stiff brush or by applying a two-layer paint.  Hardwood brushing
Read also how to make a garden swing, garden path and stepladder with your own hands from wood.
The first option is called brushing, and the second - patina.
Brushing
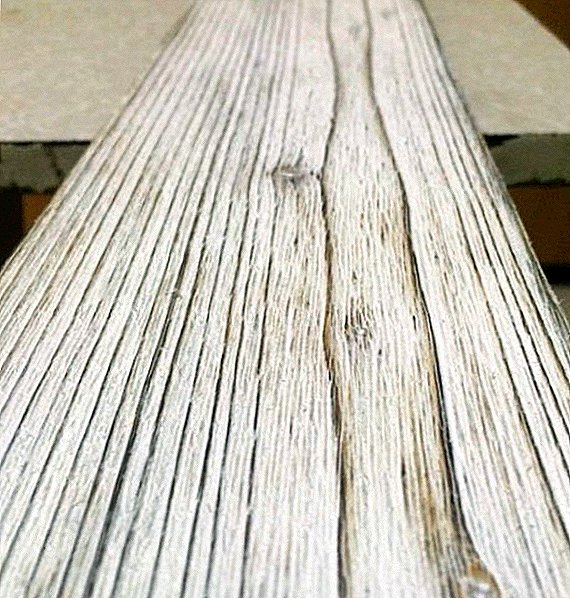
The essence of the method consists in extracting soft wood fibers, as a result of which a clearly pronounced relief is obtained on the surface of the board. The same thing happens in nature in decades.
Video: how to age a tree - brushing Experts consider brushing the easiest method, but they call for a responsible approach to the choice of wood. For this it is better to use conifers with a clear pattern.
Coniferous woods are: yew, pseudo-hemlock, larch, fir and pine.
Categorically not suitable:
- beech;
- maple;
- fruit trees (cherry, pear, apple);
- teak;
- alder;
- Birch tree;
- juniper.
Important! When working with lumber, do not forget to protect your face and eyes with the help of a mask or goggles from splintering, dust. The respirator won't hurt either..
When the choice of material is made, you can get to work.
Experienced masters advise initially to practice on any unnecessary pruning to "fill" the hand:
- Take a gas burner and pre-process it material. Do not lose vigilance: burn the material without delaying the device for a long time. Do not allow tar to ignite.
- In the case when thermal procedures are not provided, before work, be sure to dampen the board with a wet brush and let it dry for about 3 minutes.
- Put a metal brush with a special nozzle on the grinder or electric drill and move from one end of the board to the other in the direction of the fibers, thus removing the soft fibers. It is important to do this in one touch, not jerks.
- Finely polish the surface with a sheet of fine-coated emery paper.
- Remove any dust with a vacuum cleaner or a soft-bristled wooden brush. All movements should be directed along the fibers, not across.
- If desired, you can improve your masterpiece by imitating the traces of the bark beetle. This is done with the help of a thin drill. Angular holes should be chaotic, but heaped.
- To create a complete image, cover the surface with wax painting elements or paint, varnish. Some designers recommend a creative approach to this stage of work, combining light and dark colors. However, they should be distributed respectively at the depressions and protuberances.
- If the coloring is monotonous, go through the sandpaper on the relief to achieve its wear.
- Finally, varnish the board. The grid of cracks looks very impressive, which is obtained after coating with special craquelure paints and varnishes.
 Burner-aged wood
Important! When purchasing lumber, consider their classification. To create a worn effect, a class C is more suitable, which is characterized by an unlimited number of knots (including fallen out), cracks and grooves. If you don’t like the spirit of excessive antiquity, you can give preference to class AB boards. They have much less defects.
Patinated
Once patina was called a thin oxide coating on copper products. Today it is a popular technique in the processing of both metal and wood products.
The method is labor intensive, although it is done by applying special reagents. For its implementation requires the utmost accuracy, perseverance and attentiveness.
If you do not have experience with similar techniques, it is advisable to practice on wooden waste. Designers love to apply patinated when making a home in country and classic styles.  Experts believe that the simplest variant of such a decaying of wood is the rubbing of wax into the relief convexity of the surface, which creates the effect of wear. We will go by applying patina.
Read also how to make a sofa out of pallets with your own hands.
So, get down to work:
- Sandpaper carefully polish the surface of the board, removing the old paint as much as possible.
- Use a soft brush or vacuum to remove any dust.
- To enhance the adhesive characteristics of wood, primer it (it is important to choose a primer for antique restoration) and dry it.
- In a day you can start applying the patina. For this it is better to get acrylic paint. You need to act with the utmost care. After painting, the surface should dry for 24 hours.
- Apply the next paint coat with a bronze or metallic shade in all directions with small strokes. It is important not to overdo it with the amount of patina. Immediately, without letting the sprayed layer dry, rub the excess foam with a piece of foam.
- When the paint begins to dry, wipe out any bulges with a dry cloth, which will provide the effect of antiquity.
- Varnish the entire surface. This will give it sophistication and protect it from mechanical damage and excessive dampness.
Video: furniture patching
Important! Patinating is not applied on parts that are often contacted by a person. The paint is very quickly erased, which gives the effect of untidiness instead of the spirit of antiques.
Thermal
The effect of aging is achieved by complex processing of lumber. This technique is carried out in several stages:
- Initially burn the surface of the board with a gas torch. This action will help to clean it of soft light fibers and show the pattern, cracks and knots.

- Then, using a stiff metal brush, remove the resulting carbon.
 It looks like a tree after processing stiff brush
 - If you wish, you can impregnate wood with wood stain. One coating will be enough to improve the expected effect.
- Open the surface with varnish. Depending on the breed of the material and its decorative qualities, you can choose colorless varnish or with coloring elements.

- Note that the use of a blowtorch during thermal aging of wood often leads to burn marks that are not amenable to leveling..

 It looks like a tree after processing stiff brush

Chemical
This method looks original only on deciduous species, since there are tannins in the composition of their wood. In contact with chemical reagents, they darken, due to which there is a deterioration effect.
Important! If there are signs of fungus on the wood, a special chlorine-based bleach will help get rid of the problem. Note that it penetrates 3 cm deep into the material.
The technology is characterized by simplicity and the presence of different variations, with which you can achieve a greater or lesser degree of aging.
Be sure to sand the surface with a piece of emery paper with a large fraction before work. And then choose the method to your taste:
- Treat the board generously with ammonia. Reacting with the material, the substance will cause a noble darkening. If we are talking about aging a certain area on the wall, you can distribute the reagent unevenly, which will increase the effect.
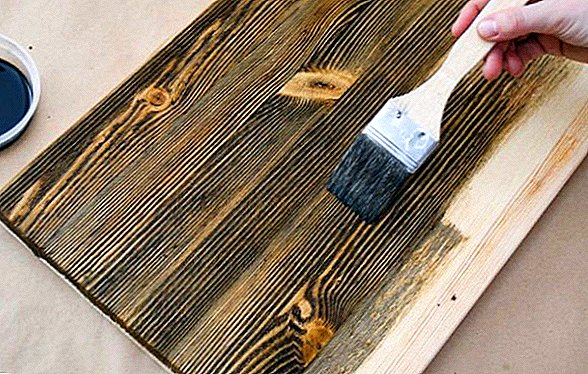
- Using a polymer brush, process the board so that the annual rings show through clearly. Then cover the lumber with stain and varnish it.
- Paint the polished surface with enamel paint and dry. On the dried layer apply a second paint of a more liquid consistency. Allow to dry and process some parts of the wood with an emery cloth with a fine fraction.
- Cover the tree with water-based stain. After that, partially wash off the coating in the middle zone, leaving dark edges.

We recommend reading about how to build a swimming pool, bath, cellar and veranda, as well as how to make a brazier, pergola, gazebo, dry stream, waterfall and a path of concrete with your own hands.
Even at home, you can make fragments of decoration and antique decor, although in fact they will be completely new. In this process, it is important to show maximum imagination and diligence, and then your wooden objects will look no worse than those that are for sale in antique shops.
Feedback from network users