Many wonder whether it is possible to grow tomatoes in the winter. It turns out that this is quite possible for everyone.
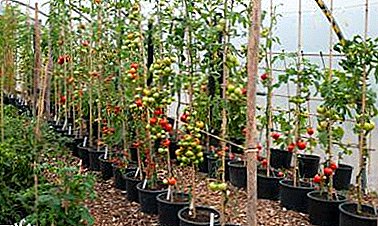
To get a harvest of greenhouse tomatoes in winter is quite real not only in industrial production conditions.
Of course, there are some nuances and difficulties, but they are completely surmountable if you follow certain rules of cultivation. But the result will pay back both material costs and the labor invested.
What varieties of tomatoes to choose?
The main requirement that applies to the "winter" varieties of tomatoes - their good growth in low light conditions. The second indispensable requirement for a variety is its indeterminacy., that is, the ability to constant growth.
It allows you to form a vertical shoot, that is, to get the maximum yield from the minimum area. Other requirements for the variety are standard - good taste, high yield, early ripening, resistance to diseases, lack of cracking tendency, etc.
These requirements are met by modern tomato hybrids.
Samara F1
Height 2-2.5 meters, fruiting in 90-95 days, fruits weighing 80-100 g.

Vasilievna F1
Height 1.8-2 meters. Srednerosly, fruiting after 95-97 days, the weight of the fetus about 150 g

Divo F1
Height 1.7-1.9 meters, fruiting after 100 days, the weight of the fetus - 150-200 g or more.

Annabel F1
Srednerosly, fruiting after 119 days, fruit weight 110-120 g.

In addition to these, hybrids are popular:
- Eupator;
- The president;
- Raisa;
- Dobrun;
- Baby;
- Flamenco;
- Pink flamingo;
- Octopus;
- Amber;
- Hurricane, etc.
How to prepare a greenhouse?
In order to prepare the greenhouse for winter operation, it is necessary:
- remove old tops and debris;
- inspect the greenhouse, make the necessary repairs;
- check the health of lighting, heating and water supply system;
- remove 10-15 cm of topsoil;
- prepare the ground.
Soil preparation
The optimal soil composition for growing tomatoes is a mixture of humus and sod soil in a 1: 1 ratio.
The litter is a layer of organic matter (biofuel). It is a substrate: manure, rotted sawdust, foliage, straw. Straw should not be treated with herbicides.. Straw consumption per 1 m2 - 10-12 kg.
Straw sprinkled with fertilizer and boiled water until dissolved. Fertilizer consumption per 100 kg of straw:
 lime - 1 kg;
- urea - 1.3 kg;
- potassium nitrate - 1 kg;
- superphosphate - 1 kg;
- potassium sulfate - 0.5 kg.
 lime - 1 kg;
Microorganisms begin to actively develop on the straw. The substrate heats up to 40-50 degrees. A week later, the process ends, and when the temperature drops to about 35 degrees, a layer of soil about 10 cm thick is laid out over the substrate. Subsequently, the soil is periodically sprinkled and the total layer thickness is brought to 20-25 cm.
The soil must be disinfected with a 1% potassium permanganate solution or a 3% nitraphine solution. To get rid of nematodes, it is necessary to treat the soil with the preparation "Nematophagin".
As an alternative biological remedy is very effectively used to obtain biohumus - California red worm. It perfectly processes the substrate, at the same time improving the properties of the soil.
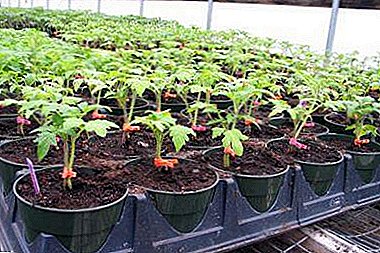
Growing seedlings
This is done like this:
- Seeds calibrated. If they were stored in a cool place (in the refrigerator), they should be warmed up 2-3 weeks before sowing. In the simplest case, a few days is enough to keep them on the battery.
- Seeds are etched by holding them for 20 minutes in a 1% solution of potassium permanganate at 400 With or put them for 8 minutes in 2-3% solution of hydrogen peroxide.
- Preparing a mixture of humus, peat and sod land.
- The earth mixture is sterilized with a 1% solution of potassium permanganate or steamed.
- Drainage is piled on the bottom of wooden boxes - expanded clay, crushed pine bark, etc.
- Pour the soil, lightly tamped.
- Hold grooves with a depth of 0.5 cm and sow in them prepared seeds with an interval of 3-4 cm.
- Spray the boxes with heated water and cover with glass.
- After germination, the glass is removed and the boxes are placed in a cool room (140-160 afternoon and 100-120 at night).
- After a few days the temperature is raised, bringing the day to 180-200and nighttime until 120-140.
- Ascended seedlings illuminate at least 12-14 hours a day.
Picks
The pick is necessary in order to stimulate the development of the root system. It is held when the seedlings throw the first two true leaves. At the same time, young plants are transferred to peat pots or paper cups with soil mixture.
When transplanting, pinch off the main root by about 1/3. The seedling is buried in a cup to the cotyledons and lightly tamped. For dived plants, illumination is stopped for 3-4 days. Then the lights are turned on again.
Watering and feeding
Picked plants are watered moderately - 2-3 times a week.. Feeding is carried out three times: the first time a week after the picking, the second time - after the appearance of the third sheet, the third time - after the fifth sheet. Ammonium sulfate (1.5 g / l) or standard nitrogen-phosphorus-potassium mixture is used for top dressing.
Transplant to a permanent place
Transplantation into the greenhouse is carried out when the plants develop 6-7 true leaves.
 A few days before transplantation, seedlings are transferred to a greenhouse so that they are accustomed to new micro-conditions.
- The temperature of the air in the greenhouse raise to 230-240.
- A week before transplantation, seedlings are sprayed with a 5% copper sulphate solution to prevent fungal diseases.
- Two days before transplanting, seedlings are watered abundantly.
- Landing scheme - tape two-line. In the ground make holes at a distance of about half a meter from each other. If the variety in the description is characterized as powerful, the distance between the holes is 60-70 cm, the distance between the rows is 60-90 cm.
- The wells are treated with a solution of potassium permanganate (2 g / l).
- At least 0.5 liters of water (not cold!) Is poured into each well.
- Turning over, carefully remove the seedling along with a lump of earth.
- The seedling is moved into the hole, buried along the cotyledon, and carefully tamped.
 A few days before transplantation, seedlings are transferred to a greenhouse so that they are accustomed to new micro-conditions.
Care rules
Moisture mode
Hygrometer moisture should be about 60-70%.. Visually, the benchmark indicator of the required moisture regime is constantly wet soil under the bushes and dry leaves of the bushes themselves.
In the first week after transplantation, plants are usually not watered at all. When the roots take root, you can begin watering. The optimum water temperature is 20-22 degrees. Before flowering tomatoes watered every 4-5 days. Water consumption - 4-5 liters per square meter. After the start of flowering, watering increase to 10-12 liters. Watered at the root.
Temperature
 Tomatoes do not tolerate large and sudden changes in temperature.. The optimum greenhouse temperature should be 220-240, the soil temperature should be around 190. At elevated temperatures, the plant will drop buds, flowers, and ovaries.
Techniques for achieving these correct temperature parameters depend on how the greenhouse is heated. In that case, if the greenhouse is heated with electricity, this mode is achieved automatically using a temperature relay.
Illumination
There is no need for round-the-clock lighting. The optimal day length in a greenhouse for tomatoes is 16-18 hours. If the seedlings are planted in September-October, then the period of light exposure will be increased, since the growing season will fall on the period of a short day. If the tomatoes are sown in November-December, then the period of intensive growth will coincide with the addition of light time, and additional lighting can be reduced.
At the end of winter, when the sun is already beginning to shine brightly, it is necessary to ensure that the tomatoes do not get burned. For this plant, sometimes it is necessary to specifically shade, especially protecting the ovary.
Garter
Indeterminate tomato varieties grown in greenhouses require mandatory garters. The garter should be started 3-4 days after transplantation. Tapestries are mounted in the greenhouse, that is, rows of thick wire stretched at a height of about 1.8 m.
Each plant is not tightly tied at the base, and the other end of the rope is tied to a trellis. As they grow, the stem is twisted around the rope. Too tight to tighten the garter should not be. To fasten the stem on the trellis there are special clips. When the plant reaches the desired height, the top should be pinched.
Masking
Stepson - second-order escape that appears in the leaf bosom. They must be removed because they are depleting the plant in vain, without adding any yield. Remove the stepchildren, when they do not exceed 3-5 cm in length. Sometimes one of the lower stepsons is left, choosing the strongest, and they form a bush of two stems.
So, having made some efforts, it is quite possible to get a tomato crop in our own greenhouse in winter. Over time, when a certain amount of experience has accumulated, an enterprising owner may well think about organizing his own small-scale production.
Modern hybrids, specially designed for growing in winter greenhouses, have, with the right agrotechnology, quite suitable for this crop - up to 20 kg per square meter.