Successful incubation of eggs would be impossible if there were no stable temperature conditions. This process is provided by a special thermostat for the incubator, which maintains a level of ± 0.1 ° C, while it can vary the temperature in the range from 35 to 39 ° C. Such requirements are inherent in many digital devices and analog devices. Quite decent and accurate thermostat can be done at home, if you have for this basic skills and knowledge in electronics.
Device assignment
The principle of operation of the thermostat - feedback, in which one controlled quantity indirectly affects the other. For artificial breeding of birds, it is very important to maintain the desired temperature, because even a slight glitch and deviations can affect the number of hatched birds - the thermostat for incubation is precisely for this purpose.
The device heats the elements so that the temperature remains unchanged even with changes in ambient air. In the already finished device there is a sensor for an incubator thermostat that controls the temperature process.  Each poultry farmer must know the basics of the device’s workflow, especially as the connection scheme is very simple: a heat source is connected to the output wires, electricity is supplied through others, and a temperature sensor is connected to the third wire through which the temperature value is read.
Did you know? Once the thermostats used for aquariums with tropical fish. This need arose due to the fact that many models had a mechanical regulator with a heater. Therefore, maintain their own temperature. Such devices worked well only in rooms with a stable temperature.
Is independent production possible?
If you decide to create a digital thermostat for an incubator yourself, it is worthwhile to approach the issue of creation responsibly. Those who know the basics of radio electronics and know how to handle measuring devices and a soldering iron can do this kind of work. In addition, useful knowledge of printed circuit boards, configuration and assembly of electronic devices. If you focus on factory products, you may encounter problems during assembly, especially during the instrument setup phase. For easier work you need to choose a scheme that is available for the manufacture of the house.
Important! With particular care, study the instructions and the element base of the selected device. Simple at first glance, the scheme may include scarce details.
The main criterion for any type of device is to ensure high sensitivity to internal temperature extremes, as well as a quick response to such changes.
To create a thermostat for the incubator with his own hands, mainly used scheme in two versions:
- the creation of a device with an electrical circuit and radio components is a complex method, but accessible to specialists;
- the creation of the device, based on the thermostat of household appliances.
We recommend to read how to make a poultry brooder with your own hands, as well as feeders and drinkers.
The principle of operation of the thermostat: how the circuit works
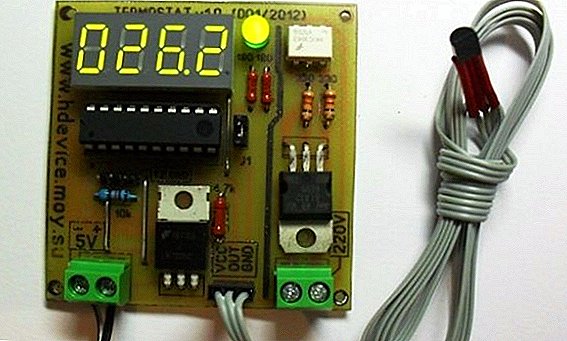
Consider how the thermostat works, created by hand.  The basis of the device is the operational amplifier "DA1", which operates in the voltage comparator mode. Voltage "R2" is supplied to one input, to the second - the specified variable resistor "R5" and trimmer "R4". However, depending on the application, “R4” may be excluded.
In the process of temperature change, the resistance "R2" also changes, and the comparator responds to a voltage difference by applying a signal to "VT1". In this case, the voltage opens the thyristor on the "R8", injecting current, and after equalizing the voltage, the "R8" disconnects the load.
Control power is provided through the diode "VD2" and the resistance "R10". With a small current consumption is acceptable, as the use of the stabilizer "VD1".
Did you know? Budget thermostat enough for a homemade incubator. Temperature control from 16 to 42 degrees and external sockets allow you to use the device in the off-season, for example, to control the temperature in the room.
Self-manufacture scheme
Many are wondering how to make a thermostat for an incubator with your own hands.
As an independent manufacturer consider a simple scheme - thermostat as a regulator.  This option is simple to make, but no less reliable to use. The creation requires any thermostat, for example, from an iron or other household appliances. First you need to prepare it for work, and for this the thermostat case is filled with ether, and then well sealed.
Important! Remember that ether is a strong volatile substance, therefore it is necessary to work with it carefully and quickly.
The ether tends to react sensitively to the smallest changes in air temperature, which affects changes in the state of the thermostat.
The screw, soldered to the body, is connected to the contacts. At the right time, the heating element is turned on and off. The temperature is set during screw rotation. Before laying eggs it is necessary to warm up the incubator. It is obvious that it is easy to manufacture the thermostat, and even a schoolboy who is passionate about electronics can do it. The circuit has no rare parts that cannot be obtained. If you yourself are making an "electric hen," it would be useful to provide a device for the automatic rotation of eggs in the incubator itself.
If you are breeding a bird, you will also need an ovoscope. Make it a power with your own hands.
Connecting the thermostat to the incubator
When connecting the thermostat to the incubator, you need to know exactly location and function of the device:
- thermostat must be outside the incubator;
- The temperature sensor is lowered inward through the hole and should be at the level of the upper part of the egg, without touching them. A thermometer is located in the same area. If necessary, the wires are extended, and the regulator itself remains outside;
- heating elements should be located approximately 5 centimeters above the sensor;
- the air flow starts from the heater, goes further in the area of the eggs, then enters the temperature sensor. The fan, in turn, is located in front of or after the heater;
- The sensor must be protected from direct radiation from the heater, fan or lighting the lamp. Such infrared waves transmit energy through the air, glass, and other transparent objects, but do not penetrate through a thick sheet of paper.