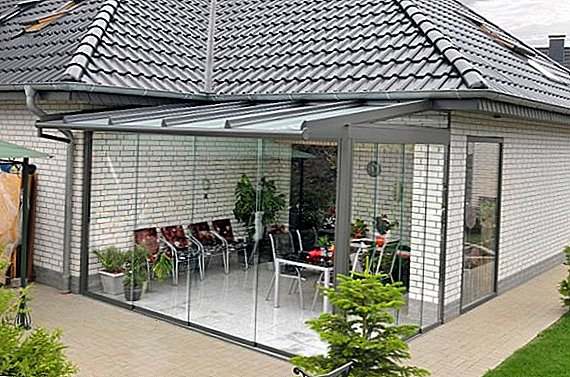
Veranda - This is an extension to the house, which allows you to admire nature, while at the same time being in a comfortable home environment. It can be made of brick or wood, and we offer you the most elegant and least time-consuming option - a polycarbonate veranda.
Location
First of all, you need to develop a construction project, and for this you need to clearly understand why you need it, what kind of veranda you want, what kind of view you will observe from it. The veranda can be used as a hall, dining room, children's playroom, to make a winter garden out of it, a living room.
Next, you should decide where you want to place it:
- on the corner;
- from the end;
- from the front of the house.
 If you make another doorway for you is not a problem, keep in mind that a good place for a veranda will be from the western or eastern wall of the house, then it will be well lit and at the same time will be protected from the summer heat. Some even build a shingled veranda around the perimeter of the whole house.
Important! Do not place the entrance to the veranda opposite the entrance to the house - because of this, there will always be a draft on the veranda.Next you need to decide on the size. Verandas look good on the entire length of the wall of the house, but you can build a smaller one. But the protruding walls of the veranda house should not be built - they look too heavy.
Recommended width - from 2.5 to 3 m, on a smaller terrace it will be difficult to place furniture. Wider extensions should be designed near large two-story houses.
The most common form for such an extension is rectangular, but it can also be in the form of a polygon or a circle. Veranda can be open (without walls) and closed. If you put the sliding panels, the closed building is easy to turn into an open if necessary.
Significantly save funds and enrich the table with fresh vegetables can the construction and operation of the greenhouse or greenhouse, it remains only to decide on the option of construction - Breadbasket, Butterfly, Snowdrop, Nurse, simple design, Meatlayder greenhouse, from polypropylene or plastic pipes, with thermal drive, from polycarbonate, tree.Project drawings must be submitted for approval to the relevant authorities, and the construction of a veranda (even with your own hands) must be legalized, otherwise problems may arise in the process of selling a house or transferring it in some other way.
List of materials and tools
To build a veranda, you need these tools: 
- shovel;
- bucket;
- concrete mixer or tub;
- hammer;
- hacksaw;
- level and water level;
- cord to align the posts;
- screwdriver;
- drill;
- drill of the corresponding diameter;
- perforator;
- power saw;
- electric planer;
- jigsaw;
- roulette;
- pencil;
- gon.
 You will also need the following materials:
- concrete (cement, sand, crushed stone or gravel);
- brick, metal poles or bars;
- boards and nails for formwork;
- water;
- waterproofing on the foundation;
- bars 100x100 mm;
- floor board 30x100 mm;
- aluminum or polycarbonate profile;
- polycarbonate;
- screws and special screws for polycarbonate;
- nails 100 mm, nails with a small hat;
- staples;
- metal corners;
- anchor bolts;
- dowel;
- slats 30 mm;
- wooden lining;
- plinth;
- vapor barrier;
- aluminum adhesive tape;
- insulation.

When planning to plant a hedge to decorate the plot, one should pay attention to the calipod, thuja, thorns, boxwood, hawthorn, forsythia, privet, tis, Thunberg barberry.
Foundation
Veranda is different from the terrace by the presence of the foundation.
If you are attaching a polycarbonate do-it-yourself porch, since this is a fairly lightweight material, foundation can be poured using the column method. However, the final choice of the method of pouring the foundation depends on the condition of the soil (frozen, swampy).
If you want a small extension, then the number of bars will be 4 pieces (1 in each corner). If you have conceived a large veranda, the columns should be set every 50 cm.  Step-by-step instructions for pouring the foundation of the porch with your own hands is as follows:
- Dismantle the porch and the carport above it.
- Collect all the trash.
- Remove the top layer of earth (15 cm).
- Map space for posts.
- Dig holes under the posts to a depth equal to the depth of the foundation of the house.
- At the bottom of the pit pour 10 cm of sand, and on top of it - 10 cm of rubble or gravel.
- From wooden boards to build a formwork of the appropriate height.
- Pour the concrete to the ground level or the entire required height of the foundation.
- If you have chosen asbestos, metal or wooden posts, then before pouring concrete, it is necessary to insert these posts, smearing them with solutions to protect metal or wood.
- Let the concrete dry well, periodically sprinkling it with water if it is hot outside.
- Take out the formwork.
- The distance between the concrete and the ground fall asleep sand or fine gravel.
- If you chose columns of brick, then lay out the brick to the required height.
- Align the height of all the columns, taking into account the fact that the floors in the house should be 30 cm higher than in the extension, otherwise its roof will not fit under the roof of the house (relevant for single-storeyed mansions).
Equipping your site you can find a place for a swing, gazebo, trellis, a dry stream, rock arias, flower beds made of stones or tires, wattle, barbecue, alpine slide, fountain.
Frame
The process of installation of the frame for the veranda with their own hands will consider step by step:
- To waterproof the foundation with roofing material or bitumen, spreading it across the foundation.
- Insert anchor in the posts, pre-drilled hole.
- Outline the first outer corner of the veranda, driving a nail.
- Starting from the first nail, mark all 4 corners of the building, carefully measuring the right angle (90 °).
- Run the bottom trim (the first layer), laying out the prepared bars 100x100 mm and joining them at the corners in the "half-timbered" way (when half of the bar is cut down at the ends of two bars with the help of an electroplaner). If the parallel bars do not connect at the corner, the parallel bars can simply be joined together.
- Between the bars it is better to lay insulation.
- Fasten the connections with metal corners or staples.
- Check with the water level how smoothly the strapping is.
- Check with the help of a square to see if the corners are twisted.
- To fasten a binding to the base with anchor bolts.
- Check again with a water level and a square that the harness has not twisted.
- Cut openings for racks. The best is considered a distance of 50 cm, you need to consider the placement of windows and doors.
- Install the racks by attaching them to the bottom trim with staples. Racks must be embedded vertically, this is easy to check with a level.
- Before installing the top trim, so that the racks do not warp, install temporary struts - nail the slats between the racks.
- In the bars for the upper trim cut through the holes for the rack.
- Attach the top trim to the racks using staples.
- Remove the spacers.
Roof
The roof of the veranda can be:
- single-pitchif the extension is attached to the house by a wide part;
- gablewhen the veranda is attached perpendicular to the house.
Did you know? Polycarbonate protects against ultraviolet radiation, as it is covered with a special film.At your request, you can choose a colored or matte material, cellular (will be a translucent roof) or monolithic (in appearance is no different from glass).
 In order to cover the veranda, you must follow the following procedure:
- Lay out using a level and drill holes for anchors in the timber and the wall of the house.
- Attach the timber to the wall with anchor bolts.
- Check the water level no distortions.
- Make grooves for rafters in a bar and in the top trim.
- Install the rafters in the "half-timbered" way from the wall to the upper trim so that they stand for the trim (otherwise rain will flow directly along the walls of the veranda). The distance between the centers of the rafters is kept at 101 cm. The angle between the rafters and the wall, between the rafters and the top trim must be straight.
- Attach the rafters with metal brackets, corners, nails.
- Make a frame using aluminum or polycarbonate profiles, screwing it to the rafters with self-tapping screws.
- Attach polycarbonate sheets with self-tapping screws or fixing profiles.
- At the junction of sheets attach a special profile.
Important! In order for water to drain, the timber should be positioned above the frame's upper trim, making an angle of approximately 40 °but not less than 25 °.If the roof for the veranda is designed as an arch, aluminum or polycarbonate profiles can be used instead of wooden bars. In spite of the fact that polycarbonate is a sufficiently convenient material for work, during its installation it is necessary to observe some nuances:
- Do not remove the protective film until the end of installation, so as not to deform.
- If an aluminum profile is used, the edges of the polycarbonate must be glued with a special aluminum adhesive tape.
- Screws must be specifically designed to work with polycarbonate, they have a special gasket that does not allow to deform the material.
- The grooves for self-tapping screws need to be drilled a little wider, since with temperature changes polycarbonate may narrow or expand.
- For the same reason, it is impossible to fasten the screw too tightly.
- Empty channels inside the polycarbonate should be placed parallel to the slope of the roof.
- For cutting sheets it is better to use jigsaw.
Important! Do not hurry and do not hesitate to cut polycarbonate sheets. - from the high speed of the jigsaw they can melt, and from too low - burst.
Floors and walls
The floors are best made of wood, using special boards 30x100 mm. Laying the floor occurs in this order: 
- Maintain boards indoors during the day.
- Make a markup using a water level and drill holes for anchors in the timber and the wall of the house.
- Attach anchors to the wall of the house.
- Water level check that there is no distortion between the bar and the bottom strapping.
- Install logs (parallel bars under the floor) perpendicular to how you will lay the floor boards, maintaining a distance of 1 m.
- Verify proper installation using water level.
- Attach logs using brackets, corners, nails.
- Check the water level no distortions.
- Line insulating layer.
- Install the floorboard, attaching it with self-tapping screws with a length of 2 times the width of the board.
- If necessary, the boards must be sanded.
- Boards to process special solutions.
- Varnish or paint.
Did you know? To make the floor warmer, you can attach a draft floor before installing the lag, drill the lag to the draft floor, and lay insulation between the lags. On top of the insulation stack finishing floor.You can also make a concrete floor and install tiles on it.
To build your own polycarbonate walls on the veranda, follow this sequence:
- If desired, aluminum or polycarbonate profiles can be attached to wooden stands.
- Prepare polycarbonate sheets, if necessary, cut into an electric jigsaw.
- Glue the edges of the sheets with a special aluminum tape.
- Starting from the left edge, attach polycarbonate sheets to the racks with special screws, so that the empty channels inside the sheet are perpendicular to the floor.
- At the junction of sheets attach a special profile.
Interior decoration of the veranda
In order to keep the harmony in the decoration, in combination with the wooden floor it is better to finish the wall of the house with wood. If the house is wooden, then no additional finishing will be required; if not, you can use boards or wooden lining for decoration. The sequence of actions for laying lining is as follows:
- To sustain lining 1 day indoors.
- Drill holes for dowels.
- Install with a dowel vertically rails with a width of 30 mm through 1 m.
- Use the level to check the absence of distortions.
- Attach the vapor barrier with screws to the rails (plastic film, foil, roofing material).
- Attach horizontal strips to vertical ones with self-tapping screws. The bottom rail should be 5 cm above the floor, and the top one 5 cm below the top trim. At the same distance it is necessary to place the slats around the windows and doors.
- Check with water level installation.
- To nail with a small hat to the rail the first lining of the wall paneling. If you want to lay the wall panel perpendicular to the floor, then the first strip is nailed near the corner, if in parallel - then at the top.
- Using a level check installation.
- Next, nail the remaining bands, checking after each absence of distortions.
- Complete the installation by installing the skirting board.
Important! It is necessary to beat the lining in the place where the connecting strip begins, further from the edge, hammering nails at an oblique angle.
Windows and doors
 If the walls of the veranda are built of wood or brick, then you can insert windows of monolithic polycarbonate, which will move apart. For this:
- At the top of the window, attach with screws, a guide along which the window will move. The doors in the wardrobes move along such guides.
- The guide can be screwed at the bottom of the window, then the window mount will be more rigid.
- Trim the polycarbonate sheet to the required size.
- Attach to the sheet special rollers that will provide mobility.
- Insert the construction into the guides.
Did you know? Glass windows are only 20% more transparent than polycarbonate windows, but polycarbonate is 20 times stronger than glass.Similarly, sliding polycarbonate doors are also installed. By the same technology, you can make a fully sliding wall by screwing the guide to the top trim.
Depending on the type of guide, windows and doors can open in one direction, in both directions, to fold in accordion.
Having built a polycarbonate porch with your own hands, you will not only give a more noble look to your home, but you will also be able to enjoy sunrise or sunset, raindrops, landscapes, with a cup of coffee or tea in hand, without suffering from unpleasant weather moments and saving labor workers.