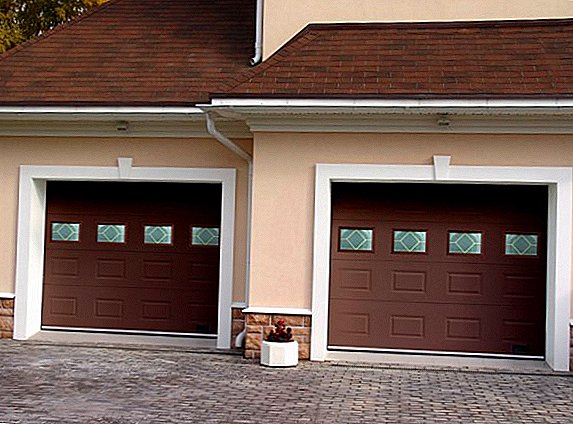
Modern, stylish and practical sectional doors have replaced large, heavy and cumbersome structures, which significantly simplified the lives of consumers.
These gates are quite light, easy to install, easy to operate.
The design features of the product allow you to quickly cope with its installation, applying minimal physical effort and having little experience of similar work.
Taking measurements
To purchase a suitable design, you must first make the right measurements:
- height and width of the opening (take the maximum value);
- values from the top of the opening (lintel) to the ceiling: these measurements will help to determine the type of installation you need to choose the gate;
- the depth of the room, that is, the distance between the front and rear walls;
- values from the opening to the left wall;
- distance from the right wall to the opening.

Important! To ensure maximum accuracy of the indicators, it is recommended to make measurements at a minimum of three points.
In the event that misalignments or inaccuracies in parallel measurements are more than 5 mm, it is necessary to align the walls. It is also important to ensure that the floor level over the entire width of the opening does not exceed 10 mm.
For the implementation of measuring work will need roulette, level and a pencil. It should be remembered that the sectional canvas should be mounted in the opening of the correct geometric shape, with a height of the facing at least 300 mm and the size of the side walls at least 250 mm. 
Gate order
Sectional doors in the construction market are represented by various types and models, which differ in design features, built-in control mechanisms, cost.
There are several types of designs:
Lifting sectional - a product consisting of steel shields connected by special loops. Thanks to a simple lifting mechanism mounted on the walls and ceiling, the sash easily rises up the metal rails. In this case, the system of bearings and rollers on a rubberized basis is responsible for opening the gate. In the open position, the one-piece sash is horizontally under the ceiling.
The advantages of this type of gate are:
- the possibility of saving space;
- durability in the operation of the product;
- excellent sound and heat insulation qualities;
- universality in use;
- good resistance to mechanical damage and deformation.

Did you know? The first lift-section type gates appeared at the beginning of the last century, in 1921. Their author was an American engineer Johnson S. G. He managed to supply the structure with the simplest electric drive, due to which the gates began to rise / fall automatically. The first products were made of wood, and only since the late 70s wood was replaced by wood.Rolling or rolling gates they are a construction in which individual profile strips (lamellae), connected in a complete canvas, are wrapped with a shaft in a special box in the form of a roll during opening. The material for the production of roll products is aluminum or steel. In addition, the gate is equipped with a system with a mechanical lift, which may be necessary in case of power failure.
Key advantages of roller shutter designs:
- easy installation;
- compact dimensions of the product;
- esthetic external indicators;
- possibility of mounting a mechanism for automatic control;
- affordable cost;
- protection from dust, wind;
- long service life.
 Lifting and turning goal - made in the form of a solid shield that covers the entire opening. Due to the built-in steel frame, the sash can be placed under the ceiling, 90 ° from the initial position. The basis of the design is the frame frame, which is made of high quality, durable and reliable steel. For convenience of control, the gate is equipped with an electric drive that allows you to open / close them without leaving the transport.
The advantages of such structures include:
- excellent protection against penetration and hacking;
- durability, due to the use of quality steel, resistant to atmospheric phenomena;
- the ability to install automatic systems;
- possibility of decorative facing of the gate.

Learn how to make a fence of gabions, bricks, chain-link, picket fence, wattle fence.Double-leaf swing - the design consisting of two cloths attached on hinges to rigid posts made of solid steel strapping. Capital gates can open outwards and inwards.
Such gates have several advantages:
- reliability and durability of the structure;
- high insulation performance;
- possibility of mounting an electric drive;
- possibility of installation in a limited space.

Find out what the advantages and disadvantages of various materials for the fence.Folding gate represent a design from vertical aluminum panels. In the open position, the product resembles a screen.
Folding gates have such advantages:
- possibility of installation in any room, regardless of height and width;
- maintainability and the ability to replace any of the panels;
- low cost.
 When choosing a sectional door, the main thing is to evaluate the advantages and disadvantages of each model. To do this, consider the following aspects:
- Polymeric material with which the product is covered. It must be of high quality in order to protect the structure against the harmful effects of external factors. Experts recommend giving preference to powder spraying.
- Anti-corrosion properties. To purchase a gate that will last for many years without losing its appearance and functionality, you need to pay attention to the quality and resistance to atmospheric phenomena of all metal elements, including hinges, springs, frame, the canvas itself.
- Heat and noise insulation. If you need to maintain good thermal performance in the room and reduce the noise level, experts recommend paying attention to the thickness of the panels and the presence of the sealant.
- Anti-burglar properties. The gates, which are aimed at providing reliable protection against penetration, are equipped with special mechanisms - anti-burglary locks and tight panels that are tightly linked to each other, which are almost impossible to damage.
- Electric drive When buying a design with an electric drive, you need to make sure that it is equipped with an automatic blocking system, which is triggered when a foreign object hits the casement. Also, the drive must have a mechanism that slows down the speed of movement, which will make it possible to reduce the load during the lowering of the canvas.

Learn how to make a mansard, gable roof, how to cover it with ondulin, metal tile.
Equipment preparation
Installation of sectional work, although it requires certain skills and abilities, is still quite capable of any master who has at least the slightest idea of the design features. In the course of the work will need the following equipment:
- Roulette and level for the necessary measurements;
- marking pencil;
- hammer for driving in nails or dowels;
- screwdrivers: universal purpose and terminal;
- the side cutters needed to shorten the cable;
- rivet gun for fixing profiles and side panels;
- sharp construction knife;
- Keys for screed connections of various types;
- grinder for fitting the sizes of fasteners;
- perforator drill with a set of drills for metal and drills for concrete bases;
- fittings with a diameter of 12-14 mm, which will be needed to start the torsion mechanism.

Preparation of the opening
Before proceeding to the installation of the gate, it is necessary to properly prepare the opening itself. Also, when choosing a design, it is necessary to take into account the fact that the installation of a cap, the height of which should be 200-500 mm, is extremely desirable for installation. If the lintel is missing or very low, it will be very difficult to install the gate. However, there is a gate, the design of which consists of tension springs, which makes it possible to mount them with a gusset of 100 mm.
There are a number of requirements that must be met by the walls of the opening:
- walls located around the opening should be in the same plane;
- It is preferable that the walls in the room are made of brick or concrete, since the guides to the foam blocks are not securely attached; in such cases, additional strapping with a steel angle will be required;
- it is better to install the web when the floor is prepared - then the gasket will fit closely to the floor, which will ensure the most accurate mounting of the guides;
- if the floor is not ready yet, you need to order (buy) the gate, taking into account the size of the floor and the error, not more than 100 mm.

Learn how to make a path from cuts, from concrete.The carrier function belongs to the ceiling and the transverse lintel above the opening, so the lightweight ceiling design cannot be used for sectional doors. Depth must necessarily be greater than the height of the canvas:
- 500 mm - for doors with mechanical control;
- 1000 mm - for structures with electric drive.
Important! If the lintel has unevenness in height, they are leveled by any convenient method: by means of a grinder, laying bars, and mixtures for plaster.
 If there is a problem of increasing the height of the opening, it is solved on the basis of the roof structure. When the jumper acts as a bearing support, temporary supports or a supporting metal circuit are installed.
If the floor panels are located across the ceiling and lie on the walls on the sides, then you can increase the height by carefully cutting or knocking out part of the opening. After completion of the work, it is recommended to reinforce the new frame with a metal profile.
Sectional doors are very sensitive to even the smallest differences and distortions, so you should maximally align the surface, as well as outline the attachment points of the profiles horizontally and vertically, with which the fixing and direction of movement of the panels will be carried out.
Video: how to prepare an opening before installing sectional doors
Arbor - a valuable component of the recreation area. Learn how to build a gazebo with your own hands from polycarbonate.
Installation of guides
Before installation, markup should be applied to the opening on both sides, at a distance of 1 m from the zero mark. From it you need to hold two vertical stripes that mark the mounting points of the rails.
Vertical
Installation of vertical guides starts with the installation of sealing inserts and their trimming, if necessary. If the inserts were included with the gate, they do not need to adjust the size.
The next step is to connect with the help of bolts support struts and the splat. 
Important! The frame of the gate must be formed in a horizontal position on a flat floor.
Fastening of vertical guides is carried out strictly according to the instructions, by means of screws, screws, depending on the type of walls. The skewing of the profile in height should not be more than 3 mm, in the vertical - 1 mm for every 1 m length.
If the deviations exceed these figures, it is necessary to level the frame using metal pads. It is strictly forbidden to use foam or wooden blocks for this purpose.
Brazier - is not just a device for cooking, but rather a cult thing. Learn how to make a compact brazier, a brazier of stone.

Horizontal
Fixing guides horizontally occurs according to this algorithm:
- The guide is connected to the radius profile and attached to the support.
- In parallel, in the same way, fix another guide.
- Carry out the fixation of horizontal profiles to the ceiling by means of suspensions. The front is placed at a distance of 900 mm from the opening, the rear - 300 mm from the edge. The rest are located on the same length from each other.
- The parts that perform are pruned. From time to time check the equality of the location of profiles diagonally.
- Install the rear jumper.
With the right approach with their own hands, you can build a bath, a cellar with ventilation, a sheepfold, a pigsty, a chicken coop with ventilation, a veranda, a pergola, a blind area of the house, a smokehouse of hot and cold smoking.If you buy a door with a vertical type of opening, then there are no horizontal guides in the kit.

In the decor of the house adjoining space you can find a place for a waterfall, an alpine slide, a fountain, a flower bed made of stones, wheel tires, herbs, a trellis, a rose garden, a mixborder, a dry stream, rock aria, a swing.
Installation of the torsion mechanism and spring cocking
Using a level, it is necessary to make sure that the torsion mechanism is mounted strictly parallel to the floor. It is located in the support brackets. Next on the shaft to place the spring. On the surface of the drum on one side it is necessary to drill a hole where the cable will go. There are already drums with holes, so this stage can be skipped.  The next step is to install the drums on the shaft. Drums have special markings - right and left, for appropriate placement.
  The assembled unit must be fixed to the surface using brackets and screws.
  The installation must be strictly horizontal; compliance with this requirement is checked by level. Bolts fasten the spring-end flange.
 After that you should install the lower section of the gate strictly on the level. Then you need to stretch the cables through the drums and fix them with a crimp sleeve or a screw. Care must be taken to ensure that both cables have the same tension.
Spring cocking is carried out in this way:
- In the special holes at the end of the springs you need to install two knobs.
- The directionality of the twist of the springs must coincide with the directionality of their curls, that is, for the right spring, the twisting is performed counterclockwise, for the left one - clockwise.
- Spin the coils of the spring to the level indicated on the spring (as a rule, this level is indicated by a red stripe).
- After the springs are cocked, they are fixed by placing the supports under the mounting rollers. Next, tighten the bolts fastening the end of the springs and pull vorotki.
 It is important to carry out the installation of the balancing mechanism system strictly in accordance with the instructions for each particular type of sectional canvases.
Learn how to make a greenhouse from plastic pipes, according to Mitlayder, with opening roof, from polycarbonate, from wood, a thermal actuator for ventilation, a foundation for a greenhouse, how to choose a film, polycarbonate or a grid for a greenhouse, how to make heating in a greenhouse.
Installation of controls and lifting mechanisms
Depending on the manufacturer, the installation of controls and lifting mechanisms in the sectional door will be slightly different.
"Dorhan" (doorhan)
"Dorkhan" - Russian-made structures, specifically designed for use in the climate of the region. Used for garage and industrial doors. They are characterized by modern design, excellent sound and thermal insulation properties, the presence of anti-corrosion coating.
The gates of this brand have two types of mechanisms:
- springwho is responsible for opening and closing the gate;

- torsion, which uses a shaft with a cable to lift the blade.


- The mechanism is placed in the U-shaped brackets and additionally supported by internal brackets.
- If you install the shaft, which consists of two parts, then use a clutch that allows you to adjust the tension of the cable.
- Обе части вала соединяют муфтой, путем установки шпонки в спецпазы. Затягивают болты, которые соединяют обе части муфты.
- Монтируют торсион так, чтобы ламель с подшипником разместилась заподлицо с внешней стенкой кронштейна. On the shaft wear a snap ring.
- The plate with the bearing by means of bolts attached to the U-shaped bracket. Fixing the mechanism on the parallel side is carried out in a similar way.
Video: how to check torsion spring
Repairs in the house - the inevitability that happens periodically. Having available some free time and desire it can be done personally. At this time, you will need knowledge of how to remove paint from the walls, how to wash the whitewash, how to glue the wallpaper, how to hold plumbing in a private house, how to put the outlet, how to make a plasterboard partition with a doorway, how to install a light switch, how to install a flow-type water heater, sheathe the walls with drywall.As for the installation of the spring mechanism, then everything is simple:
- The springs are twisted to the level indicated on it by the red marking strip. The number of revolutions required is noted in the instructions.
- After cocking the springs, they are fixed by placing supports under the setting drivers.
"Alutech"
Belarusian gate Alutech - one of the leaders in Europe in sales. They are distinguished by their reliability, safety, the presence of an anti-burglary system, and a long operational period.
Sectional canvases "Alutech" are also equipped with torsion bars and tension springs. The standard set of gates provides for a special device - a ratchet coupling, the main task of which is to block the shaft in the event of a breakdown.
The design of the lifting mechanism is as follows:
- the main element is a clutch, which makes it possible to turn the two parts of the shaft and thereby adjust the cable tension;
- the loops have a concave shape, which allows to increase the reliability and strength of the connection of the panels;
- for mounting use roller brackets that regulate the level of fit of the sandwich panels to the openings;
- A rubber seal is installed around the entire perimeter of the web, which allows for good tightness.
The feature of the Alutech gate is that they have a special spring-in-spring system, which provides protection against spring jumping out of the guides if one of them fails. In addition, the installation of sectional cloths with springs can be made in openings of almost any height.
Video: installation of sectional doors Alutech
Did you know? The history of the company "Alutech" began in the late 90s of the last century. At that time, the company, which employed only six people, was able for the first time in Belarus to produce roller-type sectional doors. Today it is a successful holding, which occupies a leading position in the market not only in Belarus, but also in Europe.
"Herman"
Hormann - products of the German manufacturer. A special feature is the increased strength characteristics, safety, improved protection against burglary, high insulation performance.
The torsion mechanism of the Hormann gate provides for two large springs, which are responsible for the balance of the blade and the easy movement of the rollers along the guides. Even if you release the sash, it will not fall, but will “hang” at some distance from the floor. The number of lifting cycles is 25,000.
Models with torsion are used for industrial purposes. For domestic purposes, we use webs with tension springs, boxes with which are provided complete with guides. Springs perform similar functions as torsion, but have less intensity. On average, the rate of lifting cycles is 10,000-15,000.
Video: installation of sectional doors Hormann
Assembly and installation of panels
Before installation, it is necessary to assemble the panels. In most cases, in order for the assembly to be easy, all panels are numbered. Assembly begins with the bottom panel at number "1". All the slats are fastened among themselves with special loops. Holes for screws, as a rule, have already been made by the manufacturer.
After the side sections and intermediate hinges are screwed, the panel should be positioned in the opening. The next step is to fasten the rollers, install them in the corresponding grooves and tighten the screws. To the extreme section it is necessary, after installation in the opening, to mount corner brackets, upper roller supports, holders and splat. 

Electric drive installation
The drive for sectional doors should be selected based on the size and weight of the structure. The recommended power level is 1/3 of that used. Virtually all automation kits have detailed instructions for installing it.
Installation can be carried out independently or using the services of professionals. If you decide to install on your own, you should especially pay attention to such aspects:
- Checking the operation of the gate. First of all, you need to check the work of the canvas, which should be gently moved, and between the highest point of the gate construction and the ceiling there should be a gap in which the automation will be installed.
- Collection mechanism. According to the instructions should be collected guide drive. It is important that all elements are involved.
- Mounting guide rail - in the center of the ceiling, opposite the opening, and check the horizontal level. Automatic mechanisms will only work properly if the beam is level.
- Fixing beams. Suspension brackets should be mounted in the back part of the guide profile using dowels or anchors in the ceiling surface.
- Drive installation. On the suspension brackets you need to position the drive with the selected control mechanism.
- Lever mounting. Further, the traction arm should be mounted in such a way that one part of it is located on the leaf, and the second part is attached to the cable or chain.
- Electrical wiring - the final stage. To do this, you need to install the wires, securely fix them with holders along the ceiling and the lower half of the wall. Grounding from the power outlet of the entire system is necessary.
Video: how to install automatics on sectional doors
Cable tension adjustment
For the normal functioning of the sectional door, it is necessary that the cables be tensioned, both of them equally. Rope slack is not allowed.
Adjustment of the cables is carried out according to the following algorithm:
- Fix the bottom brackets.
- Set the key on the blade section.
- Secure the drum by tightening the shaft.
- Rotate the shaft until sagging of the cables is removed. To ensure the required tension of the cables, the springs tighten an average of 1.5-2 turns. To fix the springs - tighten the springs, bolts and tips.
If the blades are equipped with a continuous shaft, adjust the cables, you can:
- Raise the working panel and securely fix it.
- Find the screw that secures the cable in the drum, and loosen it.
- Set the length of the cable to the desired value, while sagging, reduce the working length.
- Securely tighten and tighten the screw.
- Set the working panel to its former position and check the tension of the cables.
Video: how to tension a spring on a sectional gate
Installation of gate details
To limit the movement of the canvas when it is opened, carry out the installation of buffers. To do this, unscrew the bolts with nuts and fix the mounting brackets with embedded plates on the C-profile by means of special bolts. Next, set the buffer symmetrically to the axis of the opening.
In turn, the C-profiles are attached to the ends of the guides, located horizontally, with the help of mounting plates and bolts with nuts.
Shock absorbers are installed on both sides of the C-profile using guide plates and bolts. The shock absorber should be positioned so that when the gate is opened, its compression ratio is at least 50% of its stroke size.
Valve Installation
At the last stage, the gate is installed on the gate. Installation technology is quite simple:
- Mark holes for mounting. To mark the places for attachment, you should attach the valve to the canvas at a user-friendly height. Mark the place for installation.
- Preparation of holes. Using a drill, four holes with a diameter of 4.2 mm are drilled for screws, and one hole with a diameter of 15 mm to accommodate the bolt bolt.
- Fastening gate. Fix the valve to the inner panel using four self-tapping screws.

Important! The valve can be mounted only after the web is balanced.
The main difficulty of installing a sectional door with their own hands is to competently make all the necessary measurements and markings, as well as to perform the work very carefully, slowly, strictly adhering to the instructions and regulations from the manufacturer, in order to avoid problems during the operation of the structure. A great desire, minimal experience and small creative skills will allow even a non-professional master to competently and efficiently install the gate, spending only a few hours.
Gates Alutech size 2500 * 1900 with drive Nice Shel 50KCE. The opening itself is 2500 * 1850 with a lintel of 220 mm. I deliberately ordered 50 mm more, since I heard that the last canvas is not completely removed and reduces the opening in the light.
For Saturday and Sunday, everything was assembled by spending a total of just over 12 hours.
The main gag was with the installation of fasteners under the guides, about 4 hours, due to the fact that the opening was framed by a corner of 75 * 6, filled with concrete and plastered. Each hole had to be drilled with a 5-6 mm drill, then 11 mm, then a 10 mm drill. after the drill again sharpened, because they were blunt about the concrete. And so 16 holes.
And then everything went like a note. The correct marking and drilling accuracy as a result allowed the guides to be set straight at once. Diagonally, the difference was 1 mm. Instructions Aluteha quite detailed and sufficient for installation. The top bracket was already maximized. Drilling required only 2 holes and those according to the instructions when installing the bump stops.
I would rate the accuracy of manufacturing the elements on 9 out of 10 only because one guide on the end had a slight bend. I had to fix it with a hammer. And something is wrong with the lower seal, which is raised against the vertical seal when closing. (Photo)
By hand, the gate opens easily. But when you close the last 30-40 cm, you have to press. I understand that this is due to the fact that the upper roller goes to the arc-shaped guide. Perhaps in another case, let the experts correct.
With a declared height of 1900 mm in the light, with a full opening in manual mode, 1720 mm remain. 180 mm eats the bottom panel, which the spring can no longer pull above. This is the cost of construction.
Installation of the drive took a little more than an hour and that is because the instruction is not entirely clear. It seems every step is in the picture, but somehow ... for example, how to assemble the carriage is clear, but where and how to insert it is not clear, etc.
It is also not clear how to tighten the chain. It seems to be logical to focus on the chain sagging, and the instructions recommend focusing on the sound with low tension and failure of the drive reducer when hauling. It's awesome :).
Who in the subject tell me how to tension the chain correctly :)
Learning the console also did not cause problems. In the instructions from the network in Russian, all Pts. well written I do not understand why there are such negative reviews about Shel. Chisel set so that the last canvas would go almost to the horizon. I say almost, because unexpectedly, with the restriction of the stroke, there were not the drive possibilities, but the fact that the bracket that pulls the top panel rested against the horizontal crossmember at the very end of the horizontal guides. Then the drive itself learned by making a complete closure and full opening before the bump stops. By the way, it must be borne in mind that, in the future, the drive does not reach about 1 cm to the bump stops during operation
In general, a summary of this.
1) The complexity of the installation of sectional doors is excessively exaggerated. Why? Guess yourself
2) Anyone who has at least some skill of using power tools and wrenches to cope and enjoy the result of their work.
3) With manual control, it is necessary to take into account that the gates will reduce their height in the light by 180 mm by the size of the opening. Alas, this is the design.
4) When controlling the drive, the gate is pulled almost completely into the horizon and it is possible even without “almost” if the horizontal cross member is modified.
I will answer any questions wishing and not very much. Call, write :).
Video zalyu on YouTube in the evening :)

When I bought, there was a slightly cheaper alternative, Belarusian DOORHAN ... I read that there were complaints about them ... The drive was of 2 options: more powerful and more expensive and also cheaper and more relaxed ... I chose the second one because the gate is small, 2x2.5 m Quite enough.
There is a plug for the antenna that increases the range of the key fob ... did not connect anything, the key fob takes 5-6 meters without an antenna. The thermal insulation properties of the door IMHO, below average ... any such plan ... regardless of thickness ... just to the inside of the lumen it is clear that not everywhere the rezinochka fits tightly around the perimeter (similar to the wiper gum) protects more from blowing than from the cold.
Proceeding from this (and also because of insufficient * again IMHO * degree of protection) I did not use these gates as main ones but installed them in an extension to the garage on the fence line and in winter and at night I close the hinged insulated internal gates in the opening of the house base.
Be sure to install in the opening floating okosyachka with insulation. A groove is cut at the end of a 50x50 log. A 40x40 bar wrapped in jute is inserted into it. A planed 100x log diameter is installed on the sides. Under the beam the stapler is also superimposed jute. The bar is fastened with screws to the bar 40x40. A planed 50x diameter log is placed on top. The gap between the upper log and the board is 40-50 mm and is filled with jute or tow. Next, put the trim on both sides of 20x200. All materials for okosyachki are used dry (humidity not more than 12%)
But after this procedure, the gate is set and serve long and happy.