At first glance, it seems that installing a sink is not at all difficult: he applied the contours of the necessary hole to the worktop, cut it out, inserted the sink, connected it to the sewer and plumbing connections, and that’s all - you can use. Actually, the way it really is, except for one "but." The sink installed on the countertop will look perfect and serve properly, for a long time and without problems only with high-quality installation with strict adherence to technology and ergonomics. And here you will have to make some efforts, although for the home master and not excessive.
Required materials and tools
To install a washing device, you must have:
- sealant;
- screwdriver;
- self-tapping screws;
- marker;
- jigsaw;
- grinder with a disk for cutting concrete in case you have to work with an artificial stone;
- mounts, which are usually supplied with the sink.

Did you know? Sinks in the form of sinks, similar to modern ones, existed as early as 1700 BC in the territory of present-day Syria.
Wash Installation Rules
According to the rules of ergonomics, which are increasingly entering our life, the placement of furniture and equipment in the kitchen must comply with clear requirements, the most categorical of which is called the "golden triangle" rule, which prohibits the installation of a sink near the oven and a refrigerator.
Going to do repairs, it is useful to learn how to glue wallpaper, how to make plumbing in a private house, how to put the outlet, how to make a plasterboard partition with a doorway, how to put a light switch, how to install a flowing water heater, and how to sheathe plasterboard walls.It is most correct to have a sink in the kitchen near the work area where the cleaning and cutting of food takes place. The distance from the refrigerator to the sink and from the sink to the stove must be at least 40 centimeters on each side.
 Not so long ago, when the installation of equipment was due to a rigid link to the sewer, water, gas, electric supply pipes and ventilation, ergonomic requirements themselves faded into the background. Today, the abundance of new materials and equipment makes this long-lasting binding much less strict and completely eliminated.
Step-by-step instruction
To date, there are three most popular types of washing devices, which differ from each other in the design features of installation: overhead, mortise and desktop. The installation of each type of sink requires a special approach and often specific actions in each case.
Did you know? Creative designers in the field of plumbing thought up to create a sink located inside the aquarium with live fish. Its design is such that even hot water pouring into the sink does not harm the fish.
Installation of a wall washer
This type of kitchen unit is the most economical for a family budget and is easy to install. In this case, the sink is simply put on the furniture section in the form of a pedestal or a separate cabinet, with the result that the sink replaces the table top. The disadvantages of this type of sinks include the inevitably arising space between it and the adjacent kitchen furniture countertops.
Video: installation (installation) of kitchen sink
Surface preparation
Actually, to prepare the surface of the cabinet or cabinet is not particularly necessary because of its absence. We have a rectangular opening bounded by the walls of the cabinet. On these walls from their inside with the help of special L-shaped fasteners, usually included in the package, and the marker marks for self-tapping screws.
Remove the old paint from the walls of different materials.Then the screws, 15 mm long, are screwed into the walls of the pedestals through the holes in the fastening elements so that there is at least 5 mm between their heads and the walls.
Installation of car wash
After this comes the turn of the immediate installation of the sanitary device. But beforehand, the end of the cabinet must be treated with a sealant to isolate it from moisture and for additional fixation of the sink on the cabinet.
Important! To facilitate the process of connecting the sink to the water supply, the mixer should be fixed on it before installing it in place.Then the shell is put on the cabinet and tighten the screws until it is securely fastened with fasteners.

System connection
After removing excess sealant, you can connect the sink to the water supply and sewerage. To do this, a mixer fixed on it using flexible hoses for hot and cold water is connected to the water inlet. The siphon is mounted on an already installed sink and is connected to the sewage system by means of a corrugated sgon.
Prepare window frames for the winter.
Mounting sink installation
This type of washing device is advisable to install if the kitchen furniture is located under the same worktop, and is not assembled from separate sections. Mortise type harmoniously fits into the ensemble of a common tabletop and provides a high tightness, but in the installation it is more time consuming. And the main difficulty is to accurately and accurately cut a sink hole in the countertop.  Before installing the sink, you should check the presence of special clips and a tubular seal in the kit. It is also necessary to prepare the tools in the form of:
- electric jigsaw;
- self-tapping screws;
- metal drills with a 10 mm drill bit;
- colorless silicone sealant;
- level;
- roulettes;
- Phillips screwdriver;
- construction knife;
- rulers;
- a pencil;
- corner.
Surface preparation
For a start, it is recommended on the tabletop area where the shell is supposed to be inserted, to determine the place of the future drain and mark it with two pencil perpendicular lines. Then, turning the sink up the bowl, through the drain hole you need to find on the table top the point of intersection of previously printed perpendicular lines and visually align the center of the drain hole with it.
Learn how to make a blind area with your own hands, remove the whitewash from the ceiling, lay the paving slabs in the country, arrange the front garden beautifully, and pave the paving tiles for the summer cottage yourself.Then, aligning the top and bottom edges of the sink strictly parallel to the far and near edges of the tabletop, you need to draw a pencil around the border of the sink. After that, measure the width of the side wash and, inside the contour outlined on the worktop, measure the boundaries of the future hole with the help of measuring tools and a pencil. The width of the side varies in different models of these kitchen devices, but most often it is 12 mm.
Video: Installing the mortise sink in the kitchen
Hole cutting
Before cutting the slit along the smaller contour outlined on the table top, use a drill to drill holes in the corners that facilitate the cutting process. Then, using a jigsaw, it is extremely neat for cutting a hole, screwing the screws in several places of the slot, so that the detachable piece of the tabletop does not collapse at the end of the process.
Important! This operation should be carried out especially carefully, since, on the one hand, the sink should enter the hole freely, and on the other, the actual deviation from the marking can be a maximum of 3 mm.Having finished working with the jigsaw, you need to remove the screws and then the cut part, after which you need to carefully remove the dust from the cut and insert the sink into the resulting hole to check whether the sink fits well.

Slice processing
An untreated cut during operation in conditions of high humidity may be subject to decay and subsequent deformation, which will cause serious stability problems in the sink. Therefore, cut, free from dust, cleaned with emery paper and then covered with sanitary sealant. You can protect the cut with PVA glue, but it will have to wait about an hour until the glue dries well.
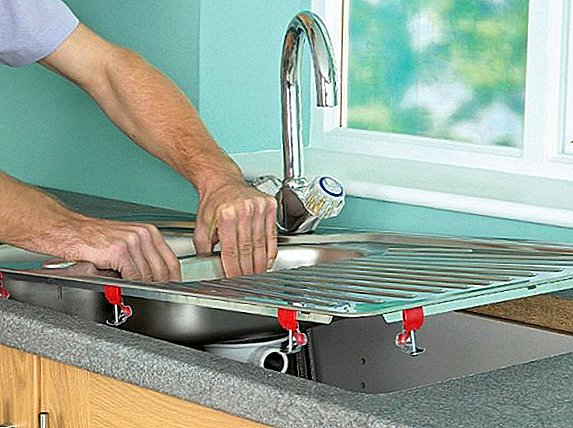
Installation of car wash
After that, it is necessary to glue the sealant, supplied with the sink, around the perimeter of the side of the sink. To do this, it should first be defatted with some solvent. Then a sealant is applied on it with a thin layer and pressed against the side of the sink. A layer of sealant is applied to the tabletop in the gap between the outer contour and the cutting line.
Install the air conditioning system at home.And from the inside, it is necessary to install fasteners on the washing edges that are not fully fixed. This is followed by the installation of the sink, which needs to be started from the side of the mixer, and then without fuss, it is necessary to continue its immersion into the hole until intimate contact with the table top.
 Making sure to use the level as an installation, you should finally fix the fasteners. If excess sealant is squeezed out from under the sides of an installed kitchen appliance, it should be removed at the same time along with the markings applied on the countertop. About a day later, when the silicone finally hardens, the sink will be ready for use.
In an effort to decorate the space around the house, pay attention to the possibility of making a waterfall, alpine slide, fountain, wattle fence, flower bed, trellis, rose garden, mixborder, dry stream.
System connection
The mixer, together with the hoses screwed to it, can be mounted on the sink immediately before it is installed in the worktop, or later. Hot and cold water supply hoses must be connected to the appropriate pipes of the plumbing system and then check the tightness of the connection. The siphon should be fixed in the drain hole and connected to the sewage through a corrugated pipe.
Specific installation of sinks made of artificial stone
Most often, artificial stone countertops are supplied on request with pre-cut openings for a particular type of sink. If this does not happen, then the hole will have to be cut by the very same scenario that is described above, only instead of a jigsaw, you will need to use a grinder equipped for working with concrete.  With some experience, a suitable set of materials and tools, as well as meticulously following the instructions of a home craftsman, it is quite possible to install a car wash on your own without the involvement of expensive professionals.
Video: how to install a sink
Reviews:

The BOSCH T101B jigsaw file has a reverse tooth, i.e., the tooth is tilted toward the jigsaw. What is the best way to make the cut - so that the jigsaw is on the side of the laminating layer of the tabletop, or is it better to turn the tabletop and cut it on the reverse side? Silicone sealant must be neutral (stainless steel sink)? Thank.