Many novice farmers believe that building a poultry house takes a lot of time and money. However, this is not quite true.
If the entire course of work is properly planned out, then building a chicken coop with your own hands will not become such an impossible undertaking even for a beginner in this business.
After making a decision to build a chicken coop, the breeder should think about the place where it will be erected. First of all, the place for this building should be completely safe.
The territory of the dacha plot or that part of the yard where chickens will live should be fenced in with a reliable fence or a thick hedge. This obstacle will help protect livestock from strangers and predators.
A few words about the chicken coop and choosing a place for it
The chicken coop itself should be located in the most remote part of the fenced yard. People and domestic animals should not often walk near it, as some breeds of hens experience extreme stress while outsiders are in the yard.
Partly shaded and closed from the rain is an ideal place for the house. You can place housing for chickens near dense bushes. In sunny weather they will give a reliable shade, and in rainy and windy they will become an excellent shelter for a bird. As a rule, various insects often lodge under shrubs, so chickens will like to rummage in the ground near them.

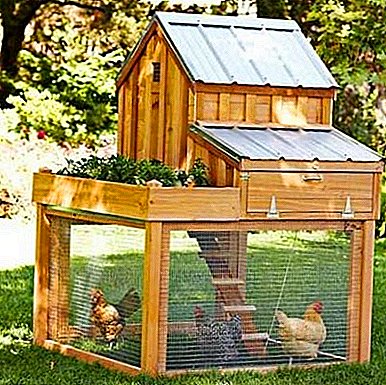
Reliable chicken coop with extensive walking
You also need to worry in advance about the future protection of chickens from such clever predators like foxes. For additional protection, the house is built from high-quality wood having a thickness of 19 mm.
The fences should be free from any holes through which foxes or rodents can get into the chicken coop. At the same time the building does not need to be placed on the ground.
Ideally, the house should be on a foundation or stilt so that foxes and rats cannot dig. In the event that fox holes were seen near, then the ground around the chicken coop is additionally strengthened with a metal grid.
A good chicken coop is one of the components of the proper keeping and raising of healthy livestock.
How to build your own hands
Determination of the poultry house and walking yard
The chicken coop should not be too crowded for birds, so the calculation of the area should be taken responsibly. During the construction of the chicken coop, its dimensions are calculated as follows: on 1 square. 2-3 birds can live.
But this does not mean that for two chickens enough chicken coop per 1 square. m. Birds will not be able to feel comfortable, so you need to build on a minimum area of 3 square meters. m
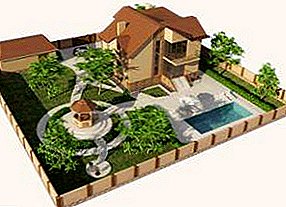
Near each house there is always a small yard. It is enclosed with a net and here at least 2 square meters is provided for each chicken. m free area.
Thus, a yard with an area of 2x7 m is well suited for a herd of 10 chickens. With 20 chickens, the yard size is doubled.
In the photo you can see the optimal size for a small chicken coop:

Foundation laying
- The site intended for construction is completely cleared of shrubs and other large vegetation. Do not worry about weeds and herbaceous plants.
- After that, a flat hole is dug out with a depth of at least 30 cm. The bottom and walls of the pit are laid out with a galvanized grid.
- After that, it is poured with a special solution that more reliably holds it to the ground. This does not allow rodents and foxes to penetrate inside the chicken coop out of the ground.
- A formwork is attached along the perimeter of the foundation. Its second internal frame is built at a distance of about 20 cm from the first.
- After that, it is poured with concrete, which is closed with burlap. In this state, the foundation for the chicken coop should stand for several days so that the solution can dry properly.
- After solidification of the mortar, the formwork is removed, and then the foundation of the house is filled with the remaining soil after digging the pit. It should be carefully leveled so that it lies well on the galvanized mesh.
- It now remains to install the house itself on the fabricated foundation.

Walling
The construction of the walls of the house is using standard technology.
The first crown must be insulated from the foundation with a double layer of roofing material or any other insulating material. In this case, the ends of the timber are always fastened to the half of the tree.
Next, you need to put sex logs made of timber with a section of 100x150 mm. They are usually placed on the edge with a distance of half a meter from each other.
The gaps formed between them are closed with scraps from a wooden bar. In the same way fit all subsequent crowns. They are connected at the corners with the thorn-groove attachment.
Do not forget that between the crowns and in the castle mounts need to lay insulation. This role will be perfectly handled by a flaxjust canvas. It perfectly keeps the heat inside the chicken coop, preventing it from dissipating even during the harsh winter.
However, in the event that the house is built from a bar of natural moisture, the crowns should be hooked onto pins made of wood.
At the corners of the frame are made special holes for pins. They need to be placed through 1-1.5 meters in a staggered manner. The depth of the hole should be the thickness of the two and a half bars.
After the completion of the holes, the dug-holes are hammered into a tree to a depth of 7 cm. This must be done so that after the shrinkage the walls of the house are not started to squint in the side.
The walls of the house should be at least 1.8 meters high. When the work with the walls will be completed, you can proceed to fixing the ceiling beams, rafters and roofs.

Roof construction
The best construction for the roof of the chicken coop is considered to be a gable, since the formed attic room will become a convenient place to store various equipment. You can also store feed, hay and garden supplies.
For the construction of the roof are often used wooden beams at an angle to each other.
Some breeders think that a flat roof may become a more relevant option for a chicken coop, but this is not entirely true. It will linger on the water, which over time can damage the roof of the finished structure.
In the photo you can see how rafters for single and dual slope roofs are being settled:

Gable roof device

Rafters for single-pitch
After the installation of wooden beams, which perform the role of a roof, you can proceed to covering the ceiling with a board. For these purposes, absolutely any board can be suitable, but it is important not to forget to warm it, since most of the heat goes through the ceiling and the roof. To save on insulation, you can use cheaper coal slag and expanded clay.
In the photo you can see the ceiling insulation scheme in the hen house:

Ventilation
Before the final weatherization of the ceiling and roof, it is necessary to proceed with the installation of the ventilation system. To do this, knock down two wooden boxes, and then attach them at different ends of the house.
One part of the ventilation pipe should be located 50 cm below the ceiling, and the second - on the same level as the ceiling. You can adjust the level of air intake with the help of tin flaps mounted on the ends of the ventilation pipes.
Schematically, the ventilation system may look like this:

In this video you can see the process of constructing a chicken coop with your own hands:
Placement of the Perches
Indoors of the house must be equipped with comfortable wooden perches. They are made of poles having a diameter of 4 to 6 cm.
They are located opposite the windows as far as possible from the entrance to the chicken coop. It will be more convenient for chickens if the perch height does not exceed 1.2 m for small breeds, and 0.6 m for large breeds.
Approximately 20 cm perch is required for each hen.so that birds do not push each other during sleep. As for the distance between the bars, it should not be less than 35 cm.
Nest location
Chicken nests should be located in the farthest corner of the house. Their number must be determined at the rate of one nest for 5 heads.
The nests are best used. wooden boxes with a height of 35 cm, width and depth - 30 cm. It is important to arrange a wide entrance to it.
The approximate width and height of the entrance should be 25 cm. A special 5 cm threshold is made at the entrance, and a shelf for take-off is nailed in front of the nest.
The roof near the nest should be inclined at 45% so that the chickens could not sit on it and soil litter. It is advisable to equip all the nests in one block, setting it on the floor of the house. The nest block should rise 40 cm above the floor.
Sizes and location of feeders
Feeders for chickens should be as easy to maintain. The length of each feeder depends on the total number of birds: about 10-15 cm for each chicken. This allows the birds to feed without repelling each other. If feeding is established correctly, then there is no food left in the feeders.
At a height of 15 cm from the floor of the coop, two small feeders are attached in the form of boxes with parameters 10x10x40 cm. They always have chalk, shell or gravel, which are necessary for layers for the normal formation of eggs.
On the territory of the yard are located y-like feeders with walls of the lattice. They contain green fodder, which birds should eat completely in one sitting.
In the photo you can see the schematic arrangement of perches, nests, and other equipment in the hen house:

Chicken Coop Device Diagram
Arrangement of paddock and gate
After completing all the basic work, it's time to start setting up the paddock around the house. Most often it is enclosed with a grid-ryabitsa, mounted on pillars of concrete.
In this fence you need to make a convenient gate through which the owner of the site will pass to the birds. It is enough to put together a wooden frame from a bar, to pull a grid on it and that's all - the gate is ready. But do not forget about the presence of a reliable lock on it.
As you already understood when setting up a chicken coop it is necessary to take into account a lot of different moments.
Preparing for the settlement
Before settling birds, you need to properly prepare the chicken coop. Preparatory work involves cleaning and disinfecting the chicken coop.
To kill all pathogens, you must wash the coop with a 2% hot soda solution. To do this, enough to dissolve 200 g of soda in a bucket of water. In addition to soda, you can use 2-5% solution of creolin. It is diluted in the same proportions as soda.
When the disinfection work is completed, the owner of the chicken coop is left to put straw or pine sawdust into the nests, put food in the feeders, and pour water into the troughs.
Hygiene in the hen house and timely disinfection are very important and every farmer knows about it.
Practical advice
In this video you will find practical tips on setting up a chicken coop:
How does a winter chicken coop differ from a summer one?
- In winter, large sizes and walls are insulated.
- For them, they must make a foundation and an additional vestibule in order to better preserve heat.
- In the winter space, lighting, heating and good ventilation are installed.
- Equipped with a special fenced walking area.
In the following video, you can familiarize yourself with the basic nuances of building a winter chicken coop:
In conclusion, I would like to say that knowing how to properly equip a chicken coop will be useful to you even if you want to turn poultry breeding into a business.
Well, we, in turn, are happy to provide you with information on how this type of activity can be beneficial and how to organize it from scratch.