Roofing is the most important stage in the construction of any building. And the bath is no exception. However, it is necessary to think about what the roof of the building will be at the planning stage. The functional purpose of this part of the building is not only to be protected from the external environment. A large amount of heat is lost through the roofing, so in the case of a bath, special attention should be paid to installing the roof, because it requires additional heat and waterproofing. You will learn about all aspects of building a roof for a bath from this article.
Roof type selection
Based on the features of the building, you can choose for it single-piece or gable roof.
These two types are most practical and do not require the construction of complex truss structures. Let's look at the advantages and disadvantages of single and double slope roofs.
Video: excursion how to build a roof in the bath
Single bar
If the bath is an extension to another structure or it is required to minimize costs, then the best option for the roof is a lean-to roof. It has a more economical and practical design, does not require special skills to create. For a shed roof can be used any roofing material.
The slope of such a roof is formed by the difference in height of the walls. The angle of inclination can vary depending on the amount of snow and the strength of the wind in your latitudes. If you live in a region where there is a lot of snow, then it is better to perform a lean-to roof with a slope of 15 degrees.
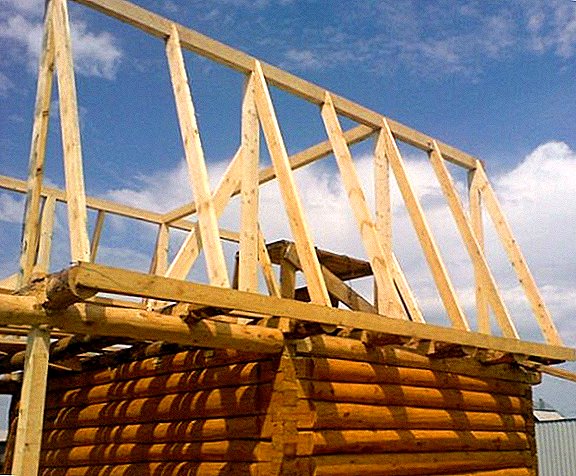
In regions with strong winds, it is better to give preference to a shallower roof.  The frame of the bath with a shed roof This design can be made with or without an attic. If you do it without an attic, you need to take care of additional thermal insulation and binder.
Shed roof with an attic requires the installation of horizontal ceiling beams. If the length of the slope is not more than 3 meters, then you can choose a lean-to roof without an attic. Otherwise, for the stability of the roof, additional installation of subrafter supports is necessary.
Did you know? The earliest baths in Russia, the so-called "black-out", were equipped very simply. In the middle, a fire burned openly, warming the whole room, and the smoke came out through an outlet in the ceiling or directly through the door. Such baths were especially popular in Siberia.
The advantages of this type include:
- economical design, the construction of which requires 2 times less materials and time than on dvuhskatnuyu;
- low weight, as a result of which special equipment is not required during installation;
- simplicity and speed of construction, as it does not require special skills and knowledge from the master;
- the roof is technically stable during repairs and maintenance.
When erecting a shed roof with an attic, additional space can be used for recreation, which increases the useful space of the building. In snowy regions, such a roof structure can withstand drifts up to 2 meters high.  Bath from a bar with a single-pitch roof However, this design has its drawbacks, although they are insignificant.
- The roof of this form can not be used for buildings of large areas.
- With the right choice of roofing material construction can have an attractive appearance, for this it is best to use ondulin. But the use of professional sheet will make your bath look like a barn.
- The roof with a small slope in need of timely cleaning of snow drifts.
Gable
For detached structures, where the aesthetic side is important, a roof with two ramps is suitable. So, if the area of the bath is more than 12 square meters. m, for the roof is better to choose dvuhskatnuyu design.
It provides for an attic, which at the request of the owner can be equipped for residential or residential premises. Such a roof has a more attractive shape, is stable and economical consumption of materials.  Sauna dvukhskatnaya roof Wide use of dvukhskatnyh roofs due to a combination of versatility and simplicity of design, functionality and affordable cost of building material and work.
The slope of this type of roof varies in the range of 20-60 degrees. The use of a sloping roof with a sharp angle allows you to avoid the accumulation of snow drifts.
Read more about how to make a gable roof of a house, a barn and a garage.
The roof structure is an isosceles triangle; rafters have the same shape and are installed at a certain distance from each other. They are installed in the same plane along the entire surface of the roof.
The top corner of the rafters is called the ridge. To reinforce the roof structure, a bolt is used, which is a wooden beam installed under the ridge. To create such a roof, special equipment and blanks are used.
The advantages of using this roof construction are:
- simplicity of production technologies;
- simplicity of arrangement of a penthouse or attic;
- visual appeal;
- reasonable price of building material;
- possibility of application for a bath of any size.
The disadvantages include the higher cost of roofing compared to a single-shed roof, as well as the irrational use of the entire space.  Example of a bath with a double-sided roof When installing a double-sided roof, it is necessary to make a proper calculation of the load on two load-bearing walls that support inclined surfaces.
Learn how to build and equip a bath, and also find out what material is best to build a bath.
Measurement
Before proceeding to the direct construction of the roof itself, it is necessary to carry out serious preparatory work. It involves the implementation of measurements and calculations of the future roofing structure, as well as the development of the project.
First you need to decide on the shape of the roof - it depends not only on the size of the bath, but also on the functional purpose of the entire space.  Measurements for single-pitch roof structures At the preparation stage, it is necessary to measure the length and width of the base. Knowing this data, it is possible to calculate the amount of material needed both on the roof itself and on the insulation.
Project development
It is necessary to begin the construction of the roof with the development of its project. For the design, you can use special computer programs or contact a specialist.
If you choose the second option, then you can offer ready-made designs. However, if you do this work yourself, you need to know the design of the roof. Having a bad understanding of this issue, you can not properly build a roof.
Roof structure
The design of any roof consists of the following elements:
- Mauerlat - slats that fix the frame of the bath and the roofing system, as well as support for the rafters.
- Rafters - wooden supports future roof. There are two types: suspended and hanging. Hanging rafters are used for buildings that do not have internal load-bearing walls. Suspended are used in buildings with small spans, where there is an average load-bearing wall or intermediate supports.
- Ridge - a long beam with a large cross-section that connects the junction of two ramps.
- Internal supports - set for uniform load distribution along the entire roof.
- Crate - small slats that are attached to the rafters. It is the basis for the insulation layer.
- Diagonal bundles or braces - are intended for fastening of a mauerlat and rafters.
- Roofing material - external roof covering, which protects the building from the external environment, and also performs a decorative function.

Roofing materials
Wood is most often used for the roof, although there are structures made of metal.
It is necessary to choose high quality materials. Their sizes and cross sections depend on the distance between the supports, the design features and the design load.
It will be useful for you to read how to erect a mansard roof, as well as how to cover the roof with an ondulin or metal tile.
In the process of drawing up a project, it is also necessary to take into account the material with which the roof will be covered. As a roofing material is used:
- slate;
- iron;
- shingles;
- reeds, cane or straw;
- metal tile;
- wooden shingle;
- metal profile;
- ruberoid.
Roof slope calculation
Determine the slope of the roof by dividing the height of the roof by half the span. This value is necessary to calculate the snow and wind load.
To carry out calculations of these indicators is very important for the correct installation of the roof. There is a close relationship between the angle of inclination and the material that will be used for roofing.  If the slope does not exceed 25 degrees, it is better to use the roll material. For a slope of 12-25 ° you can use the material with filling or other single-layer material.
Corrugated sheet of asbestos cement is used for roofs with a bevel of less than 28º, but slate is best in this case. For roofs with a slope of more than 33 ° apply tile. A metal coating requires a tilt angle of 14-27º, and for a roof without an attic, a slope of 10º will suffice.
Important! With a decrease in the angle of inclination, the smoothness of the surface of the roofing material changes. This allows to reduce the accumulation of moisture in the joints, which prolongs the life of the roof.
Determination of snow and wind loads
Rafter system provides rigidity of the roof structure. The reliability of the roof and its ability to cope with various loads will depend on how well the calculations are made for the truss system.
To calculate the roof system, it is necessary to determine the snow and wind loads that will affect the roof of the future structure.
Data from these indicators may vary by region.
Snow load (S) is defined as the product of the normative snow cover (Sg) and the coefficient depending on the roof slope (μ).  The prevailing direction of the winds and the slope of the roof The rate of snow load in different regions is determined by the amount of snow per 1 square meter. This value is calculated for each city and can be taken from the regulatory document DBN V1.2.-2: 2006 "Loads and Impacts".
The coefficient of dependence on the angle of inclination has a dimensionless value and is determined by the formula μ = 0.033 * (60-α), where α is the angle of inclination of the roof. By calculating the snow load (S), you determine the maximum amount of snow that will affect your roof.
So, for Kiev, this value will be 184.8 kg per square meter. m at a roof inclination of 25 °, and for Odessa with the same inclination of the roof - 115.5 kg per square meter. m
When the roof slopes steeply, the wind acts on one of its sides and seeks to overturn it - this is how the roof windage affects. In this regard, in windy regions, they try to install a gently sloping roof.
But here a new problem arises: with a slight inclination of the roof, aerodynamic force appears, which causes turbulence in the overhang area. So the wind is trying to blow the roof off.
Determine the wind load (Wm), acting at a height (Z) above the ground, using the formula: Wm = Wo * K * Cwhere:
- Wo - the standard value of wind pressure;
- K - coefficient that takes into account the change in wind pressure depending on the height Z;
- C - aerodynamic coefficient.
 Wind load The standard value of wind pressure can be easily determined using the regulatory document DBN V1.2.-2: 2006 "Loads and impacts".
The coefficient K depends not only on the height of the building, but also on the terrain.
So, for example, for structures up to 5 meters high in a closed area, it is 0.5, and for buildings from 5 m to 10 m - 0.65. Aerodynamic coefficient C can have a value from -1.8 (in this case, the wind tends to break the roof) to +0.8 (the wind tries to knock over the roof).
With a simplified calculation, this value equates to +0.8.
Wind load for a bath up to 5 meters in Kiev will be 16 kg per square meter. m, and in Odessa - 20 kg per square. m
It should also be noted that if the wind will affect the end of the building with a force of 33.6 kg per square meter. m and less, he will try to tear down the roof.
Did you know? The classic Russian bath was a small wooden blockhouse, with only one window - right under the ceiling.
Weight of roofing, lathing, truss system and black flooring
It is also important to know the weight of the roofing itself. For various roofing materials, it is:
- ondulin - 4-6 kg per square. m;
- slate - 10-15 kg per square. m;
- ceramic tiles - 35-50 kg per square. m;
- cement tile - 40-50 kg per square. m;
- bituminous tiles - 8-12 kg per square. m;
- metal tile - 4-5 kg per square. m;
- decking - 4-5 kg per square. m
It is necessary to consider indicators such as the weight of the structure itself and additional material:
- the weight of the truss system is 15–20 kg per square meter. m;
- crate - 8-10 kg per sq. m. m;
- black flooring - 18-20 kg per square. m
Upon further calculation, all loads on the rafter system must be summed up.
For example, for a bath in Kiev with a height of 4.5 meters, the total load will be 255.8 kg per square meter. m, if the roof will be made of metal. 
Calculation of truss system
Having dealt with the total load on the roof, we proceed to the calculation of the rafter system, namely, to the calculation of the load on each individual rafter foot. First of all, however, it is necessary to find out with what step the rafter legs are installed.
The distance between the rafters depends on the roofing material. The optimal pitch for the truss system, which is installed under the slate, is at least 800 mm.
Slate roof requires lathing, made of plank or beam with a cross section of 30 mm. The standard pitch between the rafters of metal tiles is 600-900 mm.
However, the gap for this type of roofing material is better oriented to the width of the roll or sheet heat insulator. To ensure the stiffness of the structure of corrugated board using a step of 600-900 mm.
We find the distributed load that acts on the linear meter of the rafter foot:
Qr = A * Q
Where
- A - step rafters, which will be 0.8 m;
- Q - total load, which acts on 1 square. m roof.
 Determination of the distance between the rafters (rafters step) For example, the distributed load for a bath in Kiev will be 204.64 kg / m.
Determine the cross section of the sling. To do this, set the width of the section in accordance with the standard dimensions of an arbitrary value.
Then the height of the cross section can be determined by the formula:
H ≥ 8.6 * Lmax * sqrt (Qr / (B * Rizg)) for α <30º
or
H ≥ 9.5 * Lmax * sqrt (Qr / (B * Rizg)) for α> 30º
Where:
- H - section height, cm;
- Lmax - working section rafters maximum length m;
- Qr - distributed load per linear meter of rafter, kg / m;
- B - section width, cm;
- Risg - the resistance of wood to bending, kg per square. cm;
- sqrt - square root.
Important! For steep roofs, the step between the rafters can be chosen to be larger, which is explained by the distribution of most of the load not on the roof, but on the supporting walls of the structure.
For calculations, we take Lmax = 2.8 m, B = 5 cm, R = 140 kg per square meter. cm, which corresponds to the resistance of pine 1st grade.
The height of the cross section for a bath with a tilt angle of 25 ° will be H ≥ 13.02 cm.
With the right choice of rafter section, the following inequality should be observed:
3.125 * Qr * (Lmax) ³ / (B * H³) ≤ 1
Where:
- Qr - distributed load, kg / m;
- Lmax - working section of rafters of maximum length;
- B - section width, cm;
- H - section height, see
If the rate of deflection is not met, then reduce the value of B and H.
For the Kiev dacha we check compliance with the inequality with regard to the height of the section of 15 cm: 3.125 * 204.64 * (2.8) ³ / (5 * 15³) = 0.831.  Elements of the roof system of a wooden roof. This value is less than 1, and accordingly, the choice of section of materials is made correctly.
Having finished the settlement part, it can be concluded that the system of rafters with a cross section of 50 * 150 mm, installed in increments of 800 mm, will withstand a total load of 255.8 kg per sq. m
When installing such a roof is better to use materials of the first grade. Pine or spruce, which are highly resistant to bending, are ideal.
Having decided on the required cross-section of the bars for the truss truss, find out the number of legs that need to be installed. To do this, measure the length of the roof slope and divide by the step that we chose.
The resulting value is incremented and rounded up. This calculates the right amount of roof trusses.
The length of the truss foot for any roof is calculated as the product of the height of the ridge girder and the sine of the angle of inclination.  Determining the length of the truss foot Having made the calculation of all the basic elements of the roof, you can begin to install it.
Preparation of materials and tools
When building a roof, a detailed design is used in which the section and length of all the constituent elements are calculated. To install the roof, you must use high-quality wood with low moisture content and no visible defects..
Strict selection of materials will eliminate possible problems during further operation.
The frame of the roof is often erected from coniferous wood, which is distinguished by its high strength, long service life, resistance to rotting and deformation.
To protect the frame from the effects of microorganisms, the material can be treated with special antifungal agents, and to increase the fire resistance, it can be refractory.
These funds are applied in two layers, but the second layer is applied only after complete impregnation or drying of the first layer.  Material treatment with special means If materials are treated with protective substances, their installation can be started only after drying.
When installing the truss system, angles and channels can be used. However, such elements are rarely used for self-erecting the roof, since they require work with welding equipment.
However, the preparatory work is not limited to the processing of wood.
Care must also be taken to have all the necessary tools. For the construction of the roof you will need:
- electric drill;
- screwdriver;
- circular saw and jigsaw;
- scissors for metal;
- brush;
- marker and tape measure.
Important! Particular attention is paid to the elements of the cornice during additional processing, as they are strongly exposed to the external environment.
Having completed all the preparatory work, checking the quality of the material and the availability of all the necessary tools, you can begin to build the structure of the roof itself.
Mount mount
When erecting a roof, a binding role with the main construction of the bath is performed by a mauerlat or carrying beam, which is laid along the perimeter of the walls. In the baths, made of wooden bars, this role takes on their top row.
Constructions of blocks or bricks require separate installation of a power plate. For fixing the carrier beam using steel wire, building spiers or anchor bolts.
Construction spiers are used in the construction of single-pitch roofs, since they are the most convenient option for fasteners.
In the upper row of masonry mounted spiers with a step of 60-70 cm between them. Their installation must be done carefully so as not to stain the solution. When installing the spire it is necessary to take into account the height of the mauerlat so that the spiers rise at a distance of at least 3 cm. For better fixation, the spiers are deepened into the wall at a distance of 45 cm.  Mauerlat Before installing the mauerlat along the perimeter of the wall, roofing felt is laid, after cutting strips across the width of the wall, and at the fixing points of the building spiers it is simply strung.
Before laying the beam, it is necessary to drill the fastening points of the spire, for this it is placed on the future installation site. Mark the place for drilling by using a hammer, which beat in the area of the protrusion of the steeples.
The tip of the spire leaves a mark on the surface of the beam, after which you can easily drill the marked areas. Laying the beam around the perimeter, it is fixed with nuts.
Video: how to attach a power plate and install a truss system.
Installing racks and runs
Racks are supports for supporting a truss system that are installed vertically. A girder is a horizontally laid beam, which is also necessary to maintain the rafters. Runs, as a rule, lie on racks, parallel to the mauerlat.
Before you install the rack, you need to make the appropriate markup. Pitch racks can be made equal to the rafters pitch. That is, for each pair of rafters there will be 1 rack. It is important to make sure that they are strictly vertical. You can check this by level.
You can strengthen the design using metal lining.
First of all, fix 2 extreme racks with the help of corners. Then set the girder, which is screwed with screws.  The next step is to put the rest of the rack, but they should not be immediately fixed at 100%, as with the further installation of the rafters, you may need to move the rack a little. They can be fixed to the end later.
Video: how to install racks and roofing do-it-yourself
Frame Mounting
Build trusses easier with timber or boards. To start building a framework for a dual-slope roof should be done with the installation of two frontal roof trusses. Between them pull the cord to control.
For stability, triangle trusses are balanced by temporary braces attached to the power plate.
Rafters are oblique and trailing.
Pendant more often used for single-ply roofing. Puffs for laying trusses are not required. The rafter leg is installed on the ramp on one side and attached to the power plate on the other.
If the width of the room does not exceed 4.5 m, then the struts can not install. If your structure is no larger than 5-6 m, then additional brace is required.
For a bath wider than 6 m, a system consisting of staples, struts and headstock is constructed.
Hanging rafters are connected at the highest point of the ridge, and on the edges of the contour are supported on supports.
It must be remembered that such a system has a significant load. Therefore, all joints should be made rigid, and the effect of the wind can be reduced by installing diagonal braces.  Types of rafters With a strong wind, the lower part of each rafter foot can be fixed to the power plate using steel wire with a diameter of 6 mm.
The truss system for such a roof is a series of truss trusses having the form of isosceles triangles. Depending on the span of the span, the system can be strengthened with struts, support beams or puffs. This is done to form tighter bonds.
Important! The installation of roof trusses is controlled by plummets.
When calculating the location of the elements of the truss system should be taken into account the position of the chimney. The minimum distance to it is 12 cm.
Hydroprotective film should not be in the area of the passage of the pipe. Instead of a hydraulic barrier, a steel sheet is placed. All flammable materials must be removed to the fire break and treated with anti-foam. The gap, according to building codes, is 0.6 m.
Strengthening the roof
For greater reliability, truss legs are their reinforcement. To this end, install additional beams and struts, which redistribute the load. The wooden support beam is fixed on the lower rafters in the interval between the trunnion foot and the power plate.
Attach these supports should metal plates.
In fact, it is necessary to increase the width of the truss leg at the point where the bending moment has a maximum value. If the rafters are already reinforced by atop, it is lengthened and brought to the edge of the support on the strut. Thus, they not only protect the beam from deflection, but also strengthen the supporting unit.  Strengthening of the roof with the help of steel profiled plates to prevent the support posts from bursting, apply the so-called. contractions. They are placed horizontally. At the intersection of the fight with racks that support the ridge girder, it is fastened with nails.
In fact, the scrum is an emergency element that works when the roof is under maximum load. In the spacer truss systems, the scrum reduces the spread on the walls. It can completely remove it if it is fixed between the ends of the rafters. In this case, it is called a puff.
To reduce the arching effect on the mauerlat, the rafter legs are fastened together with beams, the so-called bolts. They are fastened with nails.
Did you know? In the mythology of the Slavs, there is a spirit living in the bath - bannik. So that he treats you well, he needs to leave a piece of rye bread, soap and a broom.
Crate
The next step is to install the batten, to which the roof will subsequently be attached. Build it start from the ridge to the eaves. If a soft material (for example, roofing felt) is used as a coating, then the elements of the batten shall be arranged with the maximum density.
If the roof will be covered with roofing sheets (for example, slate), the distance between the boards can be set up to 40 cm. To form a curtain-line overhang, the crate is taken out of the line of the extreme truss by 15-20 cm.  As the material for crates using solid wooden boards. It is important that there are no cracks or chips.
Laying vapor barrier membrane, insulation, waterproofing
Much attention after the construction of the roof should be given to heat and waterproofing the roof. In buildings that are distinguished by high humidity, in addition to thermal insulation and waterproofing, a vapor barrier is required.
The waterproofing layer protects the structure from moisture ingress from the external environment, and the heat insulation layer prevents heat loss.
The vapor barrier membrane prevents wetting of the insulation and, consequently, the deterioration of its insulating properties.  Such a membrane should be laid on the inside of the building. At installation it is necessary to choose material with the minimum coefficient of vapor permeability.
Manufacturers offer various types of vapor barrier membranes:
- polyethylene film;
- reinforced polyethylene film;
- aluminum foil film;
- film with anti-condensation coating.
All of these membranes have their own areas of operation, but only aluminum-foil film was developed specifically for use in baths and saunas. When choosing, it is better to give preference to a film with a thickness of at least 140 microns.
When installing a vapor barrier material, you must adhere to certain rules. To protect the insulation from moisture, the material is placed on the inner side of the structure, thus separating the insulation and the inner lining.
Install the vapor barrier membrane directly to the rafters on the inside of the roof. Attach it with nails or a construction stapler, while closing the insulating layer.
The strips are laid horizontally from top to bottom, overlapped by at least 15 cm. For a better vapor barrier, the strips are fixed together with a special tape. The vapor barrier membrane is hidden under the inner lining of the room.
Important! When installing a vapor barrier on the inside of the room, it is laid without gaps.
For laying insulation material using three main methods. Insulation can be mounted:
- under the rafter system;
- on the truss system;
- in its gaps.
The last option is the easiest, economical and fast. But whatever the method of attachment, the presence of gaps or gaps is not allowed.
The most common material for warming the roof of the bath is mineral wool. This material combines low cost, environmental friendliness and good thermal insulation properties.  Warming of the ceiling of the bath with mineral wool In the intervals between the rafters, heat-insulating material is laid, and after its installation all gaps are foamed.
A layer of insulation is closed waterproofing. The following materials can be used to protect the roof from moisture:
- rolled polyethylene barriers with reinforced synthetic thread;
- diffusion polyethylene membranes;
- rolled bituminous materials;
- polymer and bitumen-rubber mixtures;
- liquid glass.
When using rolled hydro-barriers, it is recommended to lay them overlapped in two layers, which allows for good protection against moisture ingress from the external environment.
Laying roll waterproofing start from the bottom of the roof, rolling across the rafters and not pulling. After the waterproofing layer is made, it is covered with roofing material.
Installation of drippers
In rainy weather, water droplets tend to slide down from the roof, and not all of them fall directly on the ground.
Some of them fall on the unprotected areas of the roofing system.  For example, water that rolls off the edge of a roofing deck can get onto rafters and lead to the growth of fungi, as well as rotting of the entire structure.
To protect the base of the roof from ingress of unwanted moisture will help eaves drip, which is a curved strip of iron. The functional purpose of the dropper is the removal of residual moisture and the protection of the roof structure from its negative impact, the direction of water in the gutters of the drainage system.
Kapelnik on the design happen two types: frontal and eaves.
Eaves drip in its appearance and principle of action it resembles a window ebb, but it has a greater bend. It is installed directly on the edge of the roof structure, which allows you to protect the supporting structure from water. Kapelnik has two bends that serve for the directed diversion of water.  Eaves drip Frontal drip used for roof made of shingles. In appearance, it is a curved sheet of tin that is mounted on the front side of the roof. It directs the movement of water down, not allowing it to penetrate into the front of the roof.
  Installation of the front drip Installation of the drip occurs before installing the roofing material. Mount eaves drip from any convenient edge of the slope. Install the first drip without pruning, focusing on the first bend, screwing it with the first batten board.
At the same time between the bend of the dropper and the end of the slope there is a gap of approximately 1 cm on each side. Subsequent kapelnik install similarly, only with two nuances. The first - the installation is overlapped, the second - they are interconnected by a self-tapping screw.
After installing the eaves drip begin mounting the front. The principle of attachment is similar to the eaves, but its installation starts from the bottom of the ramp. The left frontal overlaps with the eaves.
The principle of installation of drips is very simple, and its functionality allows you to protect the roof structure for a long time.
Video: do-it-yourself installation of a drip pan
Coating installation
Now you can proceed to the final stage, namely, to the laying of the roofing. As we already know, depending on the angle of inclination, flat and sloping roof structures are distinguished. The type of coverage also depends on the angle.
| Tilt angle | Type of coverage |
| from 0 degrees | Euroruberoid or four-layer rolled roofing material (the most versatile roof coating). |
| from 1.5 ° | Shingles or three-layer roll roofing material with protection. |
| from 5º | Three-layer rolled roofing material. |
| from 15º | Slate, bitulin, ondulin or euroslate. |
| from 20º | Clay grooved tile. |
| from 30º | Sheet decking, such as metal tile, metal profile and other steel decking. |
| from 50º | Natural tile. |
| from 80º | Chips, shingles or shingles. |
Video: how to make a reliable roof in the bath Keramoplast can be used for both flat and pitched roofs.
Installation of roofing material should be carried out directly on the sheathing itself, and it is better to move from the bottom up. For fixing shingles use glue and nails, and shingles, slate, cement-sand or ceramic tiles better fasten with a lock and screws.
The sheet material is fastened with locks, and coatings of large sizes are fixed with screw nails.
Profiled - the best option roofing material. For its installation are required:
- screwdriver;
- scissors for metal;
- jigsaw;
- rivets;
- self-tapping screws;
- silicone sealant.
 The roof for the bath of corrugated It is mounted as follows:
- Laying corrugated begins with the edge, where it is attached to the crate screws.
- Screws screwed at an angle of 90º, while not allowing distortions of the flooring.
- For smooth masonry sheeting is initially fastened with a single screw, and after leveling it is already possible to firmly fasten the sheet along the entire perimeter.
- Attach the screws must always be in the bottom of the wave, and one sheet is fixed at least 8 screws.
- Sheets have an overlap in steps of one wave.
Video: installation of the roof of corrugated
Skate mount
To protect the gable roof at the highest point set the ridge, which is a galvanized iron sheet. The ridge profile covers the connecting area between the two joints of the roof. It also performs a decorative function.
Important! Skates should overlap each other.
This part of the part is mounted at the last stage of roofing. Before laying it, it is necessary to lay an insulating layer that will protect the structure from moisture ingress and insect penetration into the attic.
However, for good air circulation, the space under the ridge should not be tightly filled.
Before installing the ridge, you must check the intersection of the roof slopes. They must intersect in a straight line, although a minimum deviation of 20 mm is allowed.  For fixing the ridge, a special bar is installed with a cross section of at least 70 by 90 mm. After installing the beam, 2 crate cants are attached to both sides of the beam.
For installation use two parallel ridge, which are attached by one edge to the slope of the roof on the sheathing beam with screws, and the other - to the ridge beam, which is installed along the intersection of the slopes.
Fastening skates along the entire intersection of the slopes is made by screws, and their pitch is set in the range of 200-300 mm.
We also recommend that you read how to remove paint from the walls, whitewash from the ceiling, how to glue the wallpaper, how to hold the plumbing in a private house, how to put the socket and the switch, how to make a plasterboard partition with a doorway or how to sheathe the walls with drywall.
Roofing is a rather complicated issue that requires thorough preparation. However, your work will pay off if you approach this with all seriousness.
You should not save on materials that are used, and their choice, correct calculations and correct installation will allow you to avoid many problems in the future.